How to Observe the Moon With a Telescope: Complete Guide for 2026
Telescope Advisor Logo Telescope Advisor
The Moon showing Tycho crater and Lunar Highlands photographed by NASA Lunar Reconnaissance Orbiter
Lunar Observing Guide · 2026

How to Observe the Moon
With a Telescope

Best phases for crater detail, key features to find, eyepiece guide, why full Moon is actually the worst time to observe, and how a moon filter transforms the view.

Quarter

Best phase to observe

75–150×

Ideal magnification

3,000+

Named craters

Full

Worst phase (no shadow)

By Telescope Advisor Editorial Team Published Updated 14 min read Editorial standards

The Moon is the best object in any telescope at any aperture. A 70mm refractor at 75× shows thousands of craters, mountain ranges, and ancient lava plains in stunning three-dimensional relief. Even an experienced observer never exhausts the Moon — there are over 3,000 named craters and countless unnamed features that reward months of detailed exploration.

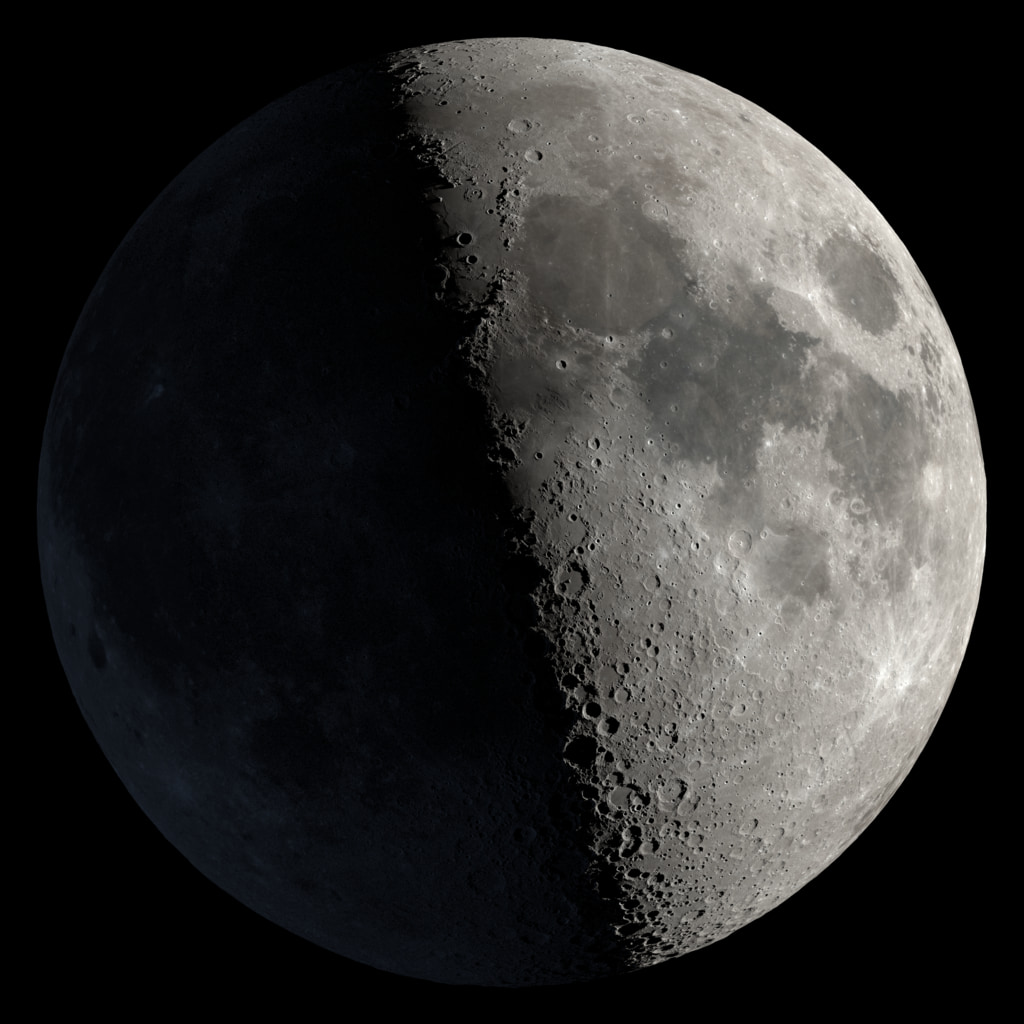
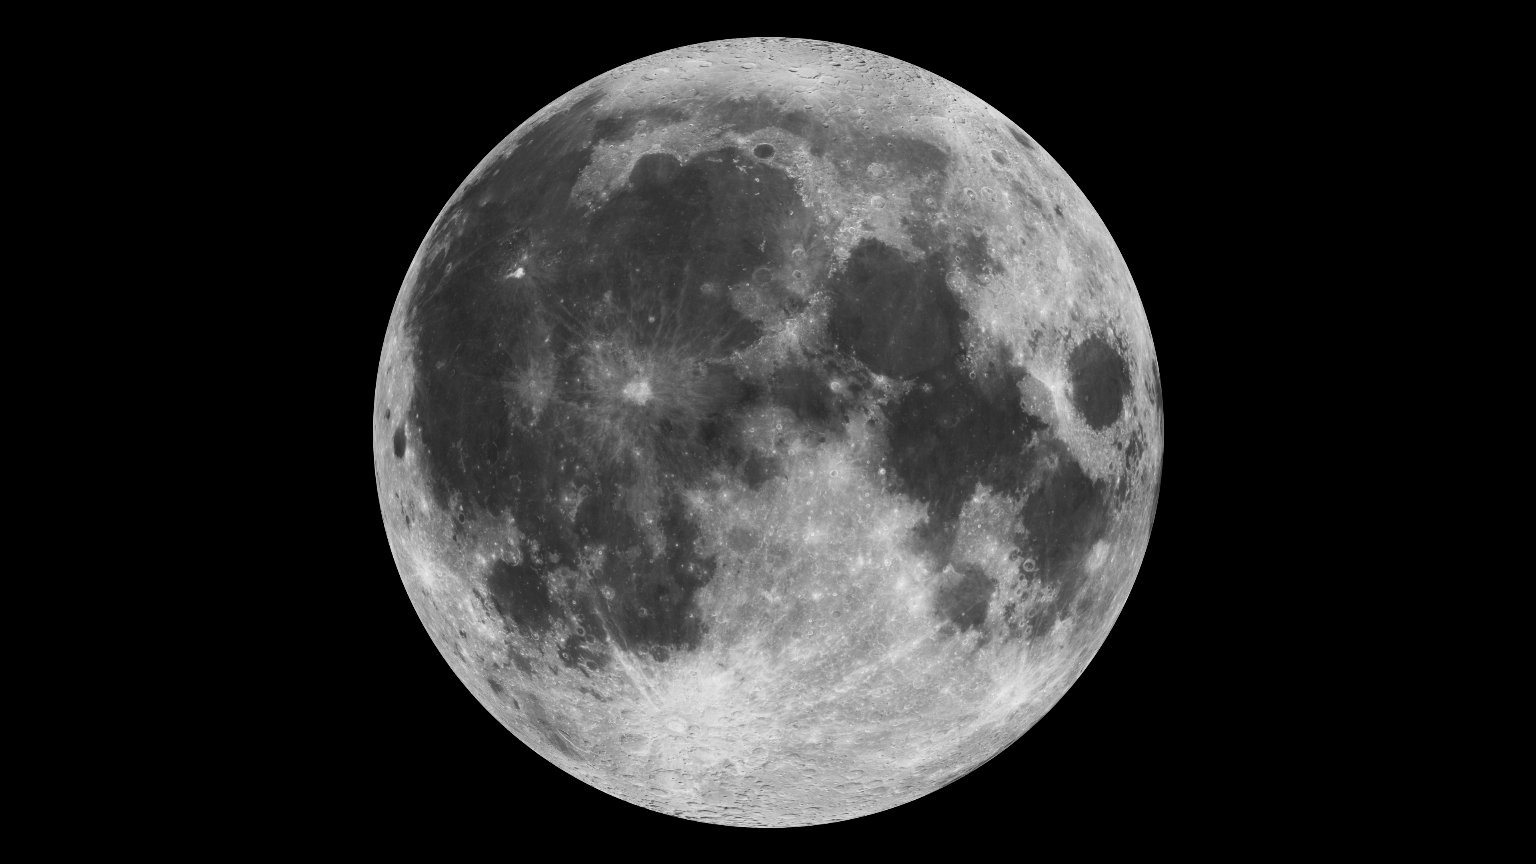
But there's a counter-intuitive truth every new lunar observer needs to know: full Moon is the worst time to observe it. The same reason a landscape looks flat in midday overhead sun — no shadows — applies to the Moon. The craters that look so dramatic at the terminator (the day/night boundary) vanish into a featureless bright plain at full Moon.

This guide covers the fundamentals of lunar observation: the right phases, the key features, what magnification to use, why a moon filter helps, and a tour of the 10 most impressive craters and formations visible in any backyard telescope.

1. The Moon Phase Guide

Quarter moon is the best phase for crater detail. Full moon is actually the worst.

Understanding why certain phases are better than others comes down to shadow. Features on the Moon show three-dimensional detail only when the Sun illuminates them at an angle, casting shadows that reveal depth. At full Moon, the Sun is effectively directly "behind" the observer's head relative to the Moon's surface — everything is lit from the front, shadows are minimal, and craters that were dramatic at quarter phase simply look like flat bright circles.

Phase Visual Quality Best For Avoid If…
Crescent (3–7 days)⭐⭐⭐⭐⭐ OutstandingDramatic crater relief, mare boundaries, Earthshine visible
First Quarter ⭐⭐⭐⭐⭐⭐ Best overallTerminator through highlands, Tycho, Clavius, Copernicus just illuminated
Gibbous (10–13 days)⭐⭐⭐⭐ Very goodWide feature variety, Tycho ray system begins to show
Full Moon ✗⭐ Poor for detailRay systems (Tycho rays extend 1,500km), albedo featuresCrater detail — use moon filter to reduce glare
Last Quarter ⭐⭐⭐⭐⭐⭐ Best overallWestern highlands, Schickard, Grimaldi — features opposite first quarter
Waning Crescent⭐⭐⭐⭐ ExcellentPre-dawn observing with dramatic western limb featuresRequires pre-dawn session

Pro tip: The terminator (shadow boundary) advances about 12° per day. Plan sessions around the terminator's position — features are most dramatic in the 1–2 days before or after they emerge from the terminator. Apps like SkySafari show the terminator position in real time.

2. The Terminator: Where All the Detail Lives

The single most important concept in lunar observation.

The terminator is the line between the illuminated and dark portions of the Moon — the day/night boundary. Craters and mountains along the terminator are illuminated at a very low solar angle, exactly like sunrise or sunset on Earth. This grazing illumination throws features into sharp relief, with crater walls casting long shadows into crater floors and mountain peaks catching sunlight while their slopes remain dark.

The same crater that looks flat and featureless in overhead lighting (full Moon) looks three-dimensional and dramatic at the terminator. Experienced lunar observers often do entire sessions just tracing the terminator from north to south, exploring whatever features happen to be emerging from the lunar night.

Moon craters showing dramatic shadow relief along the terminator — NASA Lunar Reconnaissance Orbiter

Shadow detail along the terminator reveals 3D structure. Credit: NASA/LRO

The Terminator Rule of Thumb

Any crater or mountain within 2–3° of the terminator will show maximum shadow contrast and three-dimensional appearance. Features in the center of the disk (far from the terminator) appear flat and are harder to appreciate. Always look near the terminator first — that's where the show is.

3. Key Features: Craters, Maria, and Mountain Ranges

The Moon has three major terrain types, each telling a different part of the story.

Impact Craters

Formed by asteroid and comet impacts over 4 billion years. Range from microscopic pits to Clavius (225km diameter). All have circular rims, central peaks (in large craters), and terraced walls. Fresh craters are brighter and sharper; older craters show erosion from subsequent impacts.

Maria (Seas)

Dark volcanic plains formed when ancient impacts created vast basins that later flooded with lava 3–4 billion years ago. Named optimistically as "seas" by early astronomers. Mare Tranquillitatis (Sea of Tranquility) is the Apollo 11 landing site. The contrast between dark mare and bright highland is visible to the naked eye.

Mountain Ranges and Rilles

Lunar mountain ranges (Montes Apenninus, Montes Alps) were formed by ancient impact basin rim uplifts. Rilles are sinuous channels — either ancient lava tubes that collapsed or tectonic faults. The Alpine Valley (Vallis Alpes) is a 160km straight gash through the Lunar Alps visible in any 80mm+ telescope.

Full Moon from NASA Clementine mission showing maria, highlands, and ray craters

NASA Clementine mission full Moon mosaic — maria in dark, highlands in bright. Credit: NASA/JPL

Dark and Light Contrast at a Glance

Even with the naked eye, you can identify the major maria:

  • Mare Imbrium — large dark oval in the upper left of the near-side (northern hemisphere)
  • Mare Tranquillitatis — dark patch just right of center (Apollo 11 landing site)
  • Oceanus Procellarum — largest dark region, sweeping down the western side
  • Mare Serenitatis — circular dark plain above Mare Tranquillitatis
  • Mare Crisium — distinct oval isolated dark patch near the eastern limb

4. Eyepiece Guide — What Magnification to Use

Start low to orient yourself, then increase for crater detail.

New observers often make the mistake of using maximum magnification immediately. The right approach is to start with the lowest power eyepiece (widest field of view) to see the whole Moon, orient yourself to the major features, then switch to higher magnification to zoom in on specific craters along the terminator.

Magnification Use Detail Visible
30–50×Starting/overviewFull lunar disk fits in field, major maria visible, large crater shapes apparent
75–100× ⭐Primary observingCrater walls, central peaks, mare rilles, mountain ranges — the sweet spot for most sessions
150–200× ⭐Detail workRille detail, secondary craters, terraced crater walls, crater floor details — requires steady seeing
250×+Max power (rare)Only useful in 130mm+ scope with excellent atmospheric seeing — reveals sub-km scale features

Seeing matters: High magnification on the Moon is only rewarding when atmospheric seeing is stable. On turbulent nights (often the night after a cold front), stick to 75–100×. On nights when stars are not twinkling and the air feels still and damp, push to 150–250× for maximum detail. Your app's forecast shows "seeing" quality — a 3/5 or above is good for high magnification lunar work.

5. Moon Filter: Do You Need One?

A moon filter costs $15–$25 and dramatically improves the near-full-moon experience.

The Moon near full phase is intensely bright through a telescope — bright enough to temporarily blind-spot your dark-adapted eyes and cause discomfort after extended viewing. A moon filter (also called a neutral density filter or lunar filter) screws into the eyepiece barrel and reduces the incoming light to a comfortable level.

Benefits of a Moon Filter

  • ✓ Reduces glare dramatically near full Moon
  • ✓ Allows comfortable extended viewing
  • ✓ Can improve contrast of ray systems at full Moon
  • ✓ Helps dark-adapted eyes view the Moon without resetting adaptation
  • ✓ Inexpensive ($15–$25 for quality 1.25" filter)

When You Don't Need One

  • • Crescent or quarter Moon — not bright enough to be uncomfortable
  • • First few sessions — get used to the view first
  • • If you're using a small 60–70mm telescope — less aperture = less light
  • • Budget limited — it's a nice-to-have, not essential for beginners

Standard moon filters are neutral density (grey), reducing all wavelengths equally. Variable polarizing filters (two polarizers that rotate relative to each other) allow you to adjust the light transmission from 1% to 40% — very useful for fine-tuning brightness across phases. Variable filters cost $25–$50 but give much more flexibility than fixed filters.

6. Your First Lunar Tour: 10 Unmissable Features

Start here — these are the most spectacular and recognizable features in any telescope.

🌕

1. Tycho Crater — The Most Dramatic Crater on the Near Side

In the southern highlands, Tycho is 85km across and 4.8km deep with steep terraced walls and a prominent central peak complex. It's geologically young (~108 million years old) — young enough to still be sharply defined. At full Moon, the ray system extending 1,500km from Tycho dominates the entire southern hemisphere of the Moon.

Best viewed: 7–9 days after new Moon (first quarter period) when it emerges dramatically from the terminator shadow

🌕

2. Copernicus Crater — The Monarch of the Moon

A magnificent 93km crater in Oceanus Procellarum with three-tiered terraced walls, multiple central peaks, and a sharp fresh appearance. One of the most photographed features on the Moon. Also has an extensive ray system visible near full Moon. At 100–200×, the internal wall terracing is one of the most striking views in a small telescope.

Best viewed: 9–10 days after new Moon as the terminator sweeps through

🌕

3. Clavius Crater — The Giant of the Highlands

At 225km, Clavius is one of the largest craters on the Moon's near side. Its vast floor contains a curved arc of progressively smaller craters (Porter, Rutherford, and others) diminishing in size — a famous pattern. At 75–150× during first quarter, Clavius is one of the most visually impressive sights in a backyard telescope.

Best viewed: First quarter (7 days), same session as Tycho

🌕

4. Montes Apenninus — Lunar Mountain Range

The Apennine Mountains form the southeastern rim of the Mare Imbrium basin — a 600km arc of peaks reaching up to 5km high. The highest peak, Mons Huygens (5,500m), approaches the height of Mont Blanc. At low magnification, the range's scale is impressive; at 75×, individual mountains and their shadows into the mare are spectacular.

Best viewed: ~8–9 days after new Moon as shadows sweep down the range

🌕

5. Mare Tranquillitatis — Apollo 11 Landing Site

This is where Neil Armstrong and Buzz Aldrin landed on July 20, 1969. The actual landing site (Tranquility Base) cannot be seen — even NASA's Lunar Reconnaissance Orbiter, in orbit just 50km up, only shows the descent stage as a tiny pixel. But Mare Tranquillitatis itself is a beautiful smooth dark plain easily visible to the naked eye and strikingly smooth through a telescope.

Best viewed: Any phase — the dark mare is always visually distinct from the surrounding highlands

🌕

6. Plato Crater — The Black Lake

A 101km circular crater with an unusually dark, smooth floor (ancient lava fill). The contrast between the dark floor and bright surrounding highlands makes Plato unmistakable — it looks like a black oval lake on the lunar surface. Located at the north shore of Mare Imbrium. At 150×, the floor shows tiny secondary craterlets only 2–3km across.

Best viewed: ~8–10 days (waxing gibbous phase)

🌕

7. Vallis Alpes — The Alpine Valley

A 160km straight gash cutting through the Lunar Alps — one of the most striking geological features on the Moon. The valley averages 10–12km wide and has a sinuous rille running down its center (visible in 130mm+ telescopes at 200×). The combination of the straight valley and the chaotic surrounding mountain terrain makes it immediately recognizable.

Best viewed: ~8 days, when the Alps are crossing the terminator

🌕

8. Rupes Recta — The Straight Wall

A 110km long fault scarp in Mare Nubium that rises 240–300 meters — visible in any telescope at 75× as a razor-sharp line. Just before first quarter, the low sun angle turns it into a thin dark line with a spectacular shadow; just after first quarter, as the sun swings to the other side, it appears as a bright ridge. A true showpiece feature.

Best viewed: Days 8 and 22 of the lunar cycle when sun angle is just right

🌕

9. Aristarchus — Brightest Spot on the Moon

At 40km across, Aristarchus is the brightest crater on the Moon's near side — fresh enough that its walls and rays are intensely bright against the surrounding Oceanus Procellarum. It's been reported glowing in the dark (Transient Lunar Phenomena) on rare occasions. Nearby Herodotus crater and the Schröter's Valley rille system add further interest.

Best viewed: Any phase — its brightness stands out especially near full Moon

🌕

10. Earthshine — The Dark Side Lit by Earth

During crescent phase, look at the dark portion of the Moon — you'll often see it faintly glowing with a blue-gray light. This is Earthshine: sunlight reflecting off Earth's oceans and clouds, bouncing back to illuminate the Moon's night side. Best seen 2–5 days after new Moon. Through binoculars or a telescope at low power, the dark side shows mare and highland features lit by reflected Earthlight — a hauntingly beautiful sight.

Best viewed: 2–5 days after new Moon (crescent phase)

7. Apollo Landing Sites: Can You See Them?

You can find the regions — but the equipment is too small to see the hardware.

This is one of the most common beginner questions. The short answer: no backyard telescope can see the Apollo equipment (descent stages, retroreflectors, flags). The largest amateur telescopes can achieve about 1km resolution on the Moon's surface. The Apollo lunar modules are roughly 4m wide — 250× smaller than that resolution limit.

However, you can absolutely point your telescope at the landing sites and observe the regions where history was made:

Mission Location Date What to Look Near
Apollo 11Mare Tranquillitatis SW edgeJul 1969Dark plain near the prominent crater Moltke
Apollo 12Oceanus ProcellarumNov 1969Dark mare northeast of crater Lansberg
Apollo 14Fra Mauro highlandsFeb 1971Hilly region between Copernicus and Mare Cognitum
Apollo 15Hadley-ApennineJul 1971Foot of Montes Apenninus near Hadley Rille
Apollo 16Descartes highlandsApr 1972South of Mare Tranquillitatis in rugged highlands
Apollo 17Taurus–Littrow valleyDec 1972Northeast of Mare Serenitatis, near Posidonius crater

Frequently Asked Questions

Why is the full Moon the worst time to observe it?
At full Moon, sunlight hits the lunar surface almost perpendicularly — like midday overhead sun on Earth. This eliminates the shadows that reveal crater depth and mountain height. The Moon looks flat and featureless compared to quarter phase. That said, full Moon is excellent for seeing ray crater systems (Tycho, Copernicus, Aristarchus) and albedo (brightness) differences between different terrain types. Use a moon filter to reduce the glare and make viewing more comfortable.
What telescope do I need to see Moon craters?
Any telescope at all — even 40mm binoculars — reveals Moon craters clearly. A 70mm refractor at 75–100× shows thousands of craters including all the major ones (Tycho, Copernicus, Clavius). A 130mm Dobsonian at 150–200× reveals even finer detail, including rilles, secondary craters, and mountain range textures. The Moon is the most forgiving target in astronomy — aperture matters less here than for any other object.
What magnification is best for the Moon?
Start at 50× to see the whole disk and orient to major features. Switch to 75–100× for your main observing session — this shows craters in great detail while still fitting a large area in view. Push to 150–200× on steady nights to zoom in on specific craters. Anything above 200× requires excellent atmospheric seeing and a 130mm+ telescope — on average nights it just makes the image blur.
Is the Moon upside down in the southern hemisphere?
To southern hemisphere observers, the Moon appears rotated 180° compared to northern hemisphere views. Tycho, which northern observers see in the south, appears in the north from Australia or South Africa. Feature names and maps are the same — they're just oriented differently. Telescope eyepieces also invert the image depending on design (refractors with a diagonal flip horizontally, Dobsonians invert entirely). Most lunar maps are labeled with north up for naked-eye use.
Can you see the Moon with binoculars?
Absolutely — binoculars give outstanding Moon views. A 7×50 binocular shows all the major maria, mountain ranges, and the largest craters (Tycho, Copernicus, Clavius) as circular features. A 15×70 binocular resolves enough detail to recognize dozens of features. Binoculars give a wider, more comfortable view than a telescope for many observers — the two-eye experience can be more relaxing than monocular telescope viewing for extended sessions.
How many craters can I see through a telescope?
Through a 70mm telescope at 100×, you can resolve craters down to about 3–4km in diameter, revealing thousands of named and unnamed craters. A 130mm telescope at 200× can show features down to ~2km, revealing tens of thousands of craters of all sizes. The Moon has over 3,000 named craters, but the total number of all craters down to microscopic scale numbers in the billions — impact craters at every scale the mission's instruments could resolve.