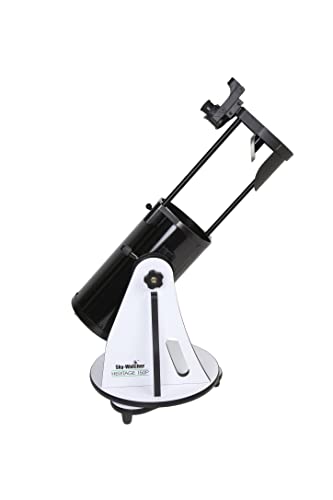
Telescope Advisor Logo Telescope Advisor
Starry night sky above dark landscape  perfect stargazing conditions

Beginner's Guide · 2026

Stargazing for Beginners: Your Complete 2026 Guide

From naked-eye constellations to binoculars and your first telescope everything you need to start exploring the night sky tonight.

$0To get started
9,000+Stars naked eye
20 minDark adaptation
5 planetsVisible naked eye
By Telescope Advisor Editorial Team Published: Updated: 20 min read Editorial Standards

Stargazing is one of the few hobbies you can start tonight, with zero equipment, from your backyard. The night sky rewards curiosity at every level whether you're learning to identify your first constellation or tracking Saturn's rings through an eyepiece for the first time.

This guide walks you through the entire journey: starting with your naked eye, adding binoculars as your first upgrade, choosing your first telescope, finding dark skies, and discovering the incredible objects waiting at every equipment level. We'll tell you exactly what you'll see no romanticizing, no disappointment.

2026 is a particularly exciting year to start. Saturn's rings are tilted beautifully toward Earth, Jupiter remains prominent in the evening sky, and several bright comets and meteor showers are on the calendar. There's never been a better time to look up.

1. Start Naked Eye Tonight, for Free

The best stargazing equipment you'll ever own is already built in.

Every astronomer started by lying on their back and staring upward. Your unaided eyes can see roughly 9,000 stars on a clear, moonless night away from city lights enough to fill the sky with patterns, stories, and structure that humans have been mapping for tens of thousands of years.

Constellations to Learn First

Don't try to learn all 88 constellations at once. Start with three anchor patterns once you can find these, you can navigate the entire sky:

Orion (Winter)

The most recognizable constellation in the sky. Three belt stars in a perfect line lead you to Betelgeuse (red, upper left), Rigel (blue-white, lower right), and the fuzzy patch of the Orion Nebula below the belt.

Ursa Major / Big Dipper (Year-round)

Visible all year from mid-northern latitudes. The two outer stars of the bowl point directly to Polaris (the North Star) your first navigation tool. The handle arcs toward the bright star Arcturus.

Scorpius (Summer)

A sweeping curve of stars with the red giant Antares at its heart. Best from JuneAugust in the southern sky. The tail curves through some of the densest parts of the Milky Way.

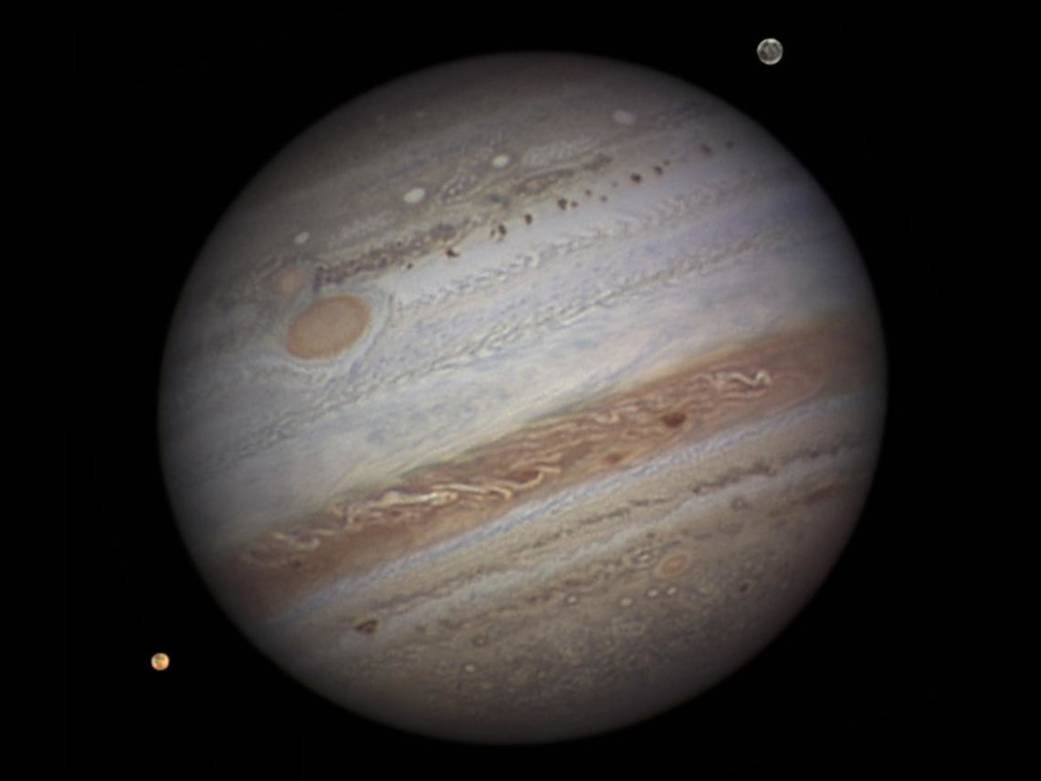
The Planets: Brightest Objects After the Moon

Five planets are visible to the naked eye and can be brighter than any star. The trick is learning to tell them apart from stars: planets don't twinkle. Their light reaches Earth as a small disk rather than a point, so atmospheric turbulence doesn't cause the same scintillation. If you see a very bright "star" that shines steadily, it's likely a planet.

Planet How to Identify Best 2026 Visibility
VenusBrilliant white, brightest object after the Moon always near the horizon at dawn or duskEvening sky JanMay, Morning sky AugDec
JupiterSteady cream-white, second brightest "star" in the sky visible most of the yearProminent evenings springautumn
SaturnSteady golden-yellow slightly dimmer than JupiterOpposition Oct 4, 2026 best JulDec
MarsDistinctly reddish-orange tint, brightness varies dramaticallyFavorable early 2026
MercuryBright but challenging always within 28 of the Sun, only visible near sunrise/sunsetSeveral elongations throughout 2026

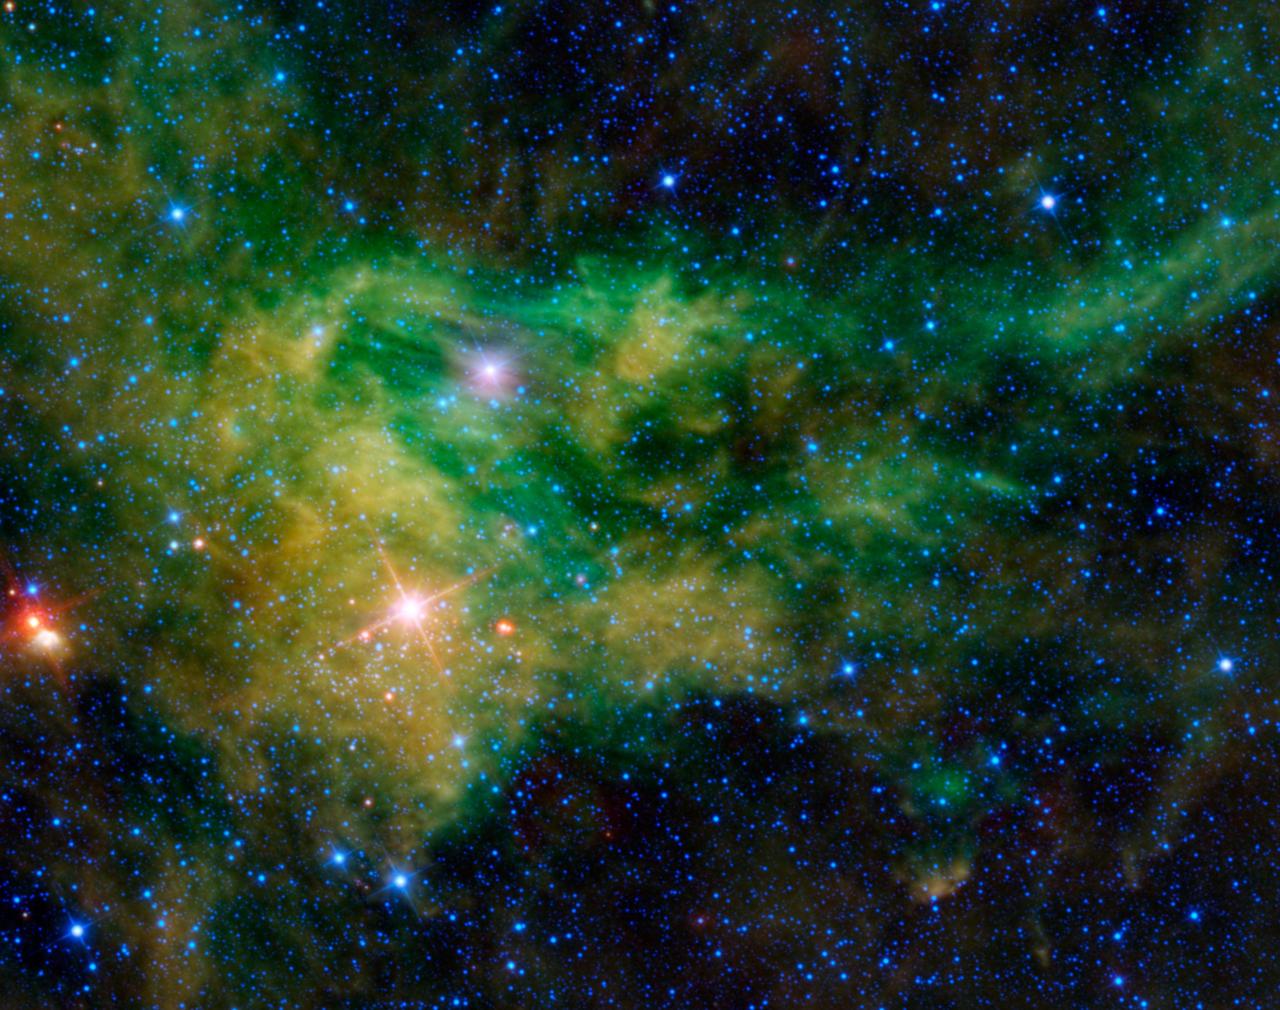
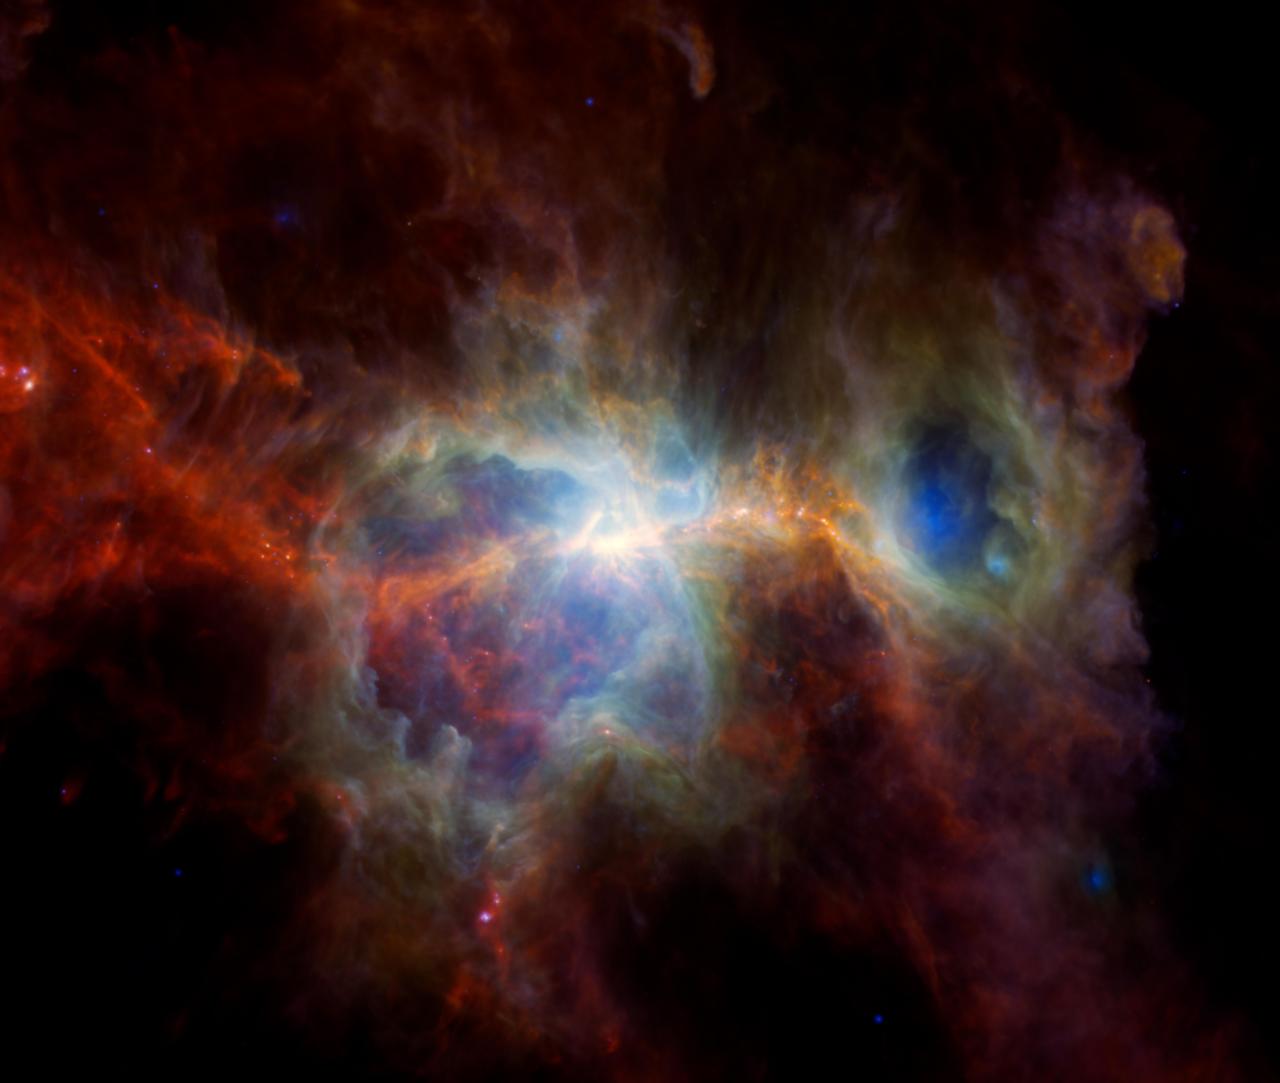
The Milky Way: Our Galaxy From Inside

Under truly dark skies (away from city lights), the Milky Way appears as a soft, irregular band of faint light stretching across the sky the combined glow of 200 billion stars seen edge-on from within our own galaxy's disk. It's one of the most profound things you'll ever see with your naked eye.

The core of the Milky Way is highest in summer skies (JulySeptember in the northern hemisphere), running through Sagittarius and Scorpius. Even from a suburban location with moderate light pollution, you may see the brightest portions near Cygnus. From dark skies, it's a revelation.

2. Dark Adaptation: The Secret to Better Stargazing

Your eyes take 2030 minutes to reach full sensitivity. This single fact changes everything.

Your eyes contain two types of photoreceptors: cones (for color, in bright light) and rods (for dim light and night vision). When you walk outside from a lit room, your rod cells are still recovering from bright-light exposure. Full dark adaptation takes 2030 minutes, during which the rhodopsin (visual pigment) in your rods slowly regenerates.

?? The #1 beginner mistake: White light destroys adaptation instantly

Checking your phone even for 10 seconds under full brightness will reset your dark adaptation back to zero. Use a red-light flashlight to read star charts. Red light has minimal effect on rhodopsin which is why astronomers love it.

Practical Dark Adaptation Tips

  • ?Go outside 30 minutes before you plan to observe seriously let your eyes adapt before you start
  • ?Switch your phone to red-filter mode (many astronomy apps have this built in) or dim it to near-zero
  • ?Use averted vision: look slightly to the side of faint objects the most light-sensitive part of your retina is slightly off-center from the fovea
  • ?Block out any nearby artificial lights a tree, building, or dark cloth helps
  • ?Moonlight also limits dark adaptation check the moon phase before a serious session

With full dark adaptation, even under suburban skies, you'll be surprised how much more you can see with your naked eye fainter stars, the texture of the Milky Way, and subtle color differences between stars all become visible that you'd completely miss if you walked straight outside after watching TV.

3. Your First Upgrade: Binoculars Before a Telescope

Most astronomy educators agree: binoculars first, telescope second.

A common beginner mistake is jumping straight to a telescope. But binoculars are actually the ideal first astronomy tool they're cheap, require zero setup, have a wide field of view that makes finding objects easy, and show you an enormous amount of sky that telescopes often miss.

What Binoculars Show

Spectacular in Binoculars

  • Moon's craters, mountains, and lava plains
  • Jupiter's four Galilean moons (tiny dots)
  • The Pleiades (Seven Sisters) star cluster in 3D
  • The Andromeda Galaxy as a faint oval smudge
  • The Orion Nebula showing fine structure
  • Star clusters throughout the Milky Way
  • Comets and their tails during bright events

What Binoculars Won't Show

  • Saturn's rings (need 25 or more)
  • Jupiter's cloud bands (7ז10 binoculars just show a disk)
  • Planetary surface detail
  • Faint deep-sky nebulae beyond the brightest examples
  • Globular cluster resolution

Understanding Binocular Specifications

Binoculars are described as magnification aperture. A "750" binocular magnifies 7 with 50mm objective lenses. For astronomy, aperture matters most larger lenses gather more light. The 50mm and 70mm sizes are sweet spots for astronomy on a budget.

Image-stabilized binoculars (1570 and larger) ideally need a tripod or monopod to avoid hand tremor. Budget workaround: rest your elbows on a car roof, a fence, or use a simple tripod adapter (under $15).

Editor's Pick — Best Entry-Level Binocular
Celestron Cometron 7x50 astronomy binoculars

Celestron Cometron 750

7 magnification 50mm aperture 7 field of view Hand-holdable

The Cometron 750 is the classic starter astronomy binocular. At 7, the image is steady hand-held, and the 50mm aperture collects enough light to show Jupiter's moons, the Orion Nebula, and dozens of star clusters. The wide 7 field of view makes finding objects easy, and the long eye relief works with glasses. Under $35.

Affiliate link — we may earn a small commission at no extra cost to you.

Celestron SkyMaster 15x70 giant astronomy binoculars

Celestron SkyMaster 1570 — Step-Up Pick

15 magnification 70mm aperture Tripod recommended Includes adapter

Giant astronomy binoculars that reveal detail no 750 can match. At 15 with 70mm objectives, you'll see Jupiter as a small disk with moons clearly separated, the Andromeda Galaxy's core brightening noticeably, and star clusters resolved into individual stars. Use with the included tripod adapter. Under $60.

4. Choosing Your First Telescope

The best first telescope is one you'll actually use. Simplicity and aperture beat complexity every time.

When you're ready for a telescope, the most common beginner mistake is either buying something too cheap (tiny 60mm refractors on wobbly tripods that produce frustrating views) or going too complex with a GoTo computerized mount before mastering the basics. The sweet spot is a simple, manual reflector in the 70130mm aperture range.

What Aperture Do You Really Need?

Aperture is the single most important specification in a telescope. It determines how much light the telescope collects and that directly controls what you can see. More aperture = dimmer objects visible, more detail on bright objects.

Aperture Saturn's Rings Jupiter's Bands Deep Sky
6070mmRings visible, smallFaint hint of bandsBright nebulae only
80100mm ?Rings clear, Cassini hint23 cloud bandsMany nebulae, clusters
114130mmRings bright, moons visibleMultiple bands, Great Red SpotExcellent deep sky
150mm+Cassini Division clearFine banding detailFaint galaxies visible

Mount Types: The Mount Matters as Much as the Optics

A wobbly mount ruins even the best optics. For beginners, two mounts work well:

  • Alt-azimuth (up/down + left/right): Simple, intuitive, easy to set up. Ideal for beginners. Doesn't track the sky automatically, but manual tracking is easy for visual observing.
  • Dobsonian (large alt-az): The best value in astronomy. Very large aperture for the money due to the simple, heavy-base design. Excellent for all visual observing.
  • Equatorial (polar-aligned): Tracks the sky's rotation axis useful for longer observing sessions once you know the basics, but has a steeper setup learning curve.
Editor's Pick — Best First Telescope
Celestron AstroMaster 70AZ refractor telescope

Celestron AstroMaster 70AZ

70mm refractor 900mm focal length Alt-az mount No tools setup

A true all-in-one beginner telescope. The 70mm refractor on a sturdy alt-azimuth mount shows Saturn's rings clearly at 70100, reveals Jupiter's main cloud bands and all four Galilean moons, and delivers gorgeous lunar crater detail. Comes with two eyepieces, requires no tools to set up. Under $150.

Affiliate link — we may earn a small commission at no extra cost to you.

Sky-Watcher Heritage 130P tabletop Dobsonian telescope

Sky-Watcher Heritage 130P — Best Step-Up Telescope

130mm aperture 650mm focal length Tabletop Dobsonian Collapsible tube

A 130mm Dobsonian in a compact tabletop package. The 130mm (5.1") mirror gathers 3 more light than a 70mm refractor, revealing planetary detail and deep-sky objects that the AstroMaster can't reach. The collapsible tube stores in a small bag. Under $200.

Want the full comparison of beginner telescopes? Read our Best Telescopes for Beginners guide we cover 8 models at every budget from $80 to $400.

5. What You'll Actually See at Each Level

Honest expectations at every equipment level no disappointments.

The Moon

The Moon is the best object in the sky for every equipment level. With the naked eye, you see the dark volcanic plains (maria) and bright highlands. Binoculars reveal the Tycho crater with its bright ray system, the ringed Copernicus crater, and the terminator (the day/night line) where shadow makes craters look three-dimensional.

A telescope at 75150 turns the Moon into a world. Thousands of craters, mountain ranges, sinuous rilles (ancient lava channels), and wrinkle ridges appear. The best phase for observing is the quarter moon, not full moon the shadows along the terminator make features pop dramatically. Full moon is actually the worst the overhead lighting washes out all the texture.

Moon craters captured by NASA's Lunar Reconnaissance Orbiter

Moon surface detail visible in any telescope. Credit: NASA/LRO

Saturn

Saturn and its rings photographed by NASA Cassini spacecraft

Saturn's rings visible in any 60mm+ telescope. Credit: NASA/JPL-Caltech

Seeing Saturn through a telescope for the first time is a moment people remember for the rest of their lives. At just 50 magnification in even a cheap 60mm refractor, the rings are unmistakable. They're so perfect and symmetrical that beginners often think they're looking at a sticker on the lens.

With a 70100mm telescope at 75150, you'll see: the rings tilted beautifully (currently at a great angle in 2026), the gap between planet and ring edges, Saturn's creamy-yellow disk, and up to five of its moons as faint stars nearby. At 130mm and above, the Cassini Division (a dark gap between ring A and B) becomes visible.

Jupiter

Jupiter is the most visually rewarding planet for small telescopes. At just 50 in a 70mm telescope, you'll see: two prominent dark equatorial cloud bands, Jupiter's flattened shape (it spins so fast it bulges at the equator), and the four Galilean moons (Io, Europa, Ganymede, Callisto) as tiny bright dots in a line.

At higher magnifications in a 100130mm telescope, 46 cloud bands, Jupiter's festoons (curved dark features), and sometimes the Great Red Spot (a 200-year-old storm) become visible. Jupiter's moons change position night to night watching their motion over a week is a genuine orbital mechanics lesson.

Jupiter with cloud bands photographed from ground-based telescope

Jupiter's cloud bands visible at 50 in 70mm telescope. Credit: NASA

Deep Sky: Nebulae and Galaxies

Orion Nebula (M42) photographed by Hubble Space Telescope

The Orion Nebula 1,344 light years away. Credit: NASA/Hubble

Deep-sky objects require realistic expectations. The stunning full-color Hubble images are long exposures visually through a telescope, nebulae and galaxies appear as gray fuzzy patches. But there's something profound about seeing photons that traveled millions of years enter your eye.

Best deep-sky targets for beginners: The Orion Nebula (M42) a bright, large patch with a hint of the Trapezium star cluster at its heart; the Andromeda Galaxy (M31) a large oval glow from 2.5 million light years away; the Pleiades (M45) a stunning star cluster; the Beehive Cluster (M44). These are all visible in binoculars and show more detail in any telescope.

Reality check: Deep-sky objects look nothing like the colorful Hubble photos. They're gray or faintly greenish patches. That's real and still amazing but expect subtle beauty rather than spectacle. Long-exposure astrophotography reveals the colors; visual observing gives you something else: the profound, quiet experience of seeing an object across time.

6. Finding Dark Skies vs Backyard Observing

You don't need dark skies to start but they change everything when you experience them.

Light pollution is the biggest limiting factor for most stargazers. The Bortle scale measures sky darkness from 1 (pristine dark sky) to 9 (inner city). Most suburban observers are at Bortle 57, which still allows excellent planetary observing and bright deep-sky objects, but limits faint nebulae and galaxy detail.

Backyard Suburban Observing (Bortle 57)

What's excellent regardless of light pollution:

  • ? All planets in complete detail
  • ? The Moon magnified to its full glory
  • ? Double stars (atmospheric seeing, not light pollution, is the limit)
  • ? Open star clusters (Pleiades, Hyades, Beehive)
  • ? Bright nebulae (Orion Nebula, Ring Nebula)
  • ? Milky Way barely visible or invisible
  • ? Faint galaxies and nebulae washed out

Dark Sky Sites (Bortle 14)

What opens up at dark sites:

  • ? The Milky Way in stunning 3D depth
  • ? Hundreds of star clusters and nebulae
  • ? Galaxies beyond the Local Group
  • ? Zodiacal light (cone of light along the ecliptic)
  • ? Gegenschein (faint glow opposite the Sun)
  • ? The full Milky Way arch from horizon to horizon

Finding Dark Sky Sites Near You

The Light Pollution Map (lightpollutionmap.info) and Dark Site Finder show Bortle ratings for any location. Many state and national parks reach Bortle 24 and are within a few hours' drive of most US and European cities. Dark sky preserves and astronomy clubs often host public star parties at excellent sites a great introduction.

Even from suburban skies, your first priority should be planets and the Moon both are bright enough to dominate light pollution completely. Save your first dark-sky trip for when you've mastered finding objects, so you can make the most of the darker skies.

7. Essential Astronomy Apps

A star chart in your pocket changes everything.

Astronomy apps are your most useful tool for identifying what's in the sky right now. Point your phone at any direction and the app overlays constellation lines, planet names, and satellite positions on your camera view.

SkySafari 7 Best Overall

iOS / Android Free tier + Pro $19.99

The most comprehensive astronomy app. Massive database, telescope control, observing log, and stunning AR sky overlay. The free version is excellent for beginners.

Stellarium Mobile Best Free

iOS / Android Free (ads) Plus $2.49

Beautiful open-source star chart with photorealistic sky rendering. Excellent for planning sessions and identifying objects the constellation art overlays are exceptional.

Star Walk 2 Best for Kids

iOS / Android Free + $4.99 extras

Clean, gorgeous interface. Easy for all ages to use. Great for spontaneous stargazing point and identify instantly. Less detailed than SkySafari but more approachable.

ISS Detector Best for ISS

iOS / Android Free

Alerts you when the International Space Station will pass over your location. The ISS is the 3rd brightest object in the sky watching it cross in 6 minutes is a great first astronomy experience for the whole family.

For a full breakdown of the top 10 astronomy apps with detailed reviews, see our Best Astronomy Apps guide.

8. Equipment Progression Roadmap

There's no rush each stage gives years of enjoyment.

1

Stage 1: Naked Eye ($0)

Learn constellations, find planets, observe dark-adapted from a dark spot. Use an astronomy app as your guide. Duration: weeks to months.

2

Stage 2: Binoculars ($30$80)

Add a 750 or 1050 binocular. Explore the Moon in detail, find Jupiter's moons, tour Milky Way star clusters. Duration: months, then keep forever as a companion instrument.

3

Stage 3: Beginner Telescope ($100$200)

A 70130mm manual telescope for planets and bright deep sky. Saturn's rings. Jupiter's bands. The Orion Nebula. Duration: 13 years before wanting more aperture.

4

Stage 4: Intermediate Telescope ($300$600)

A 150200mm Dobsonian (6"8") for serious deep-sky observing. Hundreds of Messier objects accessible. Planetary detail dramatically improved. Duration: potentially decades.

5

Stage 5: Astrophotography ($800+)

A GoTo equatorial mount + camera + dedicated software. The Hubble-like images require tracking mounts, long exposures, and significant post-processing. A separate, parallel hobby from visual observing.

Frequently Asked Questions

What is the best time to go stargazing? ?
The best time is 12 hours after your local sunset on a new-moon night. The sky is darkest during the new moon phase (no moonlight to wash out faint stars). For planets, check an astronomy app planets are visible in their "opposition" window when they're opposite the Sun and brightest. Any clear night works; avoid nights immediately after rain (atmospheric turbulence is high).
Can I go stargazing in my backyard? ?
Absolutely. For planetary observing, your backyard is as good as any location planets are bright enough to dominate light pollution. The Moon requires no dark sky at all. For deeper sky objects (Milky Way, faint nebulae, galaxies), you'll benefit from a darker site, but even from cities you can see Orion Nebula and Jupiter comfortably.
Do I need a telescope to start stargazing? ?
No. The naked eye and binoculars give you months of rewarding stargazing before a telescope adds anything. Most experienced stargazers recommend spending 23 months learning the sky naked eye first, then adding 750 binoculars, then a telescope when you're familiar with finding objects. Buying a telescope too early often leads to frustration.
What is the best telescope for a complete beginner? ?
For most beginners, the Celestron AstroMaster 70AZ (under $150) or the Sky-Watcher Heritage 130P (under $200) are the best first telescopes in 2026. The AstroMaster is simpler to set up; the Heritage gives you more aperture and therefore better views, especially deep-sky. Avoid small 60mm "department store" telescopes on flimsy tripods they produce poor views and turn people off astronomy.
Can I see the Milky Way with the naked eye? ?
Yes, but you need dark skies (Bortle 4 or below), good dark adaptation (20+ minutes away from white light), and you need to be in the northern or southern hemisphere in summer (JulySeptember in the northern hemisphere for the galactic core). From suburban locations (Bortle 56), you may see a faint haze but not the full band structure. The Milky Way is best from rural areas or national parks far from cities.
What planets are visible in 2026? ?
2026 is an excellent year for planets. Saturn reaches opposition on October 4, 2026 the rings are currently tilted at a beautiful angle toward Earth, making this one of the best Saturn-viewing periods of the decade. Jupiter is prominent in the evening sky through spring and autumn. Venus dominates the evening sky in early 2026 then transitions to the morning sky. Mars is well-placed in early 2026.
Is stargazing good for kids? ?
Stargazing is one of the best outdoor activities for children. Watching the ISS pass overhead, finding Jupiter's moons, or seeing the Moon up close through a telescope creates lasting memories. For young children, a simple app (Star Walk 2) + binoculars + the ISS passing overhead is a fantastic introduction. Read our Best Telescopes for Kids guide for age-appropriate recommendations.
What is the Bortle scale? ?
The Bortle scale is a nine-level scale (1 = darkest, 9 = inner city) measuring the night sky brightness at a given location. Bortle 12 is true dark sky where the Milky Way casts faint shadows. Bortle 45 is a typical rural or suburban edge sky where the Milky Way is clearly visible. Bortle 79 is a city sky where only the brightest stars and planets are visible. Most dedicated stargazers target Bortle 4 or darker sites for serious observing.
How do I find my first constellation? ?
Open SkySafari or Stellarium on your phone, hold it toward the sky, and look for the constellation patterns overlaid. Start with Orion (winter evenings) or the Big Dipper (year-round). The key is to find the 23 brightest stars in the pattern first these are usually first-magnitude stars like Betelgeuse (red), Rigel (blue-white), and the three belt stars. Once you find the anchor stars, the rest of the pattern becomes clear.
What is averted vision, and why does it help? ?
Averted vision is the technique of looking slightly off to the side of a faint object rather than directly at it. The center of your retina (the fovea) is densest in color-sensing cone cells, while the surrounding area has more rod cells which are far more sensitive in low light. When you look directly at a faint nebula, the less-sensitive fovea sees it poorly. When you look to the side of it, the more sensitive rods pick it up more clearly. Experienced observers use averted vision instinctively to reveal structure in deep-sky objects that would otherwise be invisible.

Related Guides