Parts of a Telescope: Complete Beginner Guide to Every Component and What It Does
Telescope Advisor Logo Telescope Advisor
Telescope silhouette under a starry sky

Beginner Equipment Guide

Parts of a Telescope:
Every Component Explained

Confused by terms like OTA, diagonal, finder scope, dovetail, and focuser? This guide breaks down every telescope part in plain language, shows what each piece does, and explains what matters most when buying or upgrading.

15+

Core parts explained

3

Major telescope types

2

Mount families

1

Simple setup checklist

By Telescope Advisor Editorial Team Published: Updated: Editorial Standards

Quick Anatomy: The Big Pieces You Should Know First

Before we break down every component, memorize this framework: every telescope system has an optical tube for collecting light, a mount for aiming and tracking, and accessories for finding, focusing, and viewing. If one of these three areas is weak, your experience suffers no matter how good the other two are.

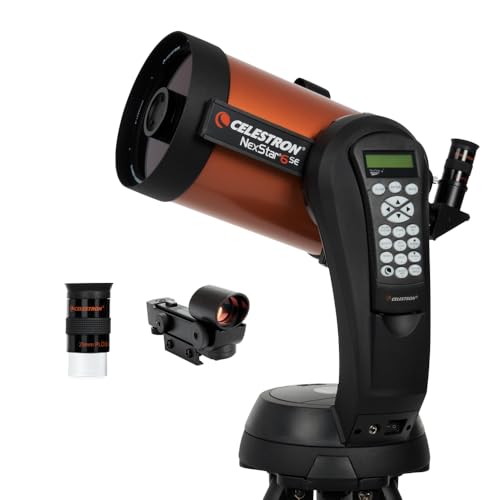
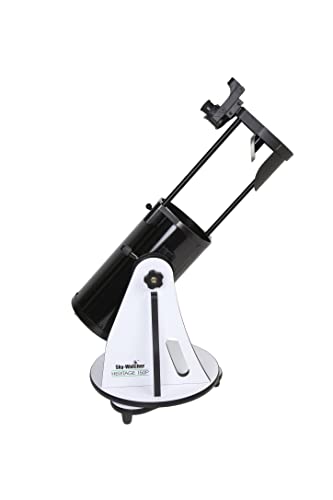
Optical Tube Assembly (OTA)

Main lens or mirror system that forms the image. Aperture and optical quality live here.

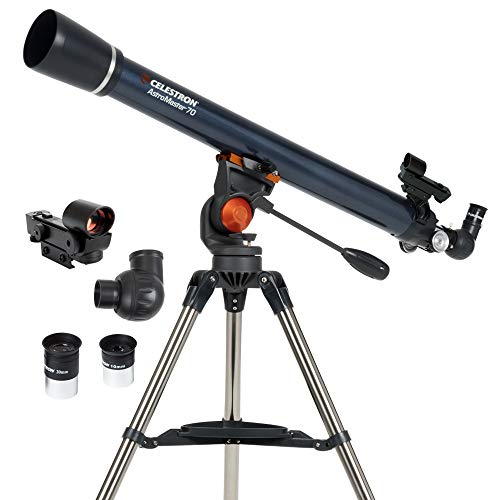
Mount and Tripod/Base

Controls stability, smooth movement, and tracking. Often more important than beginners realize.

Viewing Accessories

Finder, diagonal, eyepieces, and focus knobs make the optical tube practical to use at night.

Optical Tube Parts (Where Image Quality Starts)

The optical tube assembly is the heart of the telescope. It determines how much light you collect, how much detail you can resolve, and how easy the instrument is to transport. Understanding these parts helps you compare scopes without getting distracted by marketing magnification claims.

1) Aperture (Objective Lens or Primary Mirror)

Aperture is the diameter of the main light-collecting element. More aperture means brighter deep-sky views and higher theoretical resolution on planets. This is usually the most important optical specification.

2) Focal Length

Focal length influences image scale and helps determine magnification with an eyepiece. Longer focal lengths make it easier to reach planetary magnification with comfortable eyepieces.

3) Focal Ratio (f/number)

Computed as focal length divided by aperture. Lower f/ratios produce wider fields; higher ratios naturally favor high-power viewing and are often easier on eyepiece edge performance.

4) Tube Body and Baffling

The tube interior and baffles suppress stray light and improve contrast. Good baffling can noticeably improve lunar and planetary viewing in light-polluted areas.

Focusing and Viewing Parts

Even excellent optics feel frustrating with poor focusing hardware. The focuser, diagonal, and eyepiece interface determine how easily you can reach and hold critical focus at high power.

Part What It Does Why It Matters
Focuser Moves eyepiece/camera to focus point Smooth focus is crucial for planets
Diagonal Bends light path for comfortable viewing Improves ergonomics for refractors/SCTs
Eyepiece Sets magnification and apparent field Biggest practical image-change accessory
Barlow lens Multiplies effective focal length Flexible power options without many eyepieces

Finder System Parts

A finder is how you aim quickly before switching to high magnification. Many beginners think finder hardware is optional, then struggle with object acquisition for weeks. It is not optional.

  • Red-dot finder: fastest to use for bright targets and simple star hops.
  • Optical finder scope: magnified mini-scope for dimmer targets and more precise alignment.
  • Finder shoe/bracket: mounting interface that keeps finder aligned with OTA.
  • Adjustment screws: fine-tune finder alignment so center in finder equals center in eyepiece.

Deep dive: Red Dot Finder vs Crosshair Finder.

Mount Parts: The Most Underrated Section of the Telescope

When people complain a telescope is "bad," the optics are often fine and the mount is the true bottleneck. Mount quality controls vibration, tracking accuracy, and pointing confidence.

Alt-Azimuth Mount Parts

  • Altitude axis and tension controls
  • Azimuth axis and base bearing
  • Slow-motion controls (on some models)
  • Tripod head or Dobsonian rocker box

Equatorial Mount Parts

  • RA and DEC axes
  • Counterweight shaft and weights
  • Polar alignment adjustment bolts
  • Clutches and slow-motion or motor drives

If your budget is limited, prioritize a stable mount over one extra accessory. A sharp image that shakes with every touch is not functionally sharp.

Connection and Mechanical Parts You Should Recognize

These parts are less glamorous but critical for safety and usability. Understanding them prevents common setup mistakes and accidental drops.

Dovetail bar: metal rail that secures the OTA to the mount saddle.

Saddle clamp: locking interface that grips the dovetail.

Tube rings: circular clamps that hold the OTA and allow balancing rotation.

Vixen vs Losmandy standards: two common dovetail widths; check compatibility before upgrades.

Accessory tray: tripod spreader that boosts stability while holding eyepieces.

Dust caps and end caps: simple but essential for optics protection and long-term cleanliness.

How Parts Differ by Telescope Design

A common beginner mistake is assuming all telescope parts are interchangeable across designs. In reality, refractors, Newtonian reflectors, and Schmidt-Cassegrains share core concepts but differ in layout, access, and common upgrade paths. Knowing these differences helps you avoid buying incompatible accessories and helps you interpret reviews correctly.

Refractor Layout

Objective lens at front, focuser at rear, diagonal commonly used for comfort. Usually low maintenance and beginner-friendly alignment behavior.

Newtonian Layout

Primary mirror at bottom, secondary near top, side-mounted focuser. Strong aperture value but collimation familiarity is important.

SCT/Mak Layout

Compact folded optical path with rear accessories. Excellent portability-per-aperture and comfortable viewing ergonomics.

Accessory standards are often design-specific in practice even when the eyepiece barrel size matches. Back-focus limits, mirror travel, and mechanical clearance can change real compatibility. When in doubt, prioritize accessory combinations already used successfully on the same telescope model.

Part-by-Part Troubleshooting Map

When a telescope underperforms, isolate the problem by part category. This map prevents random adjustments that create new issues.

Image shakes when focusing: usually mount/tripod stability, not optics.

Cannot center targets after finder alignment: finder bracket flex or loose mounting shoe.

Stars never sharpen: focus travel limits, thermal instability, or optical alignment issue.

Planets look dim at high power: eyepiece choice and magnification overshoot, not necessarily poor aperture.

Object drifts too quickly: mount motion control technique or tracking setup, not eyepiece quality.

Unexpected vignetting with accessories: back-focus path length and adapter chain mismatch.

This diagnostic structure makes upgrades smarter. Fixing the correct part category first usually saves both money and observing time.

Maintenance by Component: What to Clean, Tighten, and Leave Alone

Beginners often over-clean optics and under-maintain mechanics. The right rule is simple: clean optics minimally, maintain mechanical interfaces proactively.

  • Objective lens / mirrors: avoid routine touching; clean only when contamination clearly affects use.
  • Focuser mechanism: keep motion smooth and free of grit; avoid over-tightening tension screws.
  • Mount clamps and dovetail interfaces: inspect regularly for secure fit and repeatable lock tension.
  • Tripod leg locks: check tightness before every session to prevent sudden collapse risk.
  • Finder bracket: verify alignment hardware is snug but not forced.
  • Dust caps and storage: cap all optics after sessions and store in humidity-safe conditions.

The maintenance mindset should be preventive and gentle. Most damage comes from aggressive cleaning or rushed teardown habits, not from normal observing use.

Buying Priority by Part Category (What to Spend On First)

When budgets are tight, understanding part priority protects you from overpaying for low-impact upgrades. Most performance gains come from the optical tube and mount system first, then from a practical eyepiece strategy, and only later from niche accessories.

Priority Part Category Reason
1 Aperture + optical quality Sets hard ceiling for detail and brightness.
2 Mount stability and control Determines whether optical quality is usable at target power.
3 Finder + focuser quality Directly affects speed of target acquisition and focus precision.
4 Eyepiece progression Improves versatility after fundamentals are solid.
5 Specialty accessories Useful only once core system bottlenecks are solved.

This sequence is also a good anti-marketing filter. If a product advertisement emphasizes extreme magnification, fancy naming, or bundled extras while avoiding mount stability and optical design details, it is usually signaling the wrong priorities.

Upgrade Roadmap: Which Part to Upgrade First at Each Stage

A structured upgrade roadmap helps beginners avoid expensive, low-impact purchases. Instead of buying random accessories, match upgrades to your current bottleneck. If your sessions fail at target acquisition, upgrade finder workflow first. If sessions fail at high power due to shake, mount stability upgrades come first. If sessions fail due to narrow field and poor edge comfort, eyepiece selection becomes the best next step.

Stage 1 (first 30 days): improve finder alignment and mount handling habits before spending.

Stage 2 (month 2-3): fill eyepiece gaps with one practical low/medium-power addition.

Stage 3 (month 4+): optimize high-power control with better focuser feel and vibration reduction.

Stage 4 (advanced): only then consider specialty accessories for niche targets or imaging.

This roadmap aligns your spending with observable improvements. It also prevents the common cycle where beginners buy premium accessories on top of unresolved mount and alignment issues.

Telescope Parts Glossary (Plain-English)

OTA: Optical Tube Assembly; the telescope tube with main optics.
Objective: Front lens in a refractor that collects light.
Primary mirror: Main light collector in a reflector.
Secondary mirror: Redirects light toward the focuser in reflectors.
Focuser: Mechanical assembly that brings image to sharp focus.
Eyepiece: Magnifies the image formed by telescope optics.
Diagonal: Bends light path for more comfortable viewing angle.
Barlow: Optical amplifier that increases effective magnification.
Finder scope: Auxiliary sight used to aim at targets quickly.
Red-dot finder: Non-magnifying finder with illuminated aiming point.
Alt-az mount: Moves up/down and left/right like a camera tripod.
Equatorial mount: Tilted-axis mount designed for sky tracking.
RA axis: Right ascension axis on equatorial mount.
DEC axis: Declination axis on equatorial mount.
Dovetail: Metal rail connecting OTA to mount saddle.
Saddle: Clamp that locks the dovetail rail in place.
Tube rings: Circular clamps securing OTA on some mounts.
Collimation: Optical alignment of mirrors/lenses for sharp images.
Focal length: Determines image scale with eyepiece choice.
Focal ratio: F-number, focal length divided by aperture.
Back focus: Distance required for accessories to reach focus.
Tripod spreader: Structural brace that improves tripod rigidity.

Use-Case Mapping: Which Parts Matter Most for Each Goal

Different observing goals stress different parts. Beginners often buy based on generic "best telescope" lists without matching parts to use-case. This mapping fixes that.

Moon and planets: prioritize steady mount, precise focuser behavior, and enough aperture for clean high-power work. Eyepiece ergonomics matter because small focus errors are obvious at planetary magnification.

Deep-sky visual: aperture and low-power field framing matter more than extreme magnification. Mount smoothness and balance become important for manual tracking of dim targets.

Casual family sessions: finder simplicity, mount ease, and quick setup dominate. A slightly smaller but easier system often outperforms a larger system that is hard to deploy.

Outreach events: mechanical reliability and repeatability are critical. Parts that lock securely and keep alignment under repeated use reduce downtime and frustration.

Entry imaging: mount precision and compatibility interfaces matter first. Optical quality still matters, but tracking mechanics become the practical bottleneck quickly.

Use-case mapping is the fastest way to interpret product specs. It also helps you avoid paying for premium features that do not improve your personal observing goals.

Top Beginner Mistakes by Telescope Part

Objective or mirror: over-cleaning optics too often. Most sessions need dust control, not aggressive lens cleaning.

Focuser: forcing focus knobs when near travel limits. This can introduce backlash or mechanical wear over time.

Finder: skipping daytime alignment. Nighttime alignment under pressure is slower and often inaccurate for beginners.

Mount: leaving axis tension too loose or too tight. Either extreme creates jerky movement and poor tracking confidence.

Dovetail/saddle: partial clamp engagement. This is a safety risk and should be checked every session.

Eyepiece: chasing extreme magnification before achieving clean focus at moderate power.

Tripod/base: observing with unstable leg extension on uneven ground. Mechanical stability always comes first.

Correcting these part-specific mistakes delivers immediate gains. Most beginners see better first-light outcomes by fixing handling and setup habits before buying new gear.

Compatibility Basics: Why "Fits" Is Not Always "Works Well"

Part compatibility is more than matching one connector size. Two accessories can physically attach and still perform poorly together due to focus travel limits, mechanical flex, balance shifts, or optical path length changes. This is why many beginners buy a well-reviewed accessory that technically fits but does not solve their actual problem.

Use a three-check method before buying any part: mechanical fit, optical path behavior, and handling impact. Mechanical fit confirms adapters and standards. Optical path behavior checks whether focus can be reached cleanly with your diagonal or camera chain. Handling impact checks whether the added weight changes balance, tripod stability, or mount response.

This method is simple but powerful. It protects your budget, reduces return cycles, and keeps your telescope system coherent as you grow from beginner sessions to more advanced observing projects.

Field-Ready Part Check Before Every Session

A fast pre-session part check prevents most avoidable failures. This is especially useful when multiple people use the same telescope or when gear was moved after the last session.

  • Confirm saddle and dovetail contact is full-width and clamp pressure is secure.
  • Verify finder alignment against a distant object before nightfall.
  • Check focuser travel for smooth movement without slip or binding.
  • Insert eyepiece and confirm locking screw engagement without over-tightening.
  • Inspect tripod/base contact points and tighten any loosened hardware.
  • Confirm all caps removed from optical path before first target attempt.

This two-minute ritual saves significant time in the field and creates a professional operating habit. It also makes troubleshooting easier because you start every session from a known mechanical baseline.

As your experience grows, keep this checklist but customize it for your specific instrument. The exact order can change, but the principle remains: verify critical load-bearing parts first, then alignment-critical parts, then viewing accessories. Consistency in pre-session checks is one of the strongest predictors of stress-free observing nights.

Starter Product Picks to Learn Telescope Parts in Practice

If you are learning telescope anatomy, using a stable beginner system with mainstream accessories helps you understand each part quickly without compatibility chaos.

Editor's Pick - Best All-in-One Learning Platform
Celestron NexStar 6SE telescope

Celestron NexStar 6SE

Great teaching scope for understanding OTA, fork mount mechanics, GoTo alignment, finder usage, and eyepiece workflow in one package.

View on Amazon →
Celestron AstroMaster 70AZ

Celestron AstroMaster 70AZ

Simple manual alt-az setup ideal for learning core parts and basic aiming without electronics.

View on Amazon →
Sky-Watcher Heritage 130P

Sky-Watcher Heritage 130P

Compact Dobsonian that makes base mechanics, focuser use, and eyepiece behavior easy to understand.

View on Amazon →

First-Night Checklist by Part

  1. Confirm tripod/base is level and every leg clamp is tight.
  2. Verify mount clamps and dovetail saddle are fully locked.
  3. Insert finder and align it in daylight on a distant object.
  4. Insert diagonal (if used) and secure eyepiece with set screw.
  5. Balance tube if your mount supports balancing adjustments.
  6. Test smooth motion in both axes before night observing.
  7. Practice focusing on a bright star before chasing faint targets.

Companion setup page: How to Set Up a Telescope for Beginners.

Frequently Asked Questions About Telescope Parts

What are the most important telescope parts for beginners?

Aperture, mount stability, finder usability, and focuser quality are the top priorities. Fancy accessories are secondary if these four are weak.

Is the mount really as important as the telescope tube?

Yes. A shaky mount ruins otherwise good optics, especially on planets at high magnification where tiny vibrations blur detail.

Do all telescopes need a diagonal?

No. Refractors and many Schmidt-Cassegrains commonly use diagonals for comfort, while many Newtonians usually do not.

What does OTA mean?

OTA stands for Optical Tube Assembly. It is the telescope tube containing the primary optics, typically sold with or without mount depending on package.

Can I upgrade parts later?

Usually yes. Common upgrades include eyepieces, finder systems, diagonals, and sometimes focuser improvements, provided mechanical compatibility is checked first.

Sources and Review Notes

Last reviewed: . This guide consolidates practical beginner setup patterns and common component terminology used by major amateur telescope manufacturers.

  • Manufacturer equipment manuals and OTA/mount terminology standards.
  • Practical setup reports from beginner and intermediate observer communities.
  • Editorial alignment with Telescope Advisor beginner setup resources.