Best Manual Telescopes for Beginners (2026): Top 5 Ranked + Honest Guide
Telescope Advisor Logo Telescope Advisor
Beginner manually guiding telescope under stars

Buying Guide · 2026

Best Manual Telescopes for Beginners (2026): Top 5 Picks for Learning the Sky

If your goal is to understand the night sky instead of relying on menus and motors, a manual telescope is often the better first instrument. This guide ranks beginner-friendly manual telescopes by usability, optical honesty, and real learning curve, not marketing promises.

5

Manual picks ranked

Skill first

Learn star-hopping

No alignment

Simple setup flow

Low friction

Higher observing frequency

By Telescope Advisor Editorial Team Published: Updated: Editorial Standards

What Is the Best Manual Telescope for Beginners? (Quick Answer)

For most beginners, the best manual telescope in 2026 is the Sky-Watcher Heritage 130P. It combines straightforward manual control, significant aperture for the price, and a forgiving learning curve that helps you build real observing skill. You can learn star-hopping, understand sky movement, and still enjoy impressive Moon/planet/deep-sky targets.

If you prefer a full-size mount and seated observing ergonomics, an 8-inch Dobsonian class is the long-term manual path. If portability is your priority, C90 Mak or small refractors are easier to carry but give up deep-sky reach.

Manual-Only Intent (Why This Page Is Unique)

This guide targets users who already prefer manual observing and want to become better at finding objects themselves. It does not duplicate your GoTo comparison page. The lens here is learning velocity, tactile control, and long-term skill development with minimal automation.

PageIntentDecision Focus
GoTo vs Manual TelescopeComparison between workflowsWhether to automate at all
Best Dobsonian TelescopesDobsonian category rankingAperture class and Dob lineup
Best Manual Telescopes for Beginners (this page)Beginner manual-first buyingLearning curve and ease of manual use

Top 5 Manual Beginner Telescopes (Ranked)

Editor's Pick — Best Beginner Manual Scope
Sky-Watcher Heritage 130P

1) Sky-Watcher Heritage 130P

Excellent manual starter because movement is intuitive, aperture is meaningful, and setup is quick. It teaches sky navigation without punishing complexity.

View on Amazon →
Celestron AstroMaster 130EQ

2) Celestron AstroMaster 130EQ

Manual EQ scope that can work for beginners willing to learn basic polar and axis movement. Better as a learning platform than a zero-friction starter.

View on Amazon →
Celestron C90 Mak

3) Celestron C90 Mak

Compact manual setup for Moon and planets. Great for short sessions and skill practice in finding bright targets quickly.

View on Amazon →
Celestron AstroMaster 70AZ

4) Celestron AstroMaster 70AZ

Simple alt-az control and low entry price make this a useful first manual learning scope for lunar and bright-planet work.

View on Amazon →
Celestron NexStar 5SE

5) Celestron NexStar 5SE (for context)

Not manual-first, but included as a benchmark to help beginners decide if they truly want manual operation or assisted finding.

View on Amazon →

Beginner Manual Learning Path (30 Days)

  1. Week 1: Learn finder alignment in daylight and run moon sessions only.
  2. Week 2: Add bright planets and one easy open cluster (Pleiades or Beehive).
  3. Week 3: Practice star-hopping with two seasonal targets and track object drift manually.
  4. Week 4: Build a personal observing list and repeat targets at different magnifications.

This sequence builds confidence quickly and avoids the most common beginner trap: buying a scope that is powerful on paper but too frustrating to use regularly.

Why Manual-First Still Wins for Many Beginners

Manual observing remains one of the fastest ways to build real sky competence. When you point, nudge, and reacquire targets yourself, you internalize star patterns, seasonal sky motion, and magnification behavior. That knowledge compounds. Within months, many manual users can find common targets faster than they expected and with much less dependence on app prompts.

Manual-first does not mean anti-technology. It means choosing a training path where the telescope teaches you directly. This matters long-term because every future setup, including GoTo systems, becomes easier when you already understand what the sky should look like. Beginners who skip foundational orientation often depend on automation for simple tasks and struggle when conditions are imperfect.

The key advantage of manual for beginners is skill transfer: finder alignment, target framing, focus discipline, and seeing assessment all improve with repetition. These are universal observing skills, not brand-specific features. A good manual telescope can therefore be both your first instrument and your long-term training platform.

Manual Mount Types for Beginners: What Feels Easiest in Practice

Beginners frequently underestimate mount choice and overestimate optical specs. In manual observing, the mount is your user interface. If movement feels awkward, confidence collapses quickly even with good optics. For most first-time users, alt-az motion is the most intuitive because it matches natural pointing behavior: left-right and up-down.

Mount Type Beginner Difficulty Best For Watch Out For
Alt-az tripodLowFirst-week comfortTripod stability and vibration
Dobsonian baseLowAperture value with simple movementSize/weight for larger models
Manual EQMedium to highUsers interested in axis-based tracking conceptsInitial setup complexity

The practical recommendation for most beginners is simple: start with an intuitive mount that encourages frequent use. You can always move up to more specialized systems later. Early momentum matters more than technical purity.

Manual Target Progression That Prevents Frustration

Many beginners quit manual observing because they attempt difficult deep-sky targets too early. A staged progression dramatically improves retention and confidence. The objective is to accumulate wins while your mechanical skills are still developing.

  1. Stage 1 (Nights 1-3): Moon and bright planets only. Focus on finder alignment, focusing, and smooth nudging.
  2. Stage 2 (Nights 4-8): Add bright open clusters and easy doubles. Learn field-of-view expectations.
  3. Stage 3 (Nights 9-15): Start simple star-hops using a map/app with short hops from bright stars.
  4. Stage 4 (Nights 16+): Introduce medium-difficulty targets, including globulars and brighter nebulae.

This progression works because each stage introduces one new difficulty at a time. Beginners who use staged target ladders usually report faster improvement than those who chase random targets based on social media photos or advanced observer logs.

The 6 Core Manual Skills Every Beginner Should Build

1) Finder Alignment Discipline

If your finder is off, every other skill feels harder than it should.

2) Low-to-High Magnification Flow

Acquire targets at low power first, then increase magnification intentionally.

3) Smooth Manual Tracking

Learn to nudge before targets drift out of frame instead of reacting late.

4) Seeing Awareness

Recognize atmospheric limits so you do not blame optics for bad conditions.

5) Session Planning

A 5-target plan beats random browsing, especially on short weeknight sessions.

6) Observation Logging

A simple log reveals patterns and accelerates improvement.

You do not need to master all six skills immediately. Build them progressively. Within a month, even partial improvement in each area can transform your manual observing experience.

Eyepiece Strategy for Manual Beginners

Eyepiece confusion is one of the biggest hidden friction points for new manual users. The easiest approach is role-based eyepiece planning rather than chasing every focal length. Build a two-eyepiece system first: one wide-field finder eyepiece for acquisition and one medium-power eyepiece for detail. Add a third only after you understand your local seeing patterns.

Manual beginners often overuse high magnification and mistake a dim, jittery view for telescope weakness. In reality, high power magnifies tracking difficulty and atmospheric instability. Better results usually come from moderate magnification with cleaner contrast and easier tracking behavior.

A practical rule is to increase power only when the target remains stable and sharp for several seconds at current magnification. If it does not, stay lower. This is especially important for manual users because tracking precision requirements rise as field of view narrows.

A Repeatable 45-Minute Manual Session Template

Short, repeatable sessions are better for beginner progress than occasional marathon nights. Use this template to keep manual observing consistent even on busy weeks:

  1. Minutes 0-10: Setup, finder check, and first bright target acquisition.
  2. Minutes 10-20: Planet or Moon detail pass with one magnification change.
  3. Minutes 20-35: Two sky-navigation targets (cluster or easy star-hop object).
  4. Minutes 35-45: Revisit favorite target and log what improved or failed.

This structure builds mechanical repetition and reduces decision fatigue. Over 10 sessions, you will improve faster than with unstructured observing, even if total hours are lower.

Manual Beginner Frustration Fixes (Fast Triage)

Problem Likely Cause Quick Fix
Cannot find targetsFinder misalignmentRealign in daylight and validate on bright night target
View shakes too muchTripod/mount instabilityReduce extension height and use firmer ground
Image never sharpPoor seeing or over-magnificationDrop power and refocus slowly
Object drifts too fastHigh power before tracking skillPractice nudging at medium power first
Manual feels too hardTarget ladder too aggressiveReturn to easy targets for 2-3 sessions

Most beginner pain points are procedural, not permanent. If you diagnose quickly and apply one targeted fix, manual observing becomes much more rewarding.

First-Year Manual Upgrade Path Without Wasted Money

After six to twelve months, most manual beginners face the same question: upgrade scope, upgrade accessories, or keep learning with current gear? The best answer comes from bottleneck analysis. Upgrade only where your current setup consistently limits successful sessions.

If you miss targets often: upgrade finder workflow first (and alignment routine), not aperture.

If planetary detail is weak in good seeing: evaluate collimation, cooldown, and eyepiece quality before replacing the telescope.

If deep-sky targets are consistently underwhelming: aperture upgrade may be justified, especially toward larger Dobsonian classes.

If sessions are too short: optimize setup process and ergonomics; usage frequency is your real performance multiplier.

This approach protects budget and keeps progress aligned with your real observing behavior. The strongest first-year result is not owning the biggest telescope, it is becoming the observer who can consistently get good results from any reasonable manual instrument.

A Practical Manual Training System You Can Use All Year

If you want to become genuinely good with a manual telescope, treat observing as skill practice rather than random entertainment. The same way musicians and athletes improve through repeated drills, manual observers improve through repeatable routines that reinforce core movements and decision patterns. A simple, structured practice system will outperform occasional unplanned sessions, even when total observing time is similar.

Start with a stable pre-session ritual: check finder alignment, confirm eyepiece sequence, and choose a short target ladder. This lowers cognitive load once you begin observing. Beginners often exhaust attention on setup mistakes before they even reach their first object. A ritual solves that by making setup procedural instead of improvisational.

During the session, isolate one skill goal. One night, focus on smoother tracking. Another night, focus on faster reacquisition after eyepiece swaps. Another night, focus on precise focus transitions at moderate power. Isolating skills prevents overload and makes progress measurable. When too many goals are active at once, beginners cannot tell which problem actually caused poor outcomes.

After each session, run a short debrief: what worked, what failed, and what to change next time. Keep this to three bullet points. Over 10 sessions, this log reveals clear patterns: maybe your finder drifts in transport, maybe your highest-power eyepiece is rarely useful in local seeing, or maybe your target order needs to start with brighter objects. The log turns frustration into actionable adjustment.

This training system also helps you decide whether manual remains your best path. If your skill trend rises and sessions become easier, manual is likely a good long-term fit. If process remains consistently painful despite structured practice, it may be time to hybridize with assisted finding. Either outcome is useful because the decision becomes evidence-based.

Complete Manual Beginner Decision Brief

Use this brief when you want to choose a manual telescope confidently and avoid a cycle of second-guessing. First, define your real observing environment: balcony, backyard, driveway, shared family space, or occasional dark-site trips. Your environment determines how much setup complexity you can tolerate and how often you can observe. Frequency of use should drive your decision more than peak capability.

Second, define your learning goal. If you want deep sky understanding and self-guided navigation, choose a manual system that encourages frequent star-hopping practice. If you mainly want quick visual highlights after work, choose the easiest manual workflow with the least setup friction. A mismatch between learning goal and system behavior is the fastest route to abandonment.

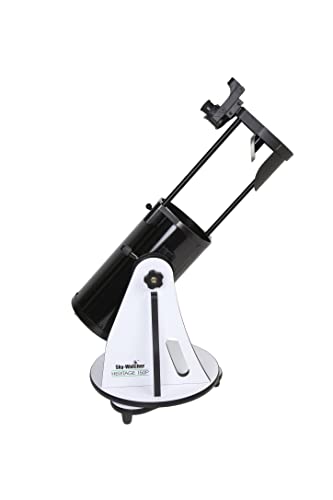
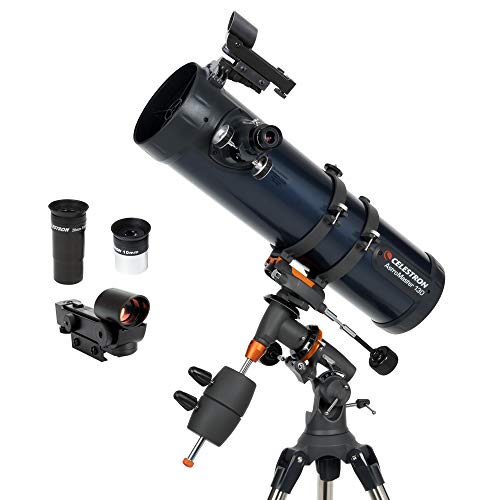
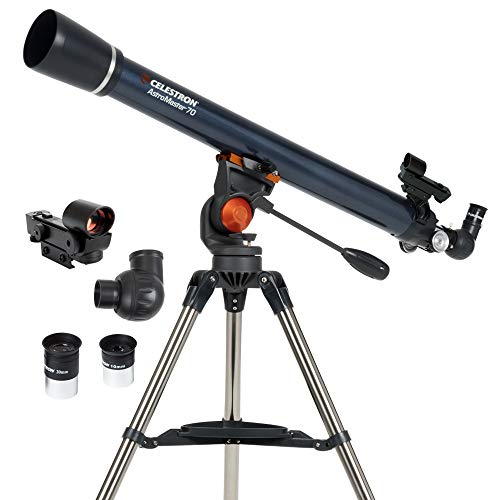
Third, choose mount behavior before optical specification. A stable, intuitive mount can make a moderate scope feel excellent, while a shaky or awkward mount can make a larger scope feel unusable. Manual beginners usually succeed fastest with alt-az or Dobsonian motion because it aligns with natural pointing instincts. Equatorial manual systems can still work, but they demand more upfront orientation and patience.

Fourth, evaluate your tolerance for maintenance and routine checks. Collimation, cooldown awareness, and finder alignment are normal manual responsibilities, not defects. If you can adopt these as habits, manual systems become increasingly rewarding over time. If you strongly dislike maintenance routines, choose a lower-overhead path even if nominal aperture is lower.

Fifth, define your first-month target library before buying. If your first four weeks include realistic, high-success targets, your confidence will rise quickly. If your first attempts are advanced targets beyond your current workflow, you may misdiagnose normal beginner friction as product failure. Planning early targets is one of the highest-return steps in beginner success.

Sixth, buy for progression, not perfection. Your first manual telescope should be good enough to build skill and deliver satisfying views, not perfect for every possible future use case. Trying to solve every future scenario in one purchase often leads to oversized, underused setups. A scope that gets used weekly beats a theoretically better scope used monthly.

Seventh, set a 60-day evaluation rule. Commit to a structured use period before judging your decision. Run at least eight sessions with a stable process. Most buyers need this amount of repetition before skill catches up to equipment. Premature judgments lead to unnecessary returns and expensive churn.

For many beginners, the most reliable recommendation remains a manual-friendly compact Dobsonian path like Heritage 130P class, especially when value, ease, and skill progression are all priorities. If your environment is extremely space-constrained and sessions are short, smaller manual options can still be excellent. The right answer is the instrument that turns intention into repeated observing, not just the one with the strongest spec sheet headline.

When to Stay Manual and When to Transition to Assisted Finding

A common question after several months is whether to stay fully manual or add assistance. The answer should come from usage data, not identity or ideology. If manual sessions are frequent, target acquisition is improving, and you enjoy the process, staying manual is often the best value path. You are already building durable skills that carry into every future instrument.

Transition becomes reasonable when your constraints change: heavier light pollution, shorter observing windows, less energy for navigation after work, or increased emphasis on sharing views quickly with family and friends. In these cases, assisted finding can preserve observing frequency. Frequency is critical; a less romantic but consistently used workflow is superior to an idealized workflow you rarely execute.

The best transition strategy is hybrid, not abrupt replacement. Keep your manual skills active while introducing assisted capability for specific use cases. For example, use manual flow on weekends and assisted flow on weeknights. This preserves learning momentum while reducing friction where needed.

The important point is that starting manual does not lock you in, and choosing assistance later does not erase your progress. Manual-first training gives you a stronger baseline no matter which path you take next. That is why this page focuses on beginner manual fundamentals: they remain valuable even if your eventual system becomes partially automated.

Manual Night Checklist: 10 Minutes That Save the Session

Manual sessions are most enjoyable when small setup errors are removed early. Use this short checklist before every session, especially when you are tired or observing time is limited.

  • Level and stability: verify mount/tripod is stable and not rocking under light pressure.
  • Finder alignment: quickly validate on a bright target before hunting fainter objects.
  • Eyepiece order: place low-power eyepiece first, medium-power second, high-power optional.
  • Target ladder: pre-select easy-to-medium sequence; avoid random first targets.
  • Focus discipline: begin with a bright object and lock in clean focus behavior early.
  • Tracking warm-up: practice 2 to 3 smooth nudges before switching to difficult targets.

This routine dramatically improves beginner consistency. Manual observing rewards process reliability. Once the checklist becomes habit, your confidence rises, your sessions start faster, and your telescope feels easier to use regardless of model.

Confidence Milestones to Track in Your First 20 Sessions

Manual progress feels slow until you measure it. Track these milestones and you will see clear improvement: finder alignment completed in under 3 minutes, first target acquired in under 5 minutes, smooth re-centering at medium power, successful two-step star hop, and clean focus transitions without repeated overshoot.

By session 10, many beginners can reliably run a short target ladder with minimal frustration. By session 20, most can adapt their plan to seeing and sky transparency in real time. This is the point where manual observing often becomes genuinely enjoyable instead of effortful.

Use milestones as your scorecard, not social media image quality. Manual astronomy is a skill game first. As your process improves, visual outcomes improve naturally and upgrades become easier to justify with real evidence. Track progress monthly to stay motivated.

Frequently Asked Questions

What is the best manual telescope for beginners in 2026?

For most beginners, Sky-Watcher Heritage 130P is the best manual starter because it combines intuitive control, strong aperture value, and a manageable learning curve.

Is a manual telescope better than GoTo for beginners?

Manual is better for learners who want stronger sky knowledge, while GoTo is better for faster target access and shorter-session convenience.

Are manual telescopes cheaper than GoTo telescopes?

Usually yes at similar aperture, because manual telescopes avoid motorized and computerized hardware costs.

What is the easiest manual telescope mount for beginners?

Alt-az mounts, especially Dobsonian-style motion, are usually the easiest because movement is intuitive for first-time users.