Best Telescope Accessories for Beginners (2026): What to Buy First & What to Skip
Telescope Advisor Logo Telescope Advisor
Telescope eyepiece set laid out on a dark surface — the single best accessory upgrade for new telescope owners

Buying Guide · Accessories

Best Telescope Accessories for Beginners (2026): What to Buy First & What to Skip

The telescope is just the beginning. The right accessories turn a frustrating first-night experience into a session you remember for years. This guide ranks every beginner accessory by real-world impact — not by price or marketing hype — so you know exactly what to buy first and what to leave for later.

Buy firstEyepiece set — biggest upgrade
Under $30Barlow lens, Moon filter
Under $50Collimation tools, finder upgrade
Biggest ROI$20 variable polarising Moon filter
By Telescope Advisor Editorial Team Published: Updated: Editorial Standards

Quick Answer: What Telescope Accessories Should a Beginner Buy First?

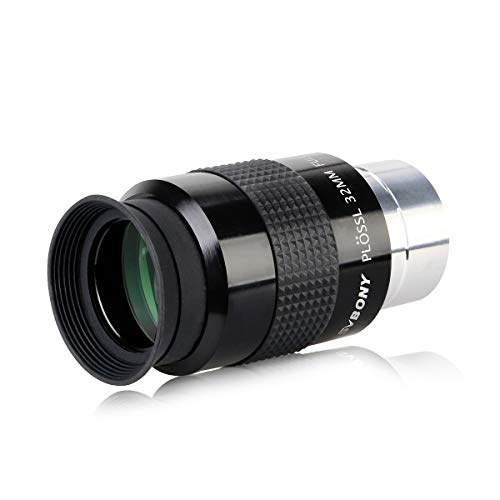
Buy a quality eyepiece set first. The eyepieces included with most beginner telescopes under $300 are the weakest link in the optical chain. A $50–$80 eyepiece set (four focal lengths covering low to high power) transforms what your telescope shows you more than any other single purchase. The Svbony SV131 4-piece eyepiece set (6mm, 10mm, 15mm, 25mm) is the most cost-effective upgrade for any beginner telescope — it replaces the single mediocre eyepiece your scope shipped with and gives you the full magnification range your telescope is capable of.

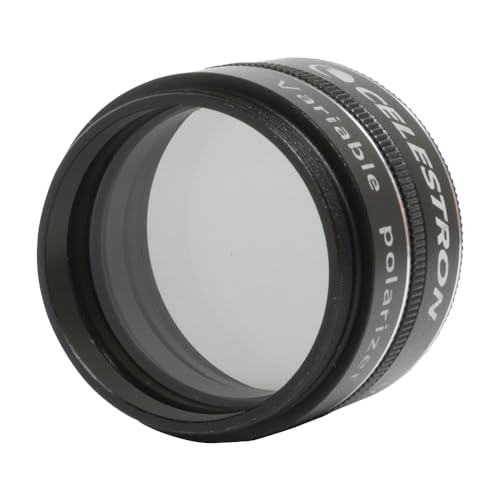
Second, buy a variable polarising Moon filter ($20–$30). The Moon is the first target for virtually every new telescope owner, and at gibbous or full phase it is painfully bright through any telescope larger than 60mm. A variable filter screws into your eyepiece and lets you dial in the perfect brightness. It is the cheapest accessory that consistently makes the difference between a good first night and a frustrating one.

Priority 1: Eyepieces

The biggest single upgrade for any telescope. A four-piece eyepiece set costs less than a single premium eyepiece and gives you the full low-to-high magnification range. Start here.

Priority 2: Moon Filter

The Moon is everyone’s first target. A variable polarising filter makes the view comfortable at any phase. $20 well spent.

🔭

Not sure which telescope actually fits your goals?

Answer 5 quick questions about your budget, observing targets, and experience level — our Telescope Finder Tool recommends a specific model in under 2 minutes.

Find My Telescope →

Why Accessories Matter More Than You Think

When you buy your first telescope, the box contains everything you technically need: an optical tube, a mount, a finderscope, and one or two eyepieces. The implied message is that this is a complete setup. In practice, the accessories bundled with beginner telescopes are chosen to hit a price point, not to deliver a great observing experience. The eyepieces are the cheapest possible designs. The finderscope is barely usable. The Moon filter is absent. The included star chart is a photocopy.

This is not a conspiracy by telescope manufacturers. It is simply that a $200 telescope that includes $60 worth of quality accessories would have to sell for $260, and at $260 it loses to a different $200 telescope that includes a $2 eyepiece. The market forces manufacturers to cut corners on accessories. Your job as a buyer is to recognise which corners were cut and fix them — usually for less money than you expect.

The seven accessories ranked below are ordered by their impact on your observing experience, not by price. The first item on this list — a decent eyepiece set — can make a $150 telescope perform like a $300 telescope on the Moon and planets. The last item — a storage case — is nice to have but will not improve a single view. Spend your money in this order, and you will get more enjoyment from every night under the stars.

1. Eyepiece Set — The #1 Upgrade for Any Telescope

If you buy only one accessory, make it a set of quality eyepieces. The eyepiece that comes with most beginner telescopes is a Kellner or Huygens design — a 200-year-old optical formula with narrow apparent field, short eye relief, and visible edge distortion. Replacing it with a modern Plossl or wide-field eyepiece is the single most impactful change you can make to your telescope, period.

Editor's Pick — Best First Upgrade
Svbony SV131 4-piece eyepiece set — the best telescope accessory upgrade for beginners

Svbony SV131 4-Piece Eyepiece Set — Best Beginner Upgrade

Editor’s Pick~$65 (6/10/15/25mm + 2× Barlow)

The Svbony SV131 set includes four Plossl eyepieces (25mm, 15mm, 10mm, 6mm) and a 2× Barlow lens in a foam-lined case. From a single eyepiece set, you get eight effective magnifications: the four native focal lengths plus four Barlow-doubled equivalents. In a typical 900mm focal-length telescope, this gives you 36× (25mm), 60× (15mm), 90× (10mm), 150× (6mm), and their Barlow equivalents at 72×, 120×, 180×, and 300× — every magnification you need for the Moon, planets, and bright deep-sky objects.

The Plossl design gives a 50–52° apparent field with good edge-to-edge sharpness, comfortable 15–20mm eye relief on the longer focal lengths, and threaded barrels that accept standard 1.25″ filters. The build quality is noticeably better than the eyepieces included with any telescope under $300 — the barrels are brass rather than aluminium, which prevents scratching your focuser drawtube, and the rubber grip rings make them easy to handle in the dark.

The included 2× Barlow is a functional entry-level unit. It introduces a small amount of additional chromatic aberration at high power on the Moon, but at $65 for the complete package, the SV131 set offers the best cost-per-magnification value in all of amateur astronomy. For a more detailed breakdown of individual eyepiece types and premium options, see our full telescope eyepiece guide.

2. Variable Polarising Moon Filter

Celestron variable polarising Moon filter — the highest-value low-cost telescope accessory

A variable polarising Moon filter is the highest-value low-cost accessory in amateur astronomy. It consists of two stacked polarising filters that you rotate to adjust light transmission from roughly 50% down to about 1%. This lets you tune the brightness of the Moon to exactly what is comfortable for your telescope aperture and the current lunar phase.

Without a filter, the full Moon through a 130mm telescope is genuinely uncomfortable — bright enough to cause squinting, afterimages, and temporary night-vision loss that takes 10–15 minutes to recover. At quarter phases, the Moon is comfortable at low power but can still be too bright at high magnification. A variable filter solves both problems with a single twist.

The best part: a variable polarising filter costs $15–$30 and works with any 1.25″ eyepiece. It also functions as a general-purpose neutral-density filter for bright terrestrial daytime viewing if your telescope is used for nature watching. The Celestron Variable Polarising Filter is the standard choice — it threads into any 1.25″ eyepiece and is adjustable from about 50% down to 1% transmission.

3. Barlow Lens — Double Your Magnification Range

Celestron Omni 2x Barlow lens — affordable magnification multiplier

A 2× Barlow lens doubles the effective magnification of any eyepiece you insert into it. Insert the 25mm eyepiece into the Barlow and it behaves like a 12.5mm eyepiece. Insert the 10mm and it becomes a 5mm. For a beginner with two eyepieces, a Barlow effectively gives you four eyepieces — at a fraction of the cost of buying additional individual eyepieces.

The Celestron Omni 2× Barlow (about $40) is the best entry-level Barlow for three reasons: its two-element achromatic design preserves image quality better than single-element budget Barlows, the chrome barrel is compatible with all standard 1.25″ focusers and eyepieces, and it accepts threaded filters (so you can stack a Moon filter + Barlow without adapter rings). The difference between a $15 no-name Barlow and this Celestron unit is immediately visible on planets at high power — the cheap one adds noticeable false colour and softness, while the Omni retains sharpness and contrast.

For a deeper dive into Barlow technology, use cases, and premium alternatives, see our dedicated Barlow lens guide.

4. Collimation Tools (for Reflector / Dobsonian Owners)

Celestron Cheshire collimation eyepiece — essential tool for Newtonian telescope alignment

If you own a Newtonian reflector or Dobsonian, collimation — aligning the telescope’s mirrors — is a skill you will need to learn within your first few weeks of ownership. Reflectors go out of collimation gradually through normal transport and handling, and when they do, images become soft, stars appear comet-shaped, and high-power planetary views lose all detail.

You do not need expensive laser collimators to get started. The most effective beginner collimation tool costs about $12 and consists of a plastic cap with a tiny centre hole — a collimation cap. It fits into the focuser in place of an eyepiece and lets you centre the primary mirror reflection by eye. The process takes 5 minutes once you have done it a few times, and it keeps your reflector performing at its best.

For a small upgrade ($30–$45), a Cheshire eyepiece-and-sight-tube combination tool makes the process faster and more precise. The Celestron Collimation Eyepiece combines both tools in one unit. It is the best collimation tool for beginners who plan to maintain their own reflector for years.

For Dobsonian-specific step-by-step instructions, see our Dobsonian collimation guide.

5. Finder Scope Upgrade

Celestron StarPointer red dot finderscope — the fastest way to aim your telescope

The finderscope that ships with most beginner telescopes under $300 is a 5×24 or 6×30 optical finder with a narrow field, dim image, and crosshairs that are difficult to see against a dark sky. Many beginners abandon the finder entirely within the first month and resort to sighting along the tube — which works for the Moon and bright planets but fails for everything else.

The best upgrade is a zero-magnification red-dot finder ($25–$50). A red-dot finder projects a red LED dot onto a glass window; you look through it with both eyes open and place the dot on your target. It is faster, more intuitive, and works for the entire family — children and guests can find objects on their first try. The Celestron StarPointer is the most common model and fits the standard finder dovetail on most Celestron and Sky-Watcher telescopes. It runs for hundreds of hours on a single CR2032 battery and includes adjustable brightness for dark adaptation.

If you prefer an optical finder, a 9×50 right-angle correct-image finder ($60–$90) is a significant step up from the included 6×30. The larger objective lens gathers 2.8 times more light, revealing fainter stars that make star-hopping easier. The right-angle eyepiece with correct image orientation makes it comfortable to use when the telescope is pointed near the zenith — which is where many of the best objects are. The finderscope alignment guide covers the setup process for both types.

6. Storage and Transport

Dwarf Mini hard travel case — protects your smart telescope during transport

A telescope is a precision optical instrument, and how you store it between sessions directly affects how long it lasts and how well it performs. Dust, humidity, temperature swings, and accidental bumps are the main causes of optical degradation over time.

The minimum viable storage solution is a telescope dust cover ($10–$25) that fits over the entire optical tube when not in use. The neoprene covers from Celestron and Orion are elasticated, breathable, and protect against dust without trapping moisture. For telescopes stored in a garage or shed where humidity is a concern, a ventilated storage bag is better than a sealed case — it lets air circulate while keeping dust off.

If you transport your telescope to dark sky sites, a hard case is worth the investment. Cases from Pelican, Apache (Harbor Freight), or the Dwarf Mini Hard Case for compact/smart telescopes provide drop protection, foam inserts custom-cut to your gear, and a weather seal that keeps optics dry during transport. At $25–$150 depending on size, a hard case is cheaper than replacing a damaged corrector plate.

For more on long-term storage best practices, see our telescope storage guide.

7. What to Skip (For Now)

Not every accessory is worth buying in your first year. Here are the items that beginner astronomers commonly over-prioritise — and what to spend that money on instead.

Skip: Premium single eyepieces ($70–$150 each)

A premium eyepiece like the Tele Vue Delos or Explore Scientific 82° series is a wonderful thing — but only after you have a quality telescope that can do it justice. On a beginner scope with a spherical mirror or high f/ratio achromat, the improvement over a $15 Plossl is marginal. Buy a quality eyepiece set first. Upgrade to premium eyepieces when you upgrade your telescope.

Skip: Guided astrophotography rig ($500+)

Auto-guiding, cooled cameras, and narrowband filter sets are for deep-sky astrophotography — a discipline that requires significant technical skill, clear dark skies, and a dedicated equatorial mount. Do not buy a guide scope and guide camera until you have taken at least 50 hours of lunar and planetary images and know that astrophotography is a hobby you want to pursue seriously.

Skip: Solar filters — with one critical exception

NEVER buy a screw-in eyepiece solar filter. These glass filters that thread into the bottom of an eyepiece have been known to crack from heat concentration, instantly exposing the eye to full sunlight and causing permanent retinal damage. The ONLY safe solar filter is a full-aperture front-mounted filter (Baader AstroSolar film or a glass solar filter from Celestron/Meade) that covers the entire front of the telescope. If you want to observe the Sun, buy a certified front-mounted solar filter from a reputable manufacturer and nothing else.

Skip: Camera adapter before you have tried phone-through-eyepiece

A T-ring adapter and camera mount bracket costs $30–$80 and sounds like an obvious first purchase for “lunar photography.” In practice, most beginners get better results on their first few nights by holding a smartphone up to the eyepiece over a precisely positioned camera adapter. The phone-through-eyepiece approach teaches you focus, exposure, and framing without the frustration of prime-focus alignment. Upgrade to a proper camera adapter after you have taken 20–30 phone images and know which targets you want to photograph.

Frequently Asked Questions

How much should a beginner spend on telescope accessories?

Plan to spend roughly 20–30% of your telescope’s cost on accessories within the first year. For a $200 telescope, that is $40–$60 — enough for an eyepiece set and a Moon filter. For a $1,000 telescope, $200–$300 covers a quality eyepiece set, Barlow, Moon filter, red flashlight, and a hard case. Spending significantly more than this before you know what you actually need usually results in unused gear.

Can I use the same accessories with a future telescope?

Yes — almost all beginner accessories use the 1.25″ barrel standard, which is interchangeable across virtually every consumer telescope on the market. Eyepieces, Barlows, filters, and red-dot finders that fit your current scope will fit your next scope, even if you switch from refractor to Dobsonian to SCT. This is why investing in quality accessories before a telescope upgrade is a smart strategy — your accessories outlast your scope.

What is the difference between Plossl, Kellner, and Huygens eyepieces?

Plossl eyepieces (4-element design) offer a 50–52° apparent field, good eye relief, and sharp images across most of the field. They are the standard for modern beginner astronomy. Kellner eyepieces (3-element) have a narrower field (~40°) and shorter eye relief — they are commonly included with budget telescopes as a cost-saving measure. Huygens eyepieces (2-element) are an 18th-century design with a tiny apparent field (~30°), poor eye relief, and visible edge distortion. Any telescope that ships with a Huygens eyepiece is cutting corners, and replacing it with even a basic Plossl produces a noticeable improvement.

Do I need a laser collimator or is a collimation cap enough?

A collimation cap is enough for the first year of ownership. It is accurate to about 1–2 millimetres of centring error, which is adequate for visual observation at up to 200× magnification. A laser collimator becomes useful when you push magnification beyond 200× (for planetary observation with a large Dobsonian) or when you set up and tear down your telescope frequently — the laser speeds up the process significantly. Start with a $12 collimation cap and only buy a laser if you find collimation frustrating or need higher precision.

Is a zoom eyepiece worth it for beginners?

A zoom eyepiece (like the Svbony SV135 7–21mm) is a reasonable alternative to a fixed eyepiece set if you value convenience over ultimate image quality. The trade-off is a narrower apparent field at longer focal lengths (typically 40° at 21mm, expanding to 60° at 7mm) and slightly less contrast than a fixed focal-length Plossl. The advantage is never needing to swap eyepieces in the dark to change magnification. For a beginner who observes from a balcony or urban location where convenience matters more than peak performance, a zoom plus one wide-field low-power eyepiece can replace an entire eyepiece set.

What telescope maintenance accessories are essential?

Three items cover 95% of maintenance needs: (1) A lens cleaning kit with microfiber cloth and optical cleaning solution ($10–$15) — use it sparingly, dust on the lens barely affects image quality, and cleaning too often is more damaging than letting dust sit. (2) A can of compressed air or a rocket air blower ($10–$15) — for removing dust before it becomes grit that scratches coatings during cleaning. (3) A collimation cap or Cheshire tool for reflectors — discussed above. Avoid the temptation to “maintain” your telescope more than necessary. Optics left alone in a dry, dust-free environment perform better than optics that are cleaned weekly.