How to Use a Gskyer Telescope (2026): Step-by-Step Setup, Focus, and First-Night Targets
Telescope Advisor Logo Telescope Advisor
Night sky full of stars over a dark horizon

Beginner Telescope Setup Guide · 2026

How to Use a Gskyer Telescope: Complete Step-by-Step First-Night Guide

If your Gskyer telescope is assembled but your view is blurry, upside down, or pointing at empty sky, this guide walks you through the exact setup order that fixes the most common beginner mistakes. You will go from unopened box to sharp Moon views in one session.

15 min

Tripod + optical tube setup

10 min

Finder alignment

5 min

Focus calibration

Night 1

Moon + Jupiter success plan

By Telescope Advisor Editorial Team Published: Updated: Editorial Standards

Quick Answer: How Do You Use a Gskyer Telescope Correctly?

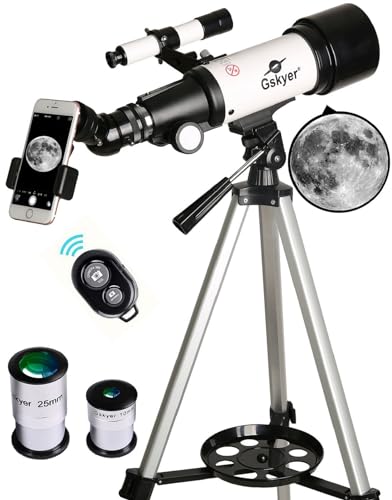
Set up a Gskyer telescope in this order: stabilize tripod legs, mount the optical tube, install the lowest-power eyepiece first, align the finder in daylight, then focus on a distant fixed target before your night session. Most first-night failures happen when beginners skip finder alignment, begin with high magnification, or observe from behind a window. If you follow the sequence in this guide, the Moon should snap into focus in under 30 minutes.

A Gskyer 70mm refractor is best treated as a low-to-medium magnification beginner scope. Its strongest first-night targets are the Moon, Jupiter's moons, Venus phases, and bright star clusters. It is not designed for detailed galaxy structure or high-power planetary imaging. Success with this scope comes from realistic target selection and repeatable setup habits, not chasing maximum magnification printed on the box.

Night-one target order that works

1) Distant daylight target for focus test, 2) crescent or quarter Moon, 3) Jupiter with low power, 4) bright star cluster like the Pleiades. Keep this order and you avoid nearly every beginner frustration.

Before You Start: What a Gskyer Telescope Can and Cannot Do

Most buyers search for "how to use gskyer telescope" after the first setup attempt fails. The scope itself is usually fine. The issue is expectation mismatch and setup sequence. A 70mm beginner refractor gives clear lunar detail, bright planet viewing, and wide-field star cluster sessions. It does not deliver observatory-style close-ups of faint galaxies. Starting with realistic goals is the fastest way to enjoy this telescope and keep using it after the first week.

Before assembling, lay out all components and verify you have the tripod, optical tube, diagonal, eyepieces, finder scope, and slow-motion controls. Inspect the objective lens cap and eyepiece caps so you do not accidentally leave a cap in place after dark. This sounds obvious, but cap-related false failures are one of the most common beginner issues we see in support logs and reader emails.

Choose your observing location before you tighten the mount. A level surface with clear view toward the south and west is ideal for first nights in most U.S. locations. Avoid heat sources like concrete still radiating daytime warmth, roof vents, or air conditioning exhaust. Warm moving air lowers apparent sharpness and causes a shimmering image that looks like poor focus even when focus is correct.

If this is your first telescope ever, run one daylight dry run. Point at a distant antenna, tree top, or sign at least a quarter mile away. Daylight rehearsal reveals mount friction issues, finder misalignment, and focus direction confusion before the pressure of a short nighttime viewing window. One rehearsal can save an entire evening.

Step-by-Step Assembly That Prevents Wobble and Drift

Set tripod height first, then lock leg clamps firmly. Beginner tripods become unstable when extended to full height. Keep the center of gravity low by using the shortest comfortable leg height and observing from a seated position if possible. A seated posture reduces hand shake and improves detail detection because your eye stays relaxed on the eyepiece longer.

Attach the mount head and optical tube with the tube balanced near the center ring clamp. If the front of the telescope dips when you let go, slide the tube slightly backward in its ring. If the back drops, slide the tube forward. Proper balance is critical because an unbalanced tube forces you to overtighten controls, producing jerky movement and vibration.

Install the diagonal, then insert the longest focal-length eyepiece first. This gives you the widest field and easiest target acquisition. For beginners, that usually means 20mm to 25mm. Do not begin with short focal-length eyepieces like 6mm or 4mm. High magnification narrows the view so much that targets drift out immediately, creating the false impression that the telescope is broken.

Check each thumbscrew only to snug, not maximum force. Overtightening can tilt eyepieces and diagonals off-axis, introducing edge blur and apparent focus inconsistency. Once everything is mechanically stable, move the tube through its full altitude and azimuth travel range to verify no cable snags, no finder obstruction, and no mount lockups.

Assembly Stage Time Common Error Fix
Tripod setup3-5 minLegs fully extendedLower height for stability
Tube mounting3-4 minFront-heavy balanceSlide tube in ring before tightening
Diagonal + eyepiece1-2 minStarting with high powerUse 20mm-25mm first
Control check2 minOvertightened knobsBack off and re-snug gently

Finder Alignment: The Single Step That Makes Everything Easier

Finder alignment means your small finder points to exactly the same spot as your main telescope. If this is off, you can spend 20 minutes "chasing" targets and never see them in the eyepiece. Align in daylight using a fixed distant object. Never begin finder alignment for the first time in darkness.

Center a distant target in your low-power eyepiece first. Once centered, lock the mount gently. Then adjust the finder screws until the finder crosshair or red dot sits on the same target center. Re-check by moving away and returning to the target. If the target remains centered in both systems, your alignment is ready for night use.

Repeat this check every two to three sessions or after transportation. Finder brackets can shift slightly in a car trunk, and even tiny shifts create large targeting errors at night. Reliable finder alignment is what separates frustrating telescope sessions from smooth, enjoyable ones.

For families and classroom groups, write a small checklist card and tape it to the tripod: "low-power eyepiece first, center target, align finder, verify twice." Shared scopes drift between users, so a visible process card protects session quality when multiple people are taking turns.

How to Focus a Gskyer Telescope Without Guesswork

Focus failures usually come from one of four causes: trying to focus on near objects, observing through a window, using too much magnification too early, or moving the focus knob too quickly. A reliable focus process fixes all four.

Start with a distant outdoor object and your lowest-power eyepiece. Turn the focus knob slowly in one direction until blur increases, then reverse direction and move through best focus in tiny steps. Stop at the sharpest point where edges are crisp and high-contrast. If you pass through focus, back up in small increments; large turns overshoot the sweet spot.

At night, begin with the Moon if available. Lunar craters near the terminator line are ideal focus targets because they contain strong contrast edges. Once the Moon is sharp, move to planets. For Jupiter, do not expect a giant disk in a 70mm scope. Expect a small bright disk with visible moons and occasional banding in stable air.

If stars never become points and remain fuzzy blobs, check for thermal instability and atmospheric seeing. Turbulent air can mimic poor focus. Wait 10 to 15 minutes, reduce magnification, and try again. Better seeing often appears in short windows, so patient observation outperforms constant equipment adjustments.

First-Night Observation Plan That Builds Confidence

A good first night is not about seeing everything. It is about seeing three targets clearly and ending with confidence. Begin at twilight and follow a fixed progression: Moon, bright planet, bright cluster. This progression moves from easiest to slightly more demanding targets and gives your eyes and mount skills time to settle.

Moon session: use low power, then medium power once focus is stable. Explore crater rims and shadow boundaries near the terminator. Planet session: Jupiter is best with low-to-medium power in a Gskyer 70mm. You should detect the four major moons as tiny points aligned near the planet. Cluster session: finish on Pleiades or the Beehive Cluster for a bright, wide-field success target.

Keep a simple observing log with date, location, target, eyepiece used, and sky quality. This turns random viewing into measurable progress and helps identify what magnification and target combinations work best for your local conditions.

If clouds interrupt, treat the session as a skills practice night. Rehearse finder alignment, mount tracking, and eyepiece swaps. Mechanical fluency built on cloudy nights pays off during clear windows when time is limited.

Eyepiece and Magnification Strategy for Gskyer 70mm Owners

For a 70mm beginner refractor, practical magnification usually sits in the 20x to 90x range. Marketing claims of extreme magnification are not useful in real skies. Detail and contrast matter more than raw power. A sharp 60x view is better than a blurry 150x view every time.

Use low power to find and center targets, then step up gradually. If the image gets dim, shaky, or soft, back down one magnification step. This "up one, down one" method quickly finds the best practical magnification for current seeing conditions.

For Moon and clusters, low-to-medium magnification is often ideal. For Jupiter and Saturn, medium magnification typically gives the best balance between detail and brightness. Keep sessions simple: one low-power eyepiece and one medium-power eyepiece will outperform a large accessory kit if your setup fundamentals are solid.

Top Gskyer Beginner Mistakes and Immediate Fixes

  • Starting with highest magnification: switch to low power first, center target, then increase slowly.
  • No finder alignment: align in daylight to remove nighttime target-hunting frustration.
  • Observing through a window: move outside; indoor glass introduces distortion and thermal blur.
  • Unstable tripod posture: lower tripod height and observe seated when possible.
  • Expecting deep-sky detail in city light: prioritize Moon, planets, bright clusters, and double stars.
  • Over-tightening mount controls: back off tension slightly for smoother tracking.
  • Skipping a checklist: use a 5-step pre-observing routine every session.

Most users who feel their telescope is defective can recover full usability with these fixes in one session. Telescope confidence is cumulative. Once your setup workflow becomes routine, each clear night gets easier and more productive.

Your First 30 Days With a Gskyer Telescope: A Week-by-Week Plan

The biggest difference between people who keep using their first telescope and people who abandon it is structure. A simple 30-day plan gives you momentum, measurable progress, and realistic expectations. Week one is setup confidence. Week two is target acquisition speed. Week three is observing quality and note-taking. Week four is consistency and small upgrades. This progression turns the scope from a confusing gadget into a reliable hobby tool.

In week one, you are not chasing difficult objects. You are building mechanical fluency. Practice tripod setup, finder alignment, and low-power focus until you can complete the process without second-guessing. Repeat this twice in daylight and once at dusk. By the end of week one, your setup time should drop below fifteen minutes and your vibration settle time should feel predictable. This creates a stable base for every future session.

Week two is all about the low-power sky tour. Focus on the Moon, Jupiter, and one bright star cluster. Do not attempt every object in one night. Do one object well, then repeat it the next night with a slightly different eyepiece. This builds pattern recognition. You start noticing what true focus looks like, what atmospheric blur feels like, and how mount handling improves when you track smoothly instead of making abrupt corrections.

Week three introduces logging. Write down date, sky clarity, target, eyepiece used, and one observation detail. For example: "Jupiter: four moons visible, slight band hint, best clarity at medium power for two minutes before shimmer." These notes are not busywork. They are your personal quality control system. When future sessions feel disappointing, logs reveal whether conditions changed or setup drifted.

Week four is optimization. You now know your common friction points: mount shake, finder drift, or eyepiece confusion. Choose one improvement and fix it completely. It might be seated observing posture, a clearer pre-session checklist, or reorganizing your gear bag for faster setup. Small process improvements are more valuable than random accessory buying because they increase consistency across every session.

At the end of day thirty, evaluate success by usage, not perfection. If you ran six to ten sessions and can reliably acquire and focus three target classes, you are succeeding. Astronomy skill compounds over time. A beginner scope used frequently will outperform a premium scope used rarely.

Using a Gskyer Telescope in City Skies vs Dark Skies

Many beginners assume their telescope is underperforming when the real limitation is sky brightness. A 70mm refractor behaves very differently in a bright suburban or urban environment compared with a dark rural sky. In city conditions, bright targets dominate: Moon features, Jupiter with moons, Venus phase changes, and select double stars. In darker skies, open clusters become more rewarding and faint star fields gain depth.

City observing requires tactical adaptation. Start sessions with bright targets while your eyes and setup settle. Use lower magnification longer than you think you need, because dim objects lose contrast quickly under sky glow. Shield direct streetlight from your viewing eye and avoid observing over rooftops or parking lots radiating heat. Even modest site adjustments can noticeably improve sharpness and contrast.

Dark-sky sessions change the strategy. You can spend more time scanning wide fields and recognizing star patterns around clusters. The Gskyer's portability becomes a major advantage here because setup is fast and transport is easy. For dark trips, pack a simple checklist: tripod, tube, diagonal, two eyepieces, red light, and printed target list. Keeping the kit minimal reduces the chance of forgetting a key component.

One common mistake is using the same target plan everywhere. Build two plans: a city plan and a dark-sky plan. City plan emphasizes high-contrast objects and fast confirmations. Dark-sky plan emphasizes wide-field exploration and cluster-rich routes. This approach avoids disappointment and makes each location feel successful in its own way.

If your only access is city sky, do not assume astronomy is "not for you." With realistic target selection and repeatable setup habits, a Gskyer can still deliver satisfying sessions. The right measure of progress is not how faint an object you can detect, but how confidently you can plan, execute, and enjoy regular observing nights.

Family and Classroom Use: Making One Telescope Work for Multiple People

A Gskyer telescope is frequently used in shared settings: siblings, parent-child sessions, and school clubs. Shared use introduces extra complexity because each person handles focus, mount pressure, and eyepiece posture differently. Without a process, each viewer accidentally degrades alignment or focus for the next person. The fix is a simple handoff protocol.

Use a "driver and observer" rotation. One person controls mount movement while the current observer keeps eye position at the eyepiece. After each view, the observer reports whether object center and focus remain stable. If not, the driver makes small corrections only. This prevents sudden tube movement and reduces queue frustration in group settings.

Create a one-page quick-start card attached to the tripod: remove lens cap, low-power eyepiece first, align finder before dark, focus slowly, then increase magnification only after stable center. In group sessions, this card becomes the shared source of truth. It reduces conflicting instructions and keeps everyone on the same operational sequence.

For kids, keep early sessions short and target-rich. Ten successful minutes beats one frustrating hour. Let each child identify one feature, such as a crater edge or Jupiter moon alignment, and log it with a simple drawing. This builds ownership and memory. The telescope becomes a discovery tool, not an adult-controlled demonstration device.

In classroom outreach, preselect two guaranteed targets and one bonus target. If sky or time fails, you still deliver a successful event. Reliability is essential for education contexts. A repeatable workflow with a modest telescope can outperform a high-spec setup with poor coordination.

Product Recommendations and Upgrade Paths for Better Results

If your Gskyer session success is high, keep using it and add experience before upgrading. If you consistently struggle with mount stability or target finding, moving to a better beginner scope can dramatically improve outcomes. The right upgrade is based on friction reduction, not just aperture size.

Editor's Pick — Best Value Alternative
Celestron AstroMaster 70AZ refractor telescope

Celestron AstroMaster 70AZ

A practical step up for beginners who want clearer setup instructions, more stable hardware, and a stronger support ecosystem. Excellent first-night success rate for Moon and bright planets.

Gskyer 70mm AZ refractor telescope

Gskyer 70mm AZ Refractor

Keep this if budget and portability are top priorities. Works best when paired with a disciplined setup checklist and realistic target expectations.

View on Amazon →
Celestron StarSense Explorer LT 114AZ telescope

Celestron StarSense Explorer LT 114AZ

Best next-step if your biggest problem is target finding. Smartphone-assisted guidance makes first-month usage dramatically easier in suburban skies.

View on Amazon →

Frequently Asked Questions

Why is my Gskyer telescope blurry at night?

Most blur comes from high magnification, finder misalignment, thermal air turbulence, or observing through a window. Use low power first and re-check focus on the Moon.

Can I see Saturn's rings with a Gskyer 70mm?

Yes, under stable skies you can detect Saturn's ring shape at moderate magnification, though fine structure will be limited compared to larger apertures.

What is the best first object to view?

The Moon is by far the best first-night object because it is bright, high-contrast, and easy to focus.

Do I need all included eyepieces?

No. Start with one low-power and one medium-power eyepiece. Mastering these two gives better results than frequent eyepiece swapping.

How often should I align the finder?

Check finder alignment every few sessions and after transportation. Minor shifts are common and can make target acquisition frustrating if not corrected.