How to Observe Sunspots with a Telescope — Complete Safety Guide (2026)
Telescope Advisor Logo Telescope Advisor
The Sun in ultraviolet light captured by NASA's Solar Dynamics Observatory — bright active regions and sunspot groups are visible across the solar disk

Solar Observing Guide · Solar Cycle 25

How to Observe Sunspots with a Telescope — Complete Safety Guide

Solar Cycle 25 is at its peak in 2026, meaning the Sun's surface is covered with more sunspots than at any time in the past decade. Observing these dark, planet-sized regions of intense magnetic activity is one of the most accessible and rewarding forms of daytime astronomy — but it must be done safely. This step-by-step guide covers exactly how to observe sunspots through any telescope, what equipment you need, what to look for, and how to record your observations.

Safety rule #1Never point unfiltered at Sun
Best methodFront-mounted white-light filter
Solar max 2026Peak sunspot activity
Min. apertureAny telescope + filter
By Telescope Advisor Editorial Team Published: Updated: Reviewed & approved by Juhi Sahni, Senior Editor Editorial Standards

The #1 Rule: Safety First — Always

Never point any telescope, binoculars, or finder scope at the Sun without a properly fitted front-mounted solar filter. The concentrated sunlight passing through a telescope will cause instant and permanent retinal damage — there is no pain signal, no warning, and no cure. The damage occurs in a fraction of a second, faster than your blink reflex. This is not a theoretical risk: every year, amateur astronomers suffer eye damage from unsafe solar observing practices.

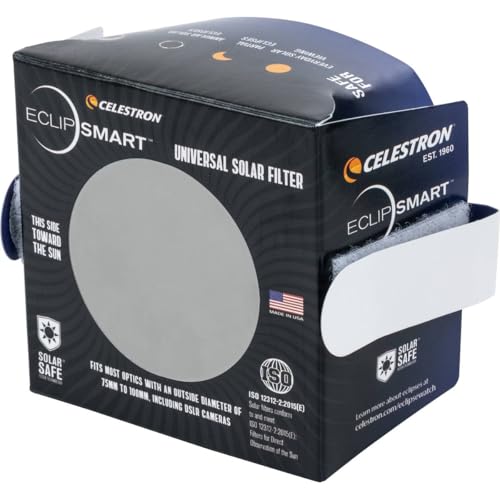
The only safe way to observe sunspots through a telescope is to use a front-mounted full-aperture solar filter that covers the objective end of the telescope. These filters block 99.999% of incoming sunlight — including invisible ultraviolet and infrared radiation — before it enters the optical system. Never use eyepiece-end filters (which can crack from the concentrated heat), smoked glass, CDs, Mylar balloons, or any improvised solution. Only ISO 12312-2 certified solar filters are safe. For a complete guide to choosing the right filter for your telescope, see our best solar filter guide.

Critical Safety Checklist — Confirm Before Observing

  • ✅ Filter is securely attached to the front of the telescope — not the eyepiece
  • ✅ Filter surface has no pinholes, scratches, or damage — inspect before each use
  • ✅ Finder scope is either removed or fully capped — never look through an unfiltered finder
  • ✅ No one else points the telescope at the Sun while you are not at the eyepiece
  • ✅ Children and guests are supervised and briefed on the safety rules

Method 1: White-Light Solar Filter (Recommended)

A white-light solar filter is the simplest and most affordable way to observe sunspots. These filters are made from specially coated glass or optically polished polymer film (such as Baader AstroSolar) that blocks 99.999% of sunlight while transmitting a neutral white image of the Sun. When attached to the front of your telescope, the filter makes solar observing as simple and safe as night-time observing — just aim at the Sun and focus.

Through a white-light filter, sunspots appear as dark regions on the Sun's brilliant yellow-white disk. The largest sunspots are visible even at 30–50× magnification. At 80–100×, you can see the detailed internal structure of each spot: the dark central umbra (the coolest region, about 3,500°C) surrounded by the lighter, filamentary penumbra (about 5,000°C, compared to the surrounding solar surface at 5,500°C). The Sun's visible surface — the photosphere — shows subtle granulation, a seething pattern of convection cells the size of Texas, best seen at 100–150× in apertures of 100mm or larger.

Method 2: Solar Projection (Eyepiece Projection)

Solar projection is a filter-free method that works by projecting the Sun's image through the telescope onto a white card or screen. It is the safest method for group observing because multiple people can view the projected image simultaneously. However, it has limitations: the image quality is lower than through a filtered eyepiece, and the telescope must be aimed very carefully to avoid heat damage to internal components.

To use projection: attach a white card to a board or tripod about 12–18 inches behind the eyepiece. Aim the telescope at the Sun using the shadow method (align so the telescope casts the smallest possible shadow). Focus the eyepiece until the Sun's disk appears sharp on the card. Sunspots appear as dark spots on the projected image. Never look through the eyepiece while projecting — the focused beam can damage your eye even in projection mode. This method works best with refractors (closed tube, no central obstruction) and should not be used with Schmidt-Cassegrain or Maksutov telescopes, as the concentrated heat can damage internal components.

What Sunspots Look Like: Structure and Evolution

A fully developed sunspot is a thing of complex beauty. Through a telescope at 80–120× with a white-light filter, you can observe the following features:

1

The Umbra — The Dark Core

The umbra is the darkest part of a sunspot, appearing black in visible light. It is about 3,500°C — roughly 2,000°C cooler than the surrounding photosphere — and its darkness is purely a temperature contrast effect, not a hole in the Sun. The largest umbras are several times the diameter of Earth. In high-quality optics at 150×+, the umbra often shows a faint, structured brightness variation — brighter "umbral dots" that are thought to be columns of hotter gas rising through the spot's magnetic field.

2

The Penumbra — The Fibrous Halo

The penumbra surrounds the umbra and appears as a lighter grey region with a distinctive radial, fibrous structure — like threads of dark and light extending outward. These filaments trace the magnetic field lines that emerge from the solar interior. The penumbra is easier to see than the umbra's internal detail and is visible in 70mm telescopes at 80× under good daytime seeing conditions.

3

Sunspot Groups — Active Regions

Sunspots rarely appear alone. They form in groups called active regions, typically arranged in a bipolar pattern: a leading spot (usually larger and more stable) followed by a trailing spot (often more fragmented). The largest groups can stretch across 200,000 km — more than 15 Earth diameters — and contain dozens of individual spots of varying sizes. During Solar Cycle 25's peak, such large groups are visible every few weeks. The number and complexity of sunspot groups are used to calculate the International Sunspot Number, a key metric of solar activity.

Recommended Equipment for Sunspot Observation

You do not need a dedicated solar telescope to observe sunspots. Any telescope can be used for white-light solar observing with the correct front-mounted filter. Here are our top recommendations:

Editor's Pick — Best Solar Observing Kit
Celestron AstroMaster 70AZ

Celestron AstroMaster 70AZ + EclipSmart 70mm Solar Filter

The most cost-effective way to start solar observing. The 70mm refractor paired with the Celestron EclipSmart 70mm front-mounted solar filter creates a dedicated white-light solar observation system. At 50–80×, sunspot umbras and penumbras are clearly visible, and the Sun's surface granulation starts to appear on steady days. The filter screws onto the telescope's lens hood securely and includes a safety strap. The refractor's closed tube design also makes it safe for solar projection if you want to try that method.

Celestron EclipSmart Universal Solar Filter

Universal Solar Filter

Fits most 4–8 inch telescopes. Baader AstroSolar film provides crisp white-light views. Ideal if you already own a telescope.

Sky-Watcher Heritage 130P

Sky-Watcher Heritage 130P + Filter

The 130mm aperture reveals finer sunspot detail and surface granulation. Add a 130mm solar filter for a powerful solar setup.

How to Sketch Sunspots — A Beginner's Guide

Sketching sunspots is one of the most rewarding solar observing activities. It trains your eye to see subtle detail, creates a permanent record of solar activity, and contributes to understanding the Sun's 11-year cycle. The technique is simple: project or filter the Sun's image onto a white surface, trace the disk outline, then carefully sketch the position, size, and shape of each sunspot group.

Use a 5-inch (125mm) circle template to pre-draw observation circles in your notebook. Record the date, time (UT), telescope and magnification used, and the seeing conditions (excellent, good, fair, poor). Sketch each sunspot group at the correct position, with the umbra filled in solid black and the penumbra indicated by lighter shading or short radial lines. Note any faculae (bright patches near the Sun's limb) with light pencil strokes. Over consecutive days, the same group rotates across the solar disk in about two weeks, allowing you to track its evolution — spots grow, merge, fragment, and eventually decay. The Astronomical League's Sunspot Program provides standardised observing forms and certification for those who want to take their observations further.

Solar Cycle 25 — Why 2026 Is the Best Year for Sunspot Observation

Solar Cycle 25, which began in December 2019, has exceeded all initial predictions. The original forecast called for a relatively weak cycle with a sunspot maximum of approximately 115, but actual sunspot counts have been significantly higher — regularly exceeding 150 and producing some of the most active solar conditions in over 20 years. In 2024, the Sun produced the strongest geomagnetic storm since 2003 (the May 2024 G5 event), and activity has remained elevated through 2025–2026 as the cycle reaches its true peak.

For sunspot observers, this means there are almost always multiple sunspot groups visible on the solar disk. On most days in 2026, there are several groups visible, with the largest spots spanning tens of thousands of kilometres. The Sun's rotation period of approximately 27 days means that large active regions remain visible for roughly two weeks as they cross the Earth-facing side of the Sun — giving you ample time to observe and sketch them through multiple sessions. To check today's sunspot activity before heading out, visit NOAA's Space Weather Prediction Center for real-time solar images and the current sunspot number.


Frequently Asked Questions

Is it safe to look at the Sun through a telescope with a filter?

Yes — with a properly fitted front-mounted ISO-certified solar filter that covers the full aperture. Inspect the filter for damage before each use. Never use eyepiece-end filters. Always supervise children and guests.

What magnification do I need to see sunspots?

30–50× shows the largest sunspot groups clearly. 80–120× reveals umbra and penumbra structure. 150×+ shows solar granulation and fine detail, but requires steady daytime seeing conditions.

Can I use binoculars to observe sunspots?

Only with front-mounted solar filters on both objectives. Solar binoculars (such as the Celestron EclipSmart 10×25) come with built-in filters and are safe. Never use regular binoculars without filters — the risk of eye damage is extremely high.

What is the best time of day to observe sunspots?

Early morning (sunrise to about 10 a.m.) offers the steadiest atmospheric seeing because the air is coolest and most stable. Late afternoon can also be good. Midday sun is highest but often suffers from heat turbulence.

How big are sunspots compared to Earth?

The largest sunspots are several times the diameter of Earth — a truly large spot can exceed 80,000 km across. Even medium spots are roughly Earth-sized. Sunspot groups can stretch across 200,000 km.

Why are sunspots darker than the rest of the Sun?

Sunspots appear darker because they are cooler than the surrounding photosphere — about 3,500°C vs 5,500°C. The intense magnetic fields in sunspots inhibit the convective transport of heat from the Sun's interior.