Moon-Mercury Conjunction June 16, 2026: U.S. Viewing Guide and Low-Horizon Strategy
Telescope Advisor Logo Telescope Advisor
Mercury image from NASA

Sky Event Guide · June 2026

Moon-Mercury Conjunction June 16, 2026: U.S. Horizon Tactics for a Harder Target

Mercury events reward planning more than aperture. This guide focuses on low-altitude timing, haze management, and realistic visual expectations so you can spot Mercury near the Moon without guesswork.

June 16

Primary Date

W-NW

Evening Direction

+30 to +70

Min After Sunset

8x42+

Best Entry Optic

By Telescope Advisor Editorial Team Published: Updated: Editorial Standards

Quick Answer

The Moon-Mercury conjunction is most useful shortly after sunset on June 16 for many U.S. observers, with best visibility depending heavily on local horizon quality. Start around 30 minutes after sunset and prioritize a flat west-northwest skyline. Mercury is low and can disappear quickly into haze, so fast target acquisition is essential.

Unlike Jupiter or Venus events, Mercury conjunctions are often won or lost by terrain and transparency rather than telescope size. A simple binocular-first workflow gives the highest success rate: find the Moon, sweep nearby, then switch to low-power telescope only after Mercury is confidently locked.

🔭

Not sure which telescope actually fits your goals?

Answer 5 quick questions about your budget, observing targets, and experience level — our Telescope Finder Tool recommends a specific model in under 2 minutes.

Find My Telescope →

Timing Model for U.S. Observers

Mercury sits low and visibility decays fast after sunset when haze is present. The best strategy is to arrive before sunset, pre-align your viewing direction, and begin scanning soon after civil twilight starts.

ZoneStart ScanningHighest Success WindowLikely Fade Window
EDTSunset + 25 min+32 to +52 min+65 min
CDTSunset + 25 min+34 to +54 min+67 min
MDTSunset + 28 min+36 to +56 min+70 min
PDTSunset + 30 min+38 to +58 min+72 min
AKDTSunset + 30 min+40 to +60 min+75 min
HSTSunset + 26 min+34 to +54 min+68 min

Why Mercury Conjunctions Feel Harder Than Other Moon-Planet Pairings

Mercury is generally low at twilight and often viewed through thicker atmospheric layers. That means more scattering, more haze interference, and less stable contrast. Even when astronomical geometry is favorable, local horizon quality can dominate outcomes. A mediocre west horizon can erase the event for one neighborhood while a nearby open view produces a clean sighting.

Another challenge is expectation mismatch. Many people assume conjunction means "objects touching" or extremely bright side-by-side visuals. In reality, spacing can still be several degrees and apparent brightness can be modest. The event is still valuable: you get a guided Mercury find using the Moon as a positional cue.

Gear That Works for Mercury Windows

10x50 binocular

10x50 Mercury Finder

Fast, wide field for low-horizon sweep.

70mm refractor

70mm Low-Power Telescope

Useful once Mercury is confidently found.

NexStar 8SE

8SE for Steadier Follow-Up

Tracking support if conditions stay clear.

Detailed Strategy: Low-Horizon Mercury Session Without Frustration

Mercury sessions fail when observers underestimate horizon physics. Light pollution is only one part of the problem. At low altitude, every layer of humid or dusty air between you and the target reduces contrast and blurs shape. The practical response is not to chase expensive optics first. The practical response is to optimize location, start time, and field workflow. This section gives you a field-ready sequence that works in real suburban conditions.

Before sunset, stand at your observing point and identify the cleanest west-northwest corridor with minimal trees, rooftops, or distant haze sources. Many observers pick a convenient backyard corner only to discover that one roofline blocks the key altitude range. If your home site is partially blocked, use a nearby parking lot, hill, or shoreline with cleaner horizon geometry. A two-mile relocation can transform session quality.

Next, simplify your equipment decision tree. For Mercury conjunctions, complexity is the enemy. Use one binocular, one telescope, and two eyepieces max. Keep accessory swaps minimal. The first successful lock often happens in a short window; if you are still assembling gear during that period, you miss the event. Prepare all caps removed, focus roughly preset on a distant terrestrial target before sunset, and tripod height adjusted in advance.

When scanning begins, lock the Moon first. The Moon is your positional anchor and your confidence anchor. Once locked, sweep the expected Mercury side in short arcs rather than broad random motions. Short arcs prevent losing orientation and reduce cognitive overload. If you do not find Mercury immediately, pause and reset from the Moon again. Re-centering prevents drift and frustration.

If haze is stronger than expected, shift priorities. Instead of chasing detail, prioritize clear confirmation and repeated reacquisition. Repeated reacquisition means you can lose and recover Mercury quickly, which is a practical skill for all twilight targets. Detail can come later under better conditions. Confirmation and reacquisition are success markers too, especially for new observers.

Safety matters during twilight sessions. Never sweep near the setting Sun with optical instruments. Start only when solar altitude is safely lower and your scan direction is clear of direct solar glare. If you are unsure, wait a little longer and use naked eye until Sun position is unquestionably safe. No conjunction is worth an unsafe optics practice.

A useful advanced practice is horizon quality logging. Rate your horizon transparency from 1 to 5 and record wind direction. Over several sessions, patterns emerge. You might learn that southwest wind gives cleaner transparency at your site while still air traps haze. These local patterns let you choose better backup dates and make stronger go/no-go decisions in future conjunctions.

Another practical upgrade is calibration nights. Spend one or two evenings before June 16 practicing west-horizon target lock on bright stars or Venus when available. This trains your body mechanics and tripod movement in the same azimuth band without event pressure. Practiced movement reduces fumbling on event night and increases confidence when the target is subtle.

For family sessions, set expectations clearly: Mercury may be subtle, and that is normal. Frame the event as a guided find challenge rather than a dramatic giant-planet show. Kids and first-time observers enjoy the process when expectations match reality. Add a simple success marker, such as "everyone confirms the Moon and Mercury together at least once," and celebrate that milestone.

End the session with one photo and one written note. Your photo does not need to be perfect. Its value is documentary context. Your note should include first lock time, best visibility minute range, and cause of fade-out. Over time this creates a personal Mercury playbook that significantly improves your success rate on future evening elongations and moon-planet pairings.

The key takeaway: Mercury conjunctions are not impossible, they are procedural. If you control horizon, timing, and workflow, your odds improve dramatically. June 16 is a strong opportunity to prove that a disciplined approach beats random searching every time.

Advanced Field Framework: From One Mercury Sighting to Consistent Twilight Success

Once you complete one successful Moon-Mercury conjunction session, the next goal is repeatability. Repeatability means your process still works across different evenings, different humidity levels, and different sites. This matters because Mercury opportunities are brief and often weather-sensitive. If your method only works in ideal conditions, you will miss most windows. The framework below is designed to reduce that risk by turning observational steps into a stable sequence.

Start with a two-layer site strategy. Layer one is your convenience site close to home where setup is easy and fast. Layer two is your clarity site with cleaner horizon and lower haze risk, even if travel time is longer. The convenience site is useful for quick attempts and routine practice. The clarity site is your backup when horizon transparency is critical. Choosing between them based on forecast conditions is often the highest-impact decision of the evening.

Create a countdown checklist anchored to sunset rather than clock time. Example: sunset minus 45 minutes, confirm final site decision and departure. Sunset minus 20 minutes, unpack and pre-focus optics on distant terrestrial objects. Sunset plus 10 minutes, complete first naked-eye horizon sweep. Sunset plus 25 minutes, start binocular scan anchored on the Moon. Sunset plus 35 minutes, begin telescope handoff only if Mercury is already confirmed. This timeline prevents late starts and decision drift.

Use directional reference points for faster target reacquisition. Pick two horizon markers, such as a hill notch and a rooftop edge, and note where the Moon appears relative to those markers. If you lose Mercury after moving optics, those markers let you rebuild orientation immediately. Without reference points, observers tend to drift into broad random sweeps and waste the highest-contrast part of twilight.

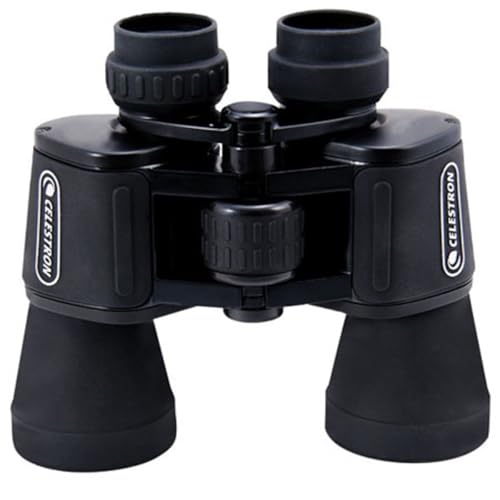
Control your scan geometry. Mercury hunts are most efficient with short, overlapping arcs rather than large swings. Short arcs maintain spatial memory and reduce fatigue. Each arc should return to the Moon anchor before the next pass. This “anchor-return” rhythm is simple but highly effective in low-contrast conditions and helps beginners maintain confidence during difficult searches.

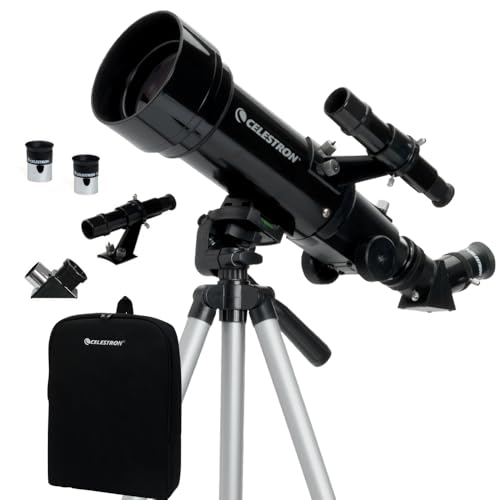
Be deliberate about magnification ceilings. Mercury near horizon is rarely kind to high power. Set a hard cap before the session, such as 60x to 100x depending on seeing. If the image softens beyond that cap, step down immediately. A smaller stable image is more informative than a larger blurred one. Magnification discipline is one of the most reliable quality improvements for twilight planetary work.

Develop a weather interpretation habit specific to horizon events. General forecasts can report good sky quality while low-altitude haze remains severe. Track humidity trends and smoke or dust advisories on the day of observation. If humidity rises sharply toward sunset, prioritize binocular confirmation early and reduce expectations for telescope detail. This adjustment is not pessimism; it is efficient risk management.

If you run group sessions, assign roles to avoid crowd confusion. One person calls time checks, one person maintains orientation references, and one person handles telescope alignment. Rotating everyone through the same role is optional; role clarity during the critical window is not. Structured teamwork produces far better results than simultaneous independent searching.

Photography during Mercury conjunctions should stay lightweight. Take one wide context frame that shows Moon and horizon geometry, then one tighter frame if Mercury is secure. Avoid long camera setup trees that consume your best visibility minutes. For most observers, conjunction photography is documentary and educational, not deep post-processing. Prioritize visual confirmation first.

Document operational metrics, not just emotions. Useful entries include first Moon lock time, first Mercury lock time, best visibility interval, and fade-out cause. Over several events, these metrics reveal your local patterns and improve predictions. Emotional notes are still valuable, but metrics are what drive process improvement.

Integrate this conjunction with adjacent June events. Use the same horizon site and timing workflow for the June planetary lineup sessions. Reusing workflow lowers preparation burden and builds muscle memory quickly. The biggest gains in observational consistency come when individual events are connected into a single operating rhythm rather than treated as isolated efforts.

Finally, define success in tiers. Tier one: confirmed Moon-Mercury pairing in binoculars. Tier two: repeatable reacquisition after target loss. Tier three: stable telescope follow-up with clean planetary hold. Tiered success prevents all-or-nothing thinking and keeps motivation high when conditions are imperfect. In practical astronomy, consistent tier-one and tier-two wins often matter more than occasional tier-three perfection.

Troubleshooting Lab: Fast Fixes for the Most Common Mercury-Session Failures

Twilight Mercury sessions can fail quickly, but many failures have predictable causes. The first failure pattern is direction drift. Observers start in the correct horizon zone, then unconsciously scan wider and lose reference. The fix is simple: return to the Moon anchor every pass and keep sweep width narrow. If you cannot re-lock the Moon quickly, reset your stance and horizon markers before continuing.

The second failure pattern is setup latency. By the time all accessories are arranged, the best contrast window is already gone. Build a compact ready-state kit with only required optics and one backup eyepiece. Keep caps and mounts pre-positioned before sunset. In short windows, pre-session organization matters more than maximum gear availability.

The third failure pattern is misreading haze. A clear upper sky can hide severe lower-atmosphere washout. If Mercury appears intermittently and then vanishes despite stable pointing, assume haze dominance and switch to confirmation mode rather than detail mode. Confirmation mode means short binocular locks, repeated reacquisition, and minimal magnification escalation.

The fourth failure pattern is magnification inertia. Many observers stay too long at high power after image quality degrades. Apply a strict degradation rule: if image stability drops for three consecutive checks, step down power immediately. Lower power often restores practical usability and keeps the session productive instead of frustrating.

The fifth failure pattern is safety hesitation near bright twilight. If uncertainty about Sun position appears, pause optics and re-establish safe geometry with naked-eye checks. Safety pauses are part of professional workflow. They are not a loss of time; they protect you from risky pointing behavior in difficult horizon lighting.

The sixth failure pattern is no backup plan. Mercury opportunities are weather-fragile, so one blocked evening should not end your attempt. Prepare adjacent-date retries and at least one alternate site with cleaner horizon. A flexible plan converts apparent failure into a delayed success with minimal additional effort.

The seventh failure pattern is poor documentation. Without notes, observers repeat the same mistakes next event. Capture quick diagnostics: start time, lock time, best visibility span, and failure trigger. These entries make future troubleshooting faster and reduce guesswork under pressure.

The eighth failure pattern is expectation mismatch. Mercury conjunctions are subtle by nature. Define success as accurate lock and repeatable reacquisition first, then detail if conditions permit. This mindset keeps morale high and encourages consistent practice. Over several events, that consistency leads to much stronger outcomes than one perfection-focused attempt.

Rapid Reference Checklist for June 16

Use this compressed checklist on event evening. 1) Arrive before sunset and verify west-northwest horizon clearance. 2) Pre-focus binoculars and telescope on distant terrestrial targets. 3) Start scanning around sunset plus 25 to 30 minutes. 4) Lock the Moon first and sweep short arcs toward expected Mercury side. 5) Once confirmed, hold binocular view for confidence before telescope handoff. 6) Keep magnification moderate unless seeing is clearly stable. 7) Stop chasing detail when haze dominates and switch to confirmation goals. 8) Log first lock and fade-out times for future Mercury attempts.

This quick-flow checklist is designed for real-world pressure when twilight changes quickly. If you only remember one principle, remember this: timing plus horizon quality beats equipment complexity. A clear low horizon and disciplined sequence can outperform a larger telescope with poor setup timing. Keep the process simple, execute cleanly, and treat every successful lock as usable progress.

Post-session, spend five minutes converting your notes into next-step actions. If lock time was late, move your start alarm earlier by ten minutes next attempt. If haze erased the final half of your window, prioritize higher-elevation backup sites next time. If telescope handoff was slow, pre-stage your low-power eyepiece before sunset. These small operational edits are what transform a one-time Mercury success into a reliable method you can use for future elongations and moon-planet pairings throughout 2026.

One additional habit that helps dramatically is pre-event rehearsal on the previous evening. Even if Mercury is not ideally placed, practicing tripod orientation, horizon marker identification, and binocular sweep rhythm reduces cognitive load on event night. Rehearsal turns complex actions into automatic steps, which is exactly what you need when twilight visibility changes fast. Observers who rehearse once often report cleaner lock times and less frustration than observers who rely only on same-day preparation.

FAQ

Is this an evening or morning event?
For many U.S. observers this is mainly an evening twilight event around June 16.

Why is Mercury harder than Saturn or Jupiter?
Mercury is usually lower and viewed through thicker, hazier atmosphere near the horizon.

Can I do this without a telescope?
Yes. Binoculars are often enough to confirm the pairing if your horizon is clear.

Should I use high magnification?
No. Start low power; high magnification usually hurts low-altitude twilight targets.

What is the best backup date?
Try adjacent evenings around June 15-17 if weather blocks your main attempt.