Smart Telescopes Explained: The Complete Beginner's Guide to Autonomous Stargazing (2026)
Telescope Advisor Logo Telescope Advisor
An astronomer setting up a smart telescope under a star-filled night sky — the telescope connects wirelessly to a tablet showing a live stacked image of the Orion Nebula

Technology Guide · 2026

Smart Telescopes Explained: The Complete Beginner's Guide to Autonomous Stargazing

Smart telescopes have transformed astrophotography from a technically demanding hobby into something anyone can do in their first night out. But the category is confusing: four major brands, overlapping features, and prices ranging from $350 to $4,000. This guide cuts through the marketing and explains exactly what a smart telescope is, how the technology actually works, and which model fits your goals and budget.

Price range$349 – $4,000+
Key skill neededNone — app-guided setup
Best forDeep-sky imaging
Major brandsZWO, Dwarf, Unistellar, Vaonis
By Telescope Advisor Editorial Team Published: Updated: Editorial Standards

What Is a Smart Telescope? The Short Answer

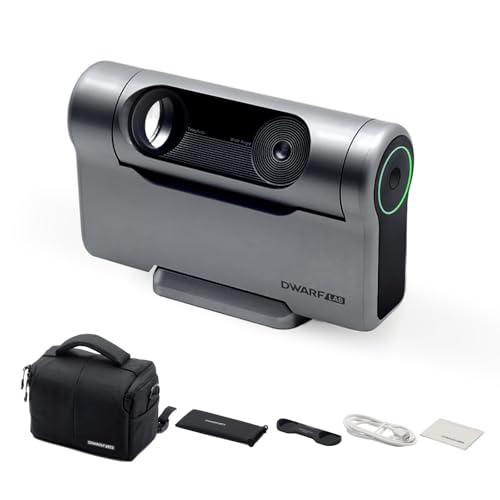
A smart telescope is an all-in-one imaging system that automates the three hardest parts of astrophotography: finding objects, tracking them accurately, and stacking multiple exposures into a finished image. Instead of a traditional optical tube, mount, camera, laptop, and software stack — each purchased separately and configured manually — a smart telescope packs everything into a single unit controlled by a smartphone or tablet app.

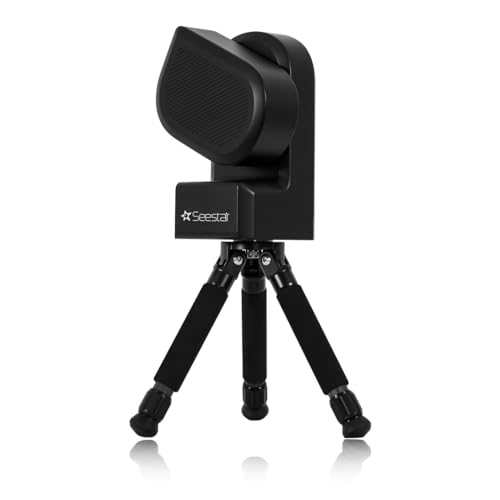
The largest category of smart telescopes uses a small aperture (30–50mm) with a sensitive CMOS camera, an alt-azimuth or equatorial mount with integrated tracking, and built-in image-processing software. You select a target on the app, the telescope slews to it, begins collecting exposures, and within minutes a stacked, processed image appears on your phone screen.

This is distinctly different from "computerized" or "GoTo" telescopes (like the Celestron NexStar series), which can find objects automatically but require you to attach a camera, align the mount, focus manually, and process images on a separate computer. A smart telescope eliminates all those intermediate steps.

What it replaces

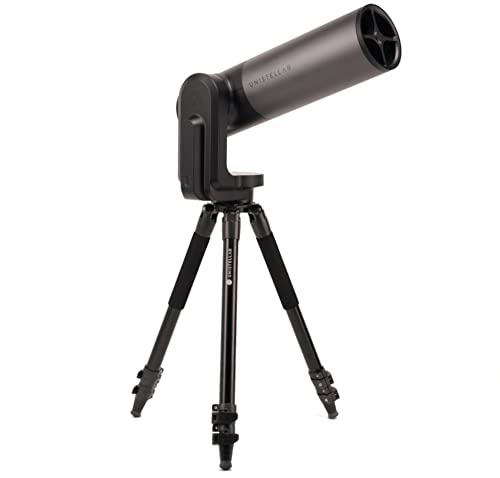
Telescope + mount + camera + laptop + guide scope + software — all in one box. Setup time: 5 minutes.

What it delivers

A stacked, processed astrophoto on your phone within 10–30 minutes of turning it on. No laptop, no polar alignment, no post-processing.

What it cannot do

Very wide fields (use a camera lens), very high-resolution planetary imaging, or the largest/deepest DSOs that benefit from 8"+ apertures.


🔭

Not sure which telescope actually fits your goals?

Answer 5 quick questions about your budget, observing targets, and experience level — our Telescope Finder Tool recommends a specific model in under 2 minutes.

Find My Telescope →

How Smart Telescopes Work: The Core Technology

Every smart telescope on the market in 2026 shares the same fundamental architecture, regardless of brand or price. Understanding these four subsystems helps you compare models intelligently.

1. Optical Tube + Sensor

Unlike traditional telescopes where you swap eyepieces, a smart telescope has a fixed imaging sensor at the focal plane — typically a Sony IMX range CMOS sensor (IMX415, IMX462, IMX533, or IMX585 depending on the model). The sensor size, pixel pitch, and quantum efficiency determine the final image quality more than the aperture does.

Most smart telescopes use refractor optics (lens-based) with apertures between 30mm and 70mm. The ZWO Seestar S50 uses a 50mm f/4.9 apochromatic refractor. The Dwarf 3 uses dual 35mm lenses (one wide-angle, one telephoto). Unistellar and Vaonis use 50–70mm apertures with longer focal lengths. Apochromatic (APO) doublet or triplet designs reduce chromatic aberration — the purple fringing visible around bright stars in cheaper optics.

2. Mount and Tracking

Accurate tracking is what separates a smart telescope from a camera on a tripod. All current models use either an alt-azimuth mount (Seestar, Dwarf) or an equatorial fork mount (Vaonis Stellina, Unistellar). Alt-az mounts are mechanically simpler and cheaper but introduce field rotation in exposures longer than about 30 seconds unless corrected. Equatorial mounts counteract the Earth's rotation more naturally, allowing longer individual exposures.

The telescope automatically platesolves — it takes a short exposure, compares the star pattern against a built-in sky database, and calculates exactly where it's pointing. This means you do not need to align the mount or even know which star is which. The telescope calibrates itself in under two minutes.

3. Image Stacking and Processing

This is the most important innovation. A single 10-second exposure through a 50mm telescope shows only the brightest stars and a faint smudge where a nebula might be. But a stack of 100 such exposures — aligned on the target, not on the stars — reveals detail invisible in any single frame.

The built-in processor performs live stacking: it captures frames continuously, discards low-quality ones (satellite trails, planes, poor seeing), aligns the keepers, and averages them into a progressively cleaner image. You watch the image improve in real time on the app. This is the same technique used by professional astrophotographers, but fully automated.

4. App and User Interface

The app is the control center. You browse a catalogue of objects (typically 5,000–100,000 depending on the brand), select one, and the telescope handles the rest. The app shows a live preview, integrates an astronomical database with object information, and manages the stacking process. Most apps also include a "social" or "gallery" feature where users share their images, creating a community feedback loop that helps beginners gauge what's achievable.

All major brands support both iOS and Android. Wi-Fi connectivity is the standard — the telescope creates its own access point, so no internet connection is required in the field.

Smart Telescope vs Traditional: Which Should You Choose?

This is the most common question from anyone considering their first telescope purchase in 2026. The answer depends entirely on what you want to get out of the hobby.

Factor Smart Telescope Traditional Telescope
Setup time 5 minutes — unfold, power on, connect app 15–45 minutes depending on mount type and accessories
Visual observing No eyepiece — you view on a screen (not the same as looking through optics) Direct visual — what you see is the actual light arriving at your eye
Astrophotography Built-in — stacked images ready in minutes, no extra gear needed Requires camera, laptop, guiding, processing software — significant investment and learning curve
Image quality Good for a 50mm aperture — excellent for bright DSOs, limited for small/faint targets Depends entirely on aperture, camera, and skill — can be world-class with investment
Learning curve Low — app-guided setup, no astronomy knowledge required to start Moderate to steep — need to understand sky, mount alignment, collimation, eyepiece selection
Portability Highly portable — most fit in a backpack (3–8 lbs) Varies widely — Dobsonians are bulky; small refractors are portable
Best target type Bright deep-sky objects: Orion Nebula, Andromeda Galaxy, globular clusters, bright nebulae Everything: planets, Moon, deep-sky, solar (with filters)
Total cost of ownership $349–$4,000 — all-inclusive, no hidden costs $100–$10,000+ — telescope is just the beginning

The short version

A smart telescope is the right choice if you want astrophotography results on your first night out with minimal technical overhead. A traditional telescope is the right choice if you value the visual observing experience — actually looking through the eyepiece — or if you want the flexibility to upgrade components over time. Many enthusiasts eventually own both: a smart scope for quick imaging sessions and a traditional scope for visual observing and planetary work.


Current Smart Telescope Models Compared (2026)

As of mid-2026, four brands dominate the smart telescope market. The table below is the quickest way to understand how they compare on the specs that actually matter.

Model Price Aperture Sensor Mount Weight Best for
ZWO Seestar S50 ~$499 50mm f/4.9 Sony IMX462 Alt-AZ ~3 kg Best overall value
Dwarf 3 ~$349 Dual 35mm Sony IMX415 Alt-AZ ~1.2 kg Best portability
Unistellar eQuinox 2 ~$1,999 50mm f/4.0 Sony IMX347 Equatorial fork ~5 kg Best deep-sky performance
Vaonis Stellina ~$3,999 80mm f/5.0 Sony IMX178 Equatorial fork ~10 kg Best image quality

Prices are approximate as of June 2026 and may vary by retailer. The ZWO Seestar S50 has been discontinued as of early 2026 — see our Seestar S50 discontinuation guide for alternatives at the same price point.

Model-by-Model Breakdown

Editor's Pick — Best Overall Value
ZWO Seestar S50 smart telescope — the best overall value for smart telescope users in 2026

ZWO Seestar S50 — The category benchmark

50mm f/4.9 APO IMX462 sensor Alt-AZ mount Built-in dew heater

The Seestar S50 is the telescope that defined the modern smart telescope category. Its 50mm f/4.9 apochromatic refractor delivers crisp, well-corrected images across the entire field, and the Sony IMX462 sensor offers excellent sensitivity in the near-infrared — meaning it picks up hydrogen-alpha emission nebulae (like the Orion Nebula, Eagle Nebula, and Lagoon Nebula) that some competitors miss. The built-in dew heater is a practical detail that matters more than most reviews admit: in humid conditions, a dewed-up corrector plate ruins a session, and the Seestar handles it automatically.

Note: ZWO has discontinued the S50 as of early 2026. Remaining stock is still available at many retailers, and ZWO has committed to ongoing app support. If you find one at the original $499 price point, it remains excellent value. For a current-production alternative, see our S50 discontinuation guide and the S50 vs S30 comparison.

Check Price on Amazon →

Affiliate link — we may earn a small commission at no extra cost to you.

Dwarflab Dwarf 3 smart telescope — the most portable smart telescope for travel

Dwarf 3 by Dwarflab — Best portability, most versatile

Dual 35mm optics IMX415 sensor ~1.2 kg Wide + telephoto

The Dwarf 3 takes a fundamentally different approach from the Seestar: instead of one aperture, it uses two 35mm optical systems — one wide-angle (for large targets like the Milky Way, Andromeda Galaxy, and constellations) and one telephoto (for smaller DSOs and brighter nebulae). This dual-camera design is unique and gives you framing flexibility no other smart telescope matches. At 1.2 kg and roughly the size of a lunchbox, it is the most portable smart telescope on the market — genuinely backpack-friendly.

The trade-off: The 35mm aperture collects less light than the Seestar's 50mm, and the smaller IMX415 sensor means less total field area. Deep-sky images are noticeably noisier in light-polluted skies. It excels as a travel companion and wide-field imager rather than a faint-nebula hunter.

View on Amazon →

Affiliate link.

Unistellar eQuinox 2 smart telescope — the best deep-sky smart telescope

Unistellar eQuinox 2 — Best deep-sky performance

50mm f/4.0 IMX347 sensor Equatorial mount Longer exposures

The eQuinox 2 uses an equatorial fork mount that tracks the sky's rotation naturally, allowing individual exposures of 60 seconds or more without field rotation (the alt-az competitors are limited to about 30 seconds per frame before stars trail). Combined with the bright f/4.0 optical system and the sensitive IMX347 sensor, this translates to deeper, cleaner images of faint targets — globular clusters resolve more stars, and dim emission nebulae show more structure. The Unistellar app also includes a citizen science programme that lets you contribute to NASA and SETI Institute research.

The trade-off: At $1,999, the eQuinox 2 costs roughly four times the Seestar S50. The mount assembly is heavier and bulkier, and the proprietary tripod (sold separately at additional cost) is needed for the best experience. You are paying for deeper sky reach and the equatorial tracking advantage.

View on Amazon →

Affiliate link.

Vaonis Stellina smart telescope — the premium smart telescope with the best image quality

Vaonis Stellina — Premium, best image quality

80mm f/5.0 APO IMX178 sensor Equatorial fork 2.6° field of view

The Stellina is the most expensive smart telescope on the market at $3,999, and it justifies the price through sheer optical quality. The 80mm f/5.0 triplet apochromatic refractor delivers the sharpest, most colour-corrected images of any smart telescope — the difference is immediately visible when comparing stacked images of the same target side by side. Brighter stars show no purple fringing, nebula details are crisper, and the wider 2.6° field means larger targets like the Andromeda Galaxy and Pleiades fit comfortably within the frame.

The trade-off: The price is prohibitive for most beginners. The 10 kg assembled weight is significantly more than competitors. And the smaller IMX178 sensor has lower quantum efficiency than newer sensors — meaning the computational advantage of the 80mm aperture is partially offset by the less sensitive detector. The Stellina also includes a built-in weather station that automatically stops observation if clouds or wind threaten, a thoughtful premium feature.

View on Amazon →

Affiliate link.

Prices and availability subject to change. All product links are affiliate links — see our editorial standards for our review process.

What to Expect from Your First Night

If you have never used a smart telescope before, here is a realistic walkthrough of a first session — from unboxing to your first astrophoto.

Step 1: Unbox and charge

Most smart telescopes take 2–4 hours to fully charge the internal battery. Do this in the afternoon before your planned session. Download the brand's app and create an account while the battery charges.

Step 2: Set up outdoors

Place the telescope on a flat, stable surface — a picnic table, patio, or the ground works. Turn it on. The telescope broadcasts a Wi-Fi network; connect your phone or tablet to it. Most models also support a "home network" mode where the telescope connects to your home Wi-Fi instead.

Step 3: Autocalibration

The telescope takes a short exposure, identifies the star pattern, and determines its orientation. This takes 30–90 seconds and requires no input from you. Keep the telescope level and still during this process.

Step 4: Select a target

Open the app's object catalogue. Start with a bright, easy target: the Orion Nebula (M42) if it's visible, or the Andromeda Galaxy (M31), or a bright globular cluster like M13 or M22. Tap the target. The telescope slews to it.

Step 5: Watch the image build

The telescope begins capturing and stacking frames. After 30 seconds, you will see a grainy but recognizable image. After 2–3 minutes, the image will be impressively detailed. After 10–15 minutes, you will have a deep, clean astrophoto that rivals what experienced astrophotographers produced with $5,000 rigs a decade ago.

What NOT to expect on your first night

  • Planetary detail (Jupiter's Great Red Spot, Saturn's Cassini Division) — smart telescopes are optimized for deep-sky, not high-magnification planetary imaging.
  • Hubble-quality images from 30 seconds of stacking — the magic happens over 10–30 minutes of accumulated exposure.
  • Perfect focus every time — most smart telescopes use contrast-based autofocus that occasionally misfocuses on very faint targets. A manual focus override in the app usually solves it.
  • Visibility in daylight or through clouds — these are low-light instruments designed for clear, dark skies.

Honest Limitations: What Smart Telescopes Still Struggle With

The smart telescope category has advanced rapidly since the first generation (the original Vaonis Stellina launched in 2019), but significant limitations remain. Knowing them upfront prevents disappointment.

Small aperture limits faint objects

A 50mm aperture gathers about half the light of a 70mm refractor and about one-eighth the light of a 200mm Dobsonian. Faint objects like the Crab Nebula (M1), the Pinwheel Galaxy (M33), and most dark nebulae will appear dim and noisy even after long stacking sessions. The Stellina's 80mm aperture is the best of the group but still modest by traditional standards.

No visual observing

There is no eyepiece. You experience the sky through a phone or tablet screen. This is fundamentally different from the immersive experience of looking through an eyepiece at Saturn's rings. Many visual observers who buy a smart telescope as their only telescope end up disappointed.

Light pollution affects them heavily

While all astrophotography benefits from dark skies, smart telescopes are more affected than larger-aperture setups because they lack the light-gathering power to overwhelm skyglow. In Bortle 7–9 urban skies, a smart telescope produces dull, gradient-ridden images unless you use a light-pollution filter (the Seestar S50 has a built-in dual-band narrowband filter that helps with emission nebulae).

Battery life limits sessions

Most smart telescopes have internal batteries rated for 2–4 hours. This is enough for a casual session but not for an all-night imaging run. Some models (Unistellar, Vaonis) support external USB power banks, which can extend runtime significantly. The Seestar S50's built-in battery lasts approximately 3 hours in moderate temperatures; cold weather reduces it further.

Frequently Asked Questions

Can I use a smart telescope for visual observing (looking through an eyepiece)?

No. Smart telescopes do not have eyepiece holders. They are designed exclusively for electronic imaging — the image is captured by an internal sensor and displayed on your phone or tablet screen. If you want to look through an eyepiece, you need a traditional telescope.

Do I need a dark sky location to use a smart telescope?

Not necessarily, but darker skies produce noticeably better results. In suburban skies (Bortle 5–6), you will get good images of bright DSOs like the Orion Nebula, Andromeda Galaxy, and globular clusters. In heavily light-polluted city skies (Bortle 7–9), emission nebulae (Orion, Lagoon, Swan) can still be imaged with the Seestar S50's built-in dual-band narrowband filter, but reflection nebulae and galaxies will appear washed out.

Can I control a smart telescope from indoors?

Yes, within Wi-Fi range. The telescope creates its own Wi-Fi access point with a range of approximately 20–30 metres (65–100 feet). You can set it up outside, go back inside, and control it from your phone or tablet through a window. This is one of the most practical advantages — particularly in cold climates.

Are smart telescopes good for planetary imaging?

Generally no. Smart telescopes have short focal lengths (250–400mm) that provide too little magnification for detailed planetary imaging. You will see Jupiter's moons and cloud bands, Saturn's rings as a tiny ellipse, and Venus's phase — but nothing approaching the detail a long-focal-length telescope with a planetary camera can capture. For planetary work, a traditional telescope remains essential.

Can I use a smart telescope for daytime observation?

The apps do not support daytime use because the image-stacking algorithms require dark backgrounds to function correctly. Aiming a smart telescope at the daytime sky will produce a washed-out, unusable image. These instruments are designed exclusively for night-sky use.

How long does the battery last on a smart telescope?

Typically 2–4 hours depending on the model and ambient temperature. The Seestar S50 averages about 3 hours. The Dwarf 3 lasts about 2 hours due to its smaller battery. The Unistellar eQuinox 2 and Vaonis Stellina can run for 4+ hours and support external USB power banks for extended sessions. Cold weather significantly reduces all lithium-ion battery performance.