
Best Camera for Telescopes: Complete Guide 2026 | Telescope Advisor
Telescope Advisor Logo Telescope Advisor
Wide-field astrophotography image showing the Milky Way arching over a mountain landscape with a telescope silhouette

Buying Guide · Astrophotography 2026

Best Camera for Telescopes: Complete Guide 2026

Connecting a camera to your telescope opens a universe of photographic possibilities. Whether you want to capture Saturn's rings, the Orion Nebula, or the Moon's craters, this guide covers every camera option and adapter you need.

By Elena Reyes Published: Updated: Editorial Standards
Elena Reyes — Senior Science Editor

Elena Reyes

Senior Science Editor

Covers NASA missions, space science discoveries, and astronomical events for Telescope Advisor. Translates complex astrophysical research into practical insights for backyard observers. Based in the San Francisco Bay Area.

Quick Answer

The best camera for your telescope depends on what you want to image. For planets and the Moon, a dedicated planetary camera like the ZWO ASI224MC captures high-speed video for stacking. For deep-sky objects, a modified DSLR like the Nikon D7500 or Canon EOS 6D Mark II offers the best value. A T-ring adapter (specific to your camera brand) and a 1.25-inch or 2-inch nosepiece are the only hardware required to connect most cameras to a telescope.


🔭

Not sure which telescope actually fits your goals?

Answer 5 quick questions about your budget, observing targets, and experience level — our Telescope Finder Tool recommends a specific model in under 2 minutes.

Find My Telescope →

Connecting a Camera to Your Telescope

Before choosing a camera, it helps to understand the two basic ways a camera attaches to a telescope. Each method suits different types of imaging:

Prime Focus

In prime-focus photography, the telescope acts as the camera's lens — the camera body attaches directly to the telescope's focuser, with the telescope's primary mirror or objective lens projecting the image directly onto the camera's sensor. This requires two components: a T-ring (which mounts to the camera body) and a T-adapter / nosepiece (which slides into the telescope's focuser). The telescope's focal length and focal ratio determine the field of view and image brightness.

Prime focus is the standard method for deep-sky astrophotography with a DSLR and for high-resolution planetary imaging with a dedicated astro camera. The image scale depends entirely on the telescope — a 1000mm telescope with an APS-C DSLR produces roughly the same field of view as a 1000mm camera lens.

Eyepiece Projection

In eyepiece projection, the camera takes a picture through the telescope's eyepiece, effectively photographing the magnified image the eyepiece produces. A camera adapter holds the camera (usually via a smartphone adapter clip or a dedicated eyepiece projection tube) over the eyepiece. This method adds the eyepiece's magnification on top of the telescope's, allowing much higher effective magnification than prime focus alone.

Eyepiece projection is most useful for planetary and lunar imaging where you need high magnification. The trade-off is reduced image brightness and quality compared to prime focus. Smartphone adapters use this method — the phone's tiny camera lens peers through the telescope eyepiece.


DSLR vs Dedicated Astro Cameras

The fundamental choice is between using a general-purpose DSLR or mirrorless camera (which you may already own) and buying a dedicated astronomy camera. Each has clear advantages:

Factor DSLR / Mirrorless Dedicated Astro Camera
Cost$0 if you own one$150–$3,000+
Daytime useYes — one camera for everythingNo — astronomy only
Sensor sensitivityGood, but stock IR filter blocks H-alphaExcellent — optimised for H-alpha and deep-sky
CoolingNone — thermal noise at long exposuresActive cooling in mid/high-end models
Video / Lucky ImagingLimited — lower frame ratesExcellent — high frame rates for planetary
Ease of useFamiliar — like normal photographySteeper learning curve, laptop required
Best forWide-field, Moon, bright deep-sky, beginnersPlanets, faint deep-sky, narrowband, serious imaging

For most beginners, the best path is start with your existing DSLR (if you have one) plus a T-ring adapter. This costs under $50 and lets you learn the basics of telescope imaging before investing in dedicated equipment. Upgrade to a planetary camera for planets and the Moon, or a cooled astro camera for deep-sky, once you've outgrown the DSLR.


Best Planetary Cameras for Telescopes

Dedicated planetary cameras capture high-frame-rate video that you later process through software like AutoStakkert to "stack" the sharpest frames, extracting detail that no single exposure can capture. These cameras connect to your computer via USB and replace the telescope eyepiece.

Editor's Pick — Best All-Round Planetary Camera
ZWO ASI120MC-S planetary imaging camera

ZWO ASI120MC-S

1.2MP Colour Entry-level

The ZWO ASI120MC-S is the most affordable way to get started with planetary imaging. Its compact design fits into any standard 1.25-inch focuser, making it compatible with virtually any telescope. The sensor captures colour video at a solid frame rate, and the included USB cable connects directly to your laptop for live capture through software like SharpCap or FireCapture. For the Moon and bright planets (Jupiter, Saturn, Mars) with a 5-inch or larger telescope, it produces excellent results that clearly show cloud bands, ring structure, and lunar crater detail. The one-shot colour sensor means you don't need separate RGB filters — simplifying processing for beginners. This is the ideal starting point for anyone wanting to try planetary astrophotography without a large investment.

Image N/A

ZWO ASI224MC — Higher Sensitivity Option

1.2MP Colour (one-shot) USB 3.0

The ZWO ASI224MC uses the Sony IMX224 sensor with higher sensitivity and lower noise than the ASI120MC-S, along with a faster 120 fps frame rate at full resolution. The small 1.2MP sensor is perfectly matched to planetary imaging — planets fill the frame nicely without needing a Barlow. It captures sharp lunar detail, crisp Saturn ring structure, and Jupiter's cloud bands and Great Red Spot with a 6-inch or larger telescope. The USB 3.0 interface supports higher data throughput for smoother live-view and faster image capture. If you're ready to invest a bit more for noticeably better low-light performance, the 224MC is a meaningful step up.


Best DSLRs for Telescope Use

If you already own a DSLR, you're halfway to astrophotography. A T-ring adapter (around $20–40) is all you need to connect most DSLRs to a telescope. Here are the best DSLR and mirrorless options for telescope imaging, considering sensor size, low-light performance, and live-view focusing.

Editor's Pick — Best DSLR for Telescope Astrophotography
Nikon D7500 DSLR camera

Nikon D7500

20.9MP APS-C Sensor Excellent ISO performance

The Nikon D7500 strikes an exceptional balance for telescope astrophotography. Its 20.9MP APS-C sensor delivers low noise at high ISO settings (clean up to ISO 6400), essential for deep-sky exposures. The tilting LCD screen is invaluable for framing and focusing when the camera is mounted at awkward angles on the telescope. It shoots 8 frames per second for lunar/planetary bursts and supports an intervalometer for time-lapse deep-sky sequences. The magnesium-alloy body is weather-sealed — useful for dewy nights. Pair it with a Nikon F-mount T-ring and a 1.25-inch or 2-inch nosepiece for prime-focus shooting.

One consideration: the D7500 lacks a built-in intervalometer, so you'll need the optional MC-DC2 remote or a third-party intervalometer for long deep-sky exposure sequences unattended. For deep-sky work, consider having the IR filter removed by a specialist service (or buy a dedicated astro-modified version) to capture the full hydrogen-alpha emission from nebulae.

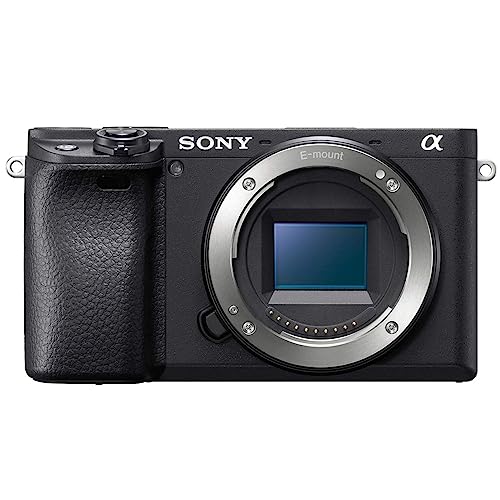
Sony Alpha a6400 mirrorless camera

Sony Alpha a6400 — Mirrorless Choice

24.2MP APS-C Real-time Eye AF

The Sony a6400 is the best option if you want one camera for both astrophotography and everyday photography. Its 24.2MP sensor delivers excellent low-light performance, and the compact mirrorless body is lighter on the telescope focuser than any DSLR — reducing the need to rebalance after attaching the camera. The electronic viewfinder shows a live exposure preview, helpful for rough focusing on bright stars. Sony E-mount T-rings are widely available. The main limitation for deep-sky astrophotography is battery life — the EVF and rear screen drain power faster than a DSLR's optical viewfinder.

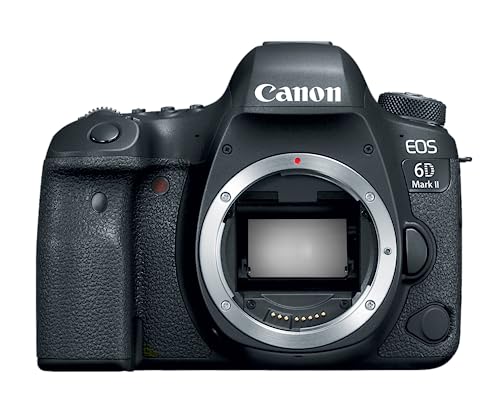
Canon EOS 6D Mark II full-frame DSLR camera

Canon EOS 6D Mark II — Full-Frame Option

26.2MP Full-Frame Built-in intervalometer

The Canon 6D Mark II's full-frame sensor captures a wider field of view through most telescopes than APS-C cameras — important for large deep-sky objects like the Andromeda Galaxy or the Pleiades. Its excellent high-ISO performance and built-in intervalometer (for unattended long-exposure sequences) make it a favourite among deep-sky imagers. The vari-angle touchscreen simplifies framing and focusing. Canon's extensive lens ecosystem also means more options for wide-field nightscapes and star trackers. Uses Canon EF-mount T-rings.


Smartphone Adapters for Telescopes

If you don't own a DSLR and aren't ready to invest in a dedicated camera, a smartphone adapter is the most affordable way to take pictures through your telescope. Modern phone cameras are remarkably capable — with the right adapter and technique, you can capture impressive images of the Moon, decent shots of Jupiter's cloud bands and Saturn's rings, and even wide-field nightscapes of the Milky Way.

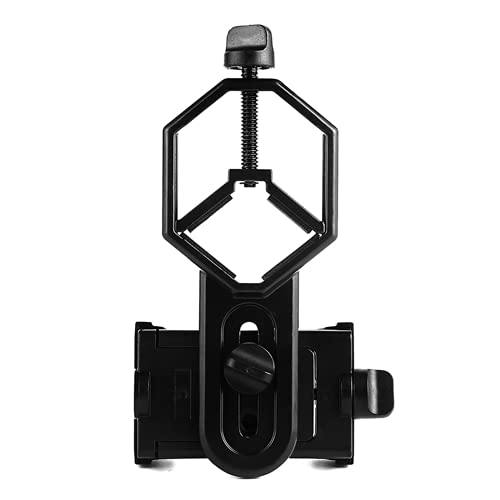
A smartphone adapter holds your phone securely over the telescope eyepiece, aligning the phone's tiny camera lens with the eyepiece's exit pupil. The best adapters offer independent adjustment for each axis and a universal clamp that fits most phone sizes and case thicknesses.

Celestron NexYZ 3-axis universal smartphone telescope adapter

Celestron NexYZ Smartphone Adapter

The Celestron NexYZ is widely considered the best universal smartphone adapter. Its three-axis adjustment system allows precise alignment of the phone camera with the eyepiece axis in X, Y, and Z directions — critical for getting a sharp, centred image. The spring-loaded clamp grips phones up to 3.5 inches wide, including most phones with cases. The adapter fits 1.25-inch and 2-inch eyepieces, and even spotting scopes and binoculars. For Moon photography, it produces sharp, detailed results. For Jupiter and Saturn, you'll get recognisable images showing the planets' discs and Saturn's rings.

SVBONY universal smartphone telescope adapter

SVBONY Universal Phone Adapter — Budget Pick

The SVBONY universal adapter offers similar functionality to the NexYZ at roughly half the price. It includes dual-axis adjustment, a universal phone clamp, and compatibility with 1.25-inch eyepieces. Build quality is good for the price point — plastic construction but with metal tightening screws that hold alignment securely. The main trade-off is the lack of Z-axis (height) adjustment, making it slightly trickier to centre the phone lens precisely over small eyepieces.


T-Ring and Nosepiece Guide

To attach a DSLR or mirrorless camera to a telescope, you need two pieces of hardware:

  • T-ring — A ring-shaped adapter that mounts to your camera's lens mount (Canon EF, Nikon F, Sony E, etc.). It replaces the camera lens and provides a standard 42mm thread (T-thread) on the telescope side. T-rings are camera-brand-specific — a Canon T-ring won't fit a Nikon body.
  • T-adapter / nosepiece — A tube that screws into the T-ring on one end and slides into the telescope's focuser on the other. It comes in 1.25-inch or 2-inch diameters to match your telescope's focuser. A 2-inch nosepiece allows more light to reach the sensor for full-frame cameras.

Many astrophotography starter kits bundle a T-ring and adapter together. The total cost is typically $30–60. Search for "[your camera brand] T-ring adapter" on Amazon — just ensure you select the correct camera mount type. The same T-ring also works with spotting scopes and some binoculars, making it a versatile investment.


Sample Setups by Budget

Entry-Level — Under $100 (If You Own a Telescope)

Smartphone adapter + free stacking software. Best for: Moon, bright planets, sharing eyepiece views on social media.

Intermediate — $200–500

Planetary camera (ZWO ASI120MC-S or ASI224MC) + T-ring for your existing DSLR. Best for: high-quality planetary and lunar imaging, introductory deep-sky with DSLR.

Advanced — $800–2,000

Dedicated cooled astro camera (ZWO ASI533MC Pro or similar) + autoguider setup on an equatorial mount. Best for: serious deep-sky colour imaging, narrowband, large mosaics.

The most important rule: invest in your mount before your camera. An expensive camera on a shaky mount produces worse images than a phone camera on a tracking equatorial mount. See our best astrophotography mounts guide for recommendations.


Frequently Asked Questions

Can I use any DSLR with a telescope?

Yes, any interchangeable-lens camera (DSLR or mirrorless) can be attached to a telescope using a brand-specific T-ring and a nosepiece adaptor. The T-ring replaces the camera lens, and the nosepiece slides into the telescope's focuser. The adapter must match your camera's lens mount type (Canon EF, Nikon F, Sony E, etc.).

What is a T-ring for a telescope?

A T-ring is an adapter that attaches to your camera body in place of a lens, providing a standard 42mm threaded mount (T-thread) on the telescope side. You then screw a nosepiece or T-adapter into the ring to connect it to the telescope's focuser. T-rings are camera-brand specific.

What is the best camera for planetary astrophotography?

A dedicated planetary camera like the ZWO ASI224MC is best for planetary imaging. These cameras capture high-speed video that you later stack to extract sharp frames, revealing detail on Jupiter, Saturn, and Mars that's difficult to capture with a standard DSLR's video mode.

Can I use my smartphone with a telescope?

Yes. A smartphone adapter like the Celestron NexYZ or SVBONY universal adapter holds your phone over the telescope eyepiece, allowing you to take photos and video through the scope. Modern smartphones can capture impressive Moon photos and recognisable images of Jupiter and Saturn.

Do I need a special camera for deep-sky astrophotography?

A standard DSLR works for bright deep-sky objects like the Orion Nebula, Andromeda Galaxy, and star clusters. For fainter objects, a modified DSLR (with IR filter removed) or a cooled dedicated astro camera is recommended to capture hydrogen-alpha emission from nebulae.

What is the difference between a planetary camera and a DSLR for telescope use?

Planetary cameras capture high-frame-rate video (60–300 fps) perfect for lucky imaging — recording thousands of frames and stacking only the sharpest ones. DSLRs capture single exposures and are better suited for deep-sky objects where longer exposures reveal faint detail. Many astrophotographers use both: a planetary camera for planets and Moon, a DSLR for deep-sky.