How to See Neptune With a Telescope (2026): Finder Workflow, Best Magnification, and What to Expect
Telescope Advisor Logo Telescope Advisor
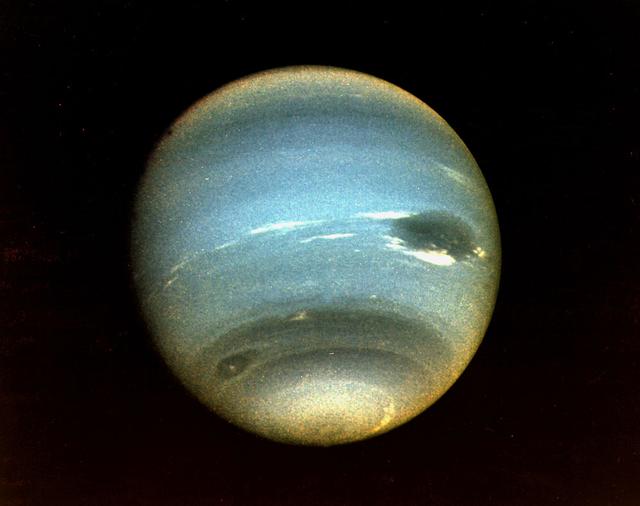
Neptune reference image showing the planet as a deep blue world with cloud features

Planet Observation Guide · Neptune 2026

How to See Neptune With a Telescope (2026): Finder Workflow, Best Magnification, and Real Expectations

Neptune is one of the most rewarding check-box targets in amateur astronomy, but only if you approach it the right way. This guide is built for practical success: where Neptune is in 2026, how to find it quickly, what magnification actually helps, and what your telescope can realistically show at the eyepiece.

Sep 2026

Best viewing window

~2.3"

Angular diameter

150x-220x

Useful range

Realistic

Blue-gray tiny disk

By Telescope Advisor Editorial Team Published: Updated: Editorial Standards

Quick Answer: Can You Actually See Neptune Through a Backyard Telescope?

Yes. You can absolutely see Neptune through a backyard telescope. The catch is that Neptune will not look dramatic like Saturn or Jupiter. In most setups it appears as a tiny blue-gray disk or a non-stellar point, not a richly detailed planet. If your expectation is a subtle but real planetary sighting, Neptune is a fantastic target. If your expectation is high-detail cloud structure, you will be disappointed.

The success formula is simple: observe near opposition, use a sky app to place Neptune correctly, and use enough magnification to separate Neptune from surrounding stars. Most beginners fail because they either look in the wrong star field or use magnification that is too low to prove they are on Neptune.

For most people, the best all-around setup is an 8-inch or 5-inch Schmidt-Cassegrain on a stable mount. A 127mm Mak is also excellent when portability matters. You can even begin with binocular-assisted finding and then switch to a telescope for confirmation. This guide walks that workflow from first attempt to repeatable success.

Why Neptune Is Hard (But Totally Possible)

Neptune challenges beginners for three reasons. First, it is faint compared with bright planets. Second, it is very small in apparent size. Third, it lives in busy star fields where a small charting error means you can stare at the wrong target for twenty minutes and still feel confident you are on track. Once you know those traps in advance, Neptune becomes much more manageable.

At opposition, Neptune shines around magnitude 7.8. That is bright enough for binocular detection in dark conditions, but not bright enough to stand out clearly in light-polluted skies without guidance. Its angular diameter is only about 2.3 to 2.4 arcseconds, so resolving it as a disk takes adequate aperture, stable seeing, and controlled magnification. The key mental model: you are not looking for a "big planet view"; you are looking for a non-stellar pinpoint with color and tiny disk geometry.

Neptune observing is a pattern-recognition task. You use a chart to identify a candidate point, increase magnification, compare with nearby stars, and confirm that Neptune behaves differently from a star at the same magnification. Stars remain pinpoints. Neptune subtly rounds into a tiny disk. That is your confirmation moment.

Challenge Why It Happens Practical Fix
Looks like a star Neptune is tiny and distant Raise magnification to 150x-220x and compare shape with nearby stars
Hard to locate No naked-eye anchor near the exact position Use a live sky app and short star-hop sequence
View seems "washed out" Sky glow and poor transparency reduce contrast Observe near culmination and avoid hazy humid nights
No visible detail Neptune detail is beyond visual amateur reach Set expectations: target is disk confirmation, color, and Triton attempt

When to Look in 2026: Opposition Strategy Beats Random Attempts

If you try Neptune at random dates and times, your success rate drops sharply. The highest-probability period is centered around opposition, when Neptune is closest to Earth for the year, brightest for the year, and visible all night. For 2026, plan your most serious attempts around September.

Opposition strategy is not just about one date. Treat it as a four-to-six week campaign. Start a little before opposition, continue through the date itself, and keep observing for two to three weeks afterward. This gives you multiple attempts under different seeing conditions and improves your confidence in confirming Neptune's slow motion against the background stars.

On each night, favor the period when Neptune is highest in your sky. Altitude matters because lower-altitude views pass through thicker atmosphere, which softens tiny targets. Many observers focus too much on clock time and not enough on altitude. For Neptune, altitude is often the deciding factor between a vague point and a clearly non-stellar target.

2026 Planning Snapshot

Best seasonLate August through October
Opposition windowAround September 2026
ConstellationPisces
Best nightly timingWhen highest in sky (near culmination)
Moon strategyAvoid bright-moon windows when possible
Transparency priorityClear, dry nights over merely cloud-free nights
🔭

Not sure which telescope actually fits your goals?

Answer 5 quick questions about your budget, observing targets, and experience level — our Telescope Finder Tool recommends a specific model in under 2 minutes.

Find My Telescope →

Step-by-Step Finder Workflow That Works for Beginners

This is the exact sequence we recommend for first-time Neptune observers. Do not skip steps. Most failed attempts happen when observers jump directly to high magnification before confirming the star field at low power.

  1. Prepare your chart first. Open SkySafari, Stellarium, or a similar app and set the correct date, time, and location. Zoom until you see field stars to at least mag 9. Screenshot the local star pattern around Neptune for quick reference at the eyepiece.
  2. Start with low power. Use your widest eyepiece to land in the right field. You are not trying to resolve Neptune yet. You are trying to match the star pattern from your app.
  3. Pattern match, not single-star guessing. Identify two or three anchor stars first, then locate the candidate point where Neptune should be.
  4. Increase to medium power. Move into roughly 100x-150x and compare candidate with nearby stars. Neptune will start looking subtly different.
  5. Confirm at higher power. Increase to 150x-220x. If seeing supports it, Neptune becomes a tiny, stable disk while stars stay tighter points.
  6. Log the position and re-check in 3 to 7 days. Neptune moves slowly relative to stars. Repeat observation confirms identity beyond doubt.

This workflow sounds methodical because it is. Neptune is one of those targets where discipline pays off. Once you complete this flow successfully two or three times, finding Neptune becomes routine instead of stressful.

Do This

  • Use a printed or screenshot finder field
  • Center target before each magnification increase
  • Let the image settle for several seconds before judging shape
  • Revisit across multiple nights for confidence

Avoid This

  • Starting at very high power before field confirmation
  • Assuming the brightest object in field is Neptune
  • Observing low over rooftops or heat plumes
  • Expecting visible rings or cloud bands visually

What You Will Actually See Through Different Equipment

Expectation management is the most important Neptune skill. If you expect a tiny blue disk and treat that as success, Neptune becomes one of the most satisfying long-distance observations you can make from a backyard. If you expect a mini Hubble image, no telescope will satisfy you visually.

Neptune is about 4.3 to 4.6 billion kilometers away from Earth depending on orbital geometry. That distance is why this target feels subtle. But subtle does not mean pointless. You are seeing a major planet of our solar system in real time, and with good nights plus enough aperture, you can push beyond a mere dot into true planetary confirmation.

Equipment Level Typical Neptune View Realistic Goal
10x50 to 15x70 binoculars Star-like point only Locate field and verify position with app
70mm to 90mm telescope Bright non-twinkling point, slight color hint Confident identification in correct star field
100mm to 130mm telescope Tiny blue-gray disk at higher power Disk confirmation at 150x and above
150mm to 200mm telescope More stable disk impression, stronger color Reliable disk and occasional Triton attempts
200mm+ premium setup Best visual Neptune available to amateurs Clean disk and advanced moon-hunting attempts

For ring questions, the honest answer remains no for amateur visual use. Neptune's rings are too faint and too dark for backyard visual detection. If that is your primary curiosity, read our dedicated Neptune rings guide and then return here for practical observing success.

Best Gear for Seeing Neptune (Ranked for Practical Success)

Editor's Pick — Best Overall Neptune Scope
Celestron NexStar 8SE telescope

1) Celestron NexStar 8SE

The strongest all-around Neptune platform for most observers. An 8-inch aperture gives enough light and resolution headroom to make disk confirmation easier, and GoTo tracking simplifies repeat visits on multi-night campaigns. This is especially helpful for beginners who struggle with manual re-acquisition at high magnification.

For Neptune, workflow consistency matters as much as optics. The 8SE's stability plus tracking helps keep Neptune centered while you evaluate shape and color.

View on Amazon →
Sky-Watcher Skymax 127 telescope

2) Sky-Watcher Skymax 127

Excellent compact Neptune scope. The Mak design provides strong contrast and a long focal length in a smaller footprint, making it a smart choice for observers with storage or transport constraints.

View on Amazon →
Sky-Watcher Classic 200P Dobsonian telescope

3) Sky-Watcher Classic 200P Dobsonian

Best aperture-per-dollar option for visual observers who enjoy manual control. When seeing is good, this scope can deliver a stronger Neptune disk impression than smaller instruments. Requires better manual tracking discipline at high power.

View on Amazon →
Celestron NexStar 5SE telescope

4) Celestron NexStar 5SE

Strong beginner-friendly balance of aperture, automation, and portability. If the 8SE is outside budget, this is still very capable for Neptune disk confirmation under average suburban conditions.

View on Amazon →
Celestron SkyMaster 15x70 binoculars

5) Celestron SkyMaster 15x70 (Finder Companion)

Not your primary Neptune detail instrument, but a very useful companion for locating the field quickly before moving to telescope confirmation. Great value add for star-hopping confidence.

View on Amazon →

Best Magnification and Eyepiece Plan for Neptune

For Neptune, magnification is about discrimination, not dramatic enlargement. You are trying to separate a tiny disk from background stars. The most useful range for this job is usually 150x to 220x on average nights. In excellent seeing, some setups can push a bit higher, but over-magnifying quickly softens the image and can make confirmation harder.

Start low, confirm field, then climb. This sequence protects your session from the most common Neptune error: getting lost after switching to a high-power eyepiece. If you are manually tracking, expect to re-center often. If you are using GoTo tracking, use the extra stability to compare Neptune with nearby stars for shape differences.

Scope Type Low-Power Find Confirm Range Upper Practical Limit
90-102mm40x-70x120x-170x~190x on good nights
127mm Mak/SCT50x-80x150x-200x~220x
8-inch SCT/Dob60x-90x170x-230x~260x if seeing supports

Do not expect filters to transform Neptune. A light blue filter may increase subjective contrast for some observers, but there is no filter that reveals dramatic visual detail on Neptune from backyard scopes. Your best upgrades are seeing quality, stable mount behavior, and disciplined finder workflow.

Your First Four Neptune Sessions (Beginner Progress Plan)

Treat Neptune as a repeatable project, not a one-night gamble. This four-session plan builds confidence quickly and reduces the chance of false positives.

Session 1: Field Familiarization

Goal: match star field and isolate candidate point at low-to-medium power. Success metric: you can return to the same candidate multiple times in one session without getting lost.

Session 2: Disk Confirmation

Goal: push into 150x-220x and compare candidate against nearby stars. Success metric: Neptune appears consistently less point-like than stars at similar brightness.

Session 3: Stability and Logging

Goal: repeat previous result under different seeing. Success metric: written notes include magnification, seeing, transparency, and confidence level. You should start seeing patterns in when Neptune looks best.

Session 4: Movement Confirmation

Goal: confirm slow position shift against background stars over several days. Success metric: your log and app comparison show Neptune has moved as predicted.

This approach does two important things. It gives you confidence that you really observed Neptune, and it teaches transferable observing discipline for other subtle targets like Uranus, faint planetary nebulae, and difficult double stars.

Most Common Neptune Mistakes (and Fast Fixes)

  • Using too much magnification too early: always confirm field first at low power.
  • Observing too low above the horizon: wait until Neptune is higher for cleaner seeing.
  • Assuming one sighting is enough: repeat over multiple nights for certainty.
  • Ignoring transparency: haze and humidity reduce tiny-target contrast more than most people realize.
  • Expecting ring visibility: Neptune's rings are not a visual amateur target from Earth.

If you hit a frustrating night, do not abandon the target. Neptune rewards persistence more than raw equipment spending. A disciplined 5-inch scope can beat a careless 10-inch scope on this particular planet.

FAQ: Seeing Neptune Through a Telescope

Can a 70mm telescope see Neptune?

Yes, but mostly as a faint point. A 70mm can detect Neptune in the right field, but disk confirmation is much easier in 100mm+ scopes at higher magnification.

What magnification should I use for Neptune?

For most setups, 150x to 220x is the practical sweet spot. Use lower power first to find and center, then step up for confirmation.

Can you see Neptune's rings visually?

No. Neptune's rings are too faint for visual backyard observing. You can read the full explanation in our Neptune rings guide.

Where is Neptune in 2026?

Neptune is in Pisces through 2026, with best viewing around opposition in September when it is up for most of the night.

Is Neptune worth observing for beginners?

Yes, if you like challenge targets and realistic goals. Neptune is one of the best beginner projects for learning finder discipline and subtle visual confirmation.

Related Guides