Best Telescope for Astrophotography Under $500 (2026)
Telescope Advisor Logo Telescope Advisor
Beginner astrophotography setup under the night sky — what is actually achievable in deep-sky and planetary photography at a budget under $500

Buying Guide · Astrophotography

Best Telescope for Astrophotography Under $500 (2026)

Astrophotography at under $500 is genuinely achievable in 2026 — but the right approach depends entirely on what you want to photograph. Smart telescopes at this price tier automatically deliver colour deep-sky images. Traditional equatorial setups capture Moon and planets superbly. This guide tells you honestly what each approach delivers and which to choose for your goals.

Best for deep-skySmart telescopes (S30 Pro, Dwarf Mini)
Best for Moon/planetsAny 130mm+ on equatorial mount
Easiest entryPhone + any telescope with adapter
Hardest to doLong-exposure tracked deep-sky
By Telescope Advisor Editorial Team Published: Updated: Editorial Standards

What Astrophotography Actually Means Under $500 — Honest Context

Before choosing equipment, it's worth being clear about what "astrophotography" means at this budget tier — because there are two fundamentally different activities both called astrophotography:

What IS achievable under $500

  • Moon photography — stunning detail images with any telescope + phone adapter
  • Planetary photography — Jupiter, Saturn, Mars in good seeing with eyepiece projection
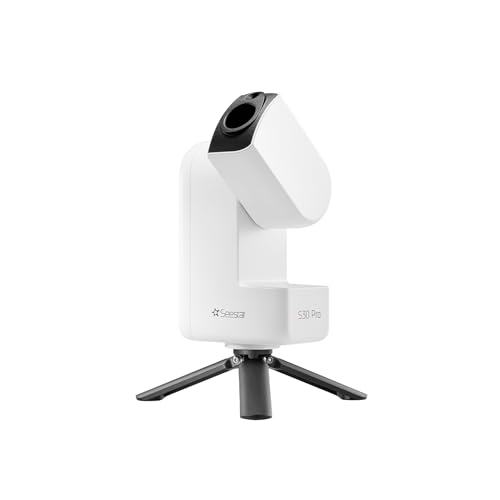
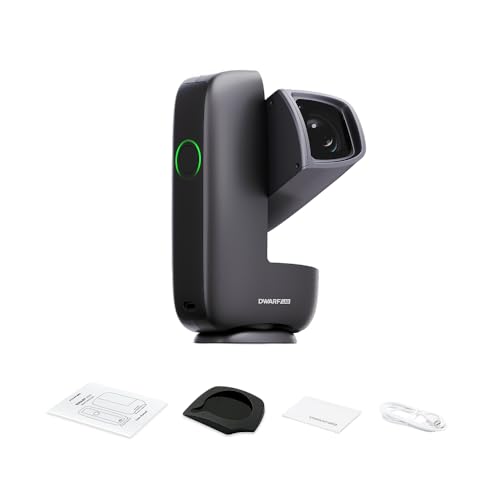
  • Smart telescope deep-sky — automated colour nebula/galaxy images (Seestar, Dwarf Mini)
  • Wide-field tracked Milky Way — camera on a star tracker ($150–$200)

What requires ABOVE $500
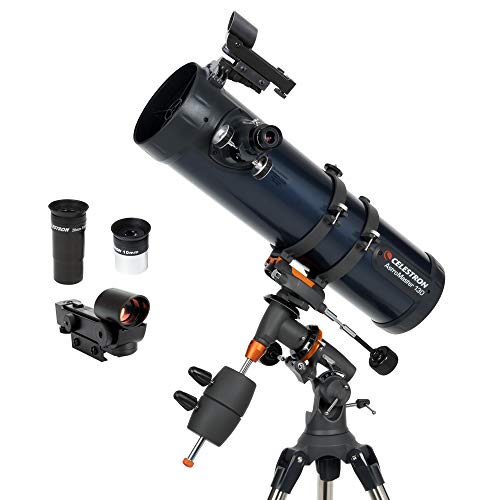
  • Tracked long-exposure deep-sky with DSO detail — requires equatorial mount ($400+) + OTA + camera
  • Ha/OIII narrowband imaging — specialist cameras or filter wheels
  • Autoguided imaging — guide scope + camera + software
  • Cooled dedicated astronomy cameras — minimum $300–$500 alone

The good news: the 2026 smart telescope category has completely changed this calculation. The ZWO Seestar S30 Pro and DWARFLAB Dwarf Mini both deliver real colour deep-sky images — nebulae, galaxies, star clusters — at or under $500, automatically, with no astrophotography knowledge required. They are a genuinely new category. For everyone else wanting traditional photography, we cover the best approaches below.


🔭

Not sure which telescope actually fits your goals?

Answer 5 quick questions about your budget, observing targets, and experience level — our Telescope Finder Tool recommends a specific model in under 2 minutes.

Find My Telescope →

Approach 1: Smart Telescopes — Best for Automated Deep-Sky Imaging

Smart telescopes are the most significant development in sub-$500 astrophotography since digital cameras. Instruments like the ZWO Seestar S30 Pro and DWARFLAB Dwarf Mini automatically locate objects, track them, stack exposures, and deliver processed colour images directly to your smartphone — with zero astrophotography skill required. They produce genuine results: colour images of nebulae, galaxies, and star clusters that no traditional sub-$500 manual setup can match for deep-sky work.

What smart telescope images look like

  • → Colour images of the Orion Nebula in a single 30-minute session
  • → Andromeda Galaxy with spiral arm hints
  • → Globular clusters resolved at the edges
  • → Bright planetary nebulae (Ring, Dumbbell) clearly annular
  • → Jupiter, Saturn, and Moon in dedicated modes
  • → Shareable phone images from urban or suburban skies

Smart telescope limitations

  • → Images shown on a phone screen — no eyepiece visual experience
  • → Limited aperture (50mm S30 Pro, ~25mm Dwarf Mini) vs traditional astrophotography rigs
  • → Resolution limited by small aperture — fine detail requires larger instruments
  • → Cannot match a dedicated $1,000+ astrophotography setup in image quality

For someone asking "can I photograph nebulae for under $500?" — yes, via a smart telescope, with no skill curve. This is genuinely remarkable and represents a category that did not exist 5 years ago. Our full comparison: smart telescope brand comparison.

Approach 2: Moon and Planetary Photography — Best Traditional Route Under $500

For traditional astrophotography of the Moon, planets, and solar system objects, a good telescope with a smartphone adapter produces genuinely impressive results at minimal cost — and this is the traditional astrophotography approach that's fully achievable under $500 without a tracking mount.

The Moon is the perfect first astrophotography target: it is so bright that a 1/500s exposure is sufficient even through a 70mm telescope, completely eliminating the need for tracking. A phone held to the eyepiece with a clip-on adapter captures the full lunar disc or individual crater fields in sharp detail. Planets require slightly more setup — a short video through the eyepiece, then processing with free software (AutoStakkert, RegiStax) to stack the sharpest frames — but this is achievable with any 130mm+ equatorial or stable alt-azimuth mount.

The smartphone planetary photography workflow

  1. Place your telescope at the target (Moon, Jupiter, or Saturn)
  2. Focus using a mid-power eyepiece (10–15mm), then clip your phone adapter onto the eyepiece
  3. Record a 60–120 second video of the planet in slow-motion or 4K mode
  4. Download the free software PIPP (or AutoStakkert) to stack the sharpest frames from the video
  5. Apply sharpening in RegiStax or Lightroom — the result is a dramatically better image than any single frame

This workflow requires no expensive accessories beyond a $15–25 clip-on phone adapter. A 130mm telescope on a stable mount (even basic alt-az) can capture satisfying lunar and planetary images. Guide: how to photograph the Moon with a telescope.

Best traditional telescope options for Moon/planet photography under $500

For the AstroMaster 130EQ — an equatorial mount reflector — the EQ mount allows one-axis slow-motion tracking to keep objects in the field longer for video captures. At 650mm focal length, it gives a nice planetary disc size without needing excessive magnification. The Celestron Inspire 100AZ has a built-in phone adapter but no tracking — better for Moon work where tracking isn't needed. See our comparison: Inspire 100AZ vs AstroMaster comparison.

Approach 3: Wide-Field Tracked Milky Way Photography

Wide-field Milky Way and constellation photography with a DSLR or mirrorless camera on a star tracker represents a third under-$500 approach that is increasingly popular. A star tracker (also called a tracking mount or sky tracker) is a compact motorised device that slowly rotates your camera to compensate for Earth's rotation, allowing exposures of 1–3 minutes without star trails.

With a star tracker (~$150–$250 for entry models), any interchangeable-lens camera, and a wide-angle lens (24–50mm), you can capture the Milky Way with a level of detail impossible without tracking. This is not telescope-based astrophotography — you use a regular camera lens rather than a telescope tube — but it is the most accessible way to capture the grand scale of the night sky photographically.

What you need for tracked wide-field photography

  • ✓ Star tracker mount ($150–$250)
  • ✓ Camera with manual exposure control (DSLR, mirrorless, or capable smartphone)
  • ✓ Wide-angle lens (camera kit lens works)
  • ✓ Dark sky location (Bortle 4 or better for best results)

Popular entry star trackers: Sky-Watcher Star Adventurer Mini, iOptron SkyTracker Pro, Vanguard ALTA Pro. Prices range from about $150 for entry models to $350 for more capable versions. Total budget including camera and tracker can be kept under $500 if you already own a camera.

What NOT to Buy for Astrophotography Under $500

Understanding common mistakes saves money and frustration. These are the most frequent misspends in the under-$500 astrophotography bracket:

Buying a refractor or Dobsonian specifically for deep-sky imaging

A Heritage 130P or AstroMaster 70AZ is an excellent visual telescope but produces poor long-exposure deep-sky images without motorised equatorial tracking. The Earth rotates 15 arcseconds per second; any exposure longer than ~30 seconds on an untracked mount shows star trails. Visual telescopes without EQ tracking are not suitable for deep-sky astrophotography — only Moon/planet video work.

Buying an equatorial mount without also budgeting the camera

A basic equatorial mount like the AstroMaster 130EQ comes with limited motor options and no camera attachment. Many beginners buy the mount and discover they also need a separate camera, adapter rings, and intervalometer — which can push total cost well over $500. Plan the complete system budget before buying individual components.

Expecting deep-sky detail from a traditional telescope without tracking

Even with a phone adapter, without tracking you are limited to objects bright enough for very short exposures (Moon, planets, very bright star clusters). Any attempt at faint nebula or galaxy photography without a tracking mount produces blurred streaks, not images.

!

Underestimating the skill required for traditional astrophotography

Traditional DSLR deep-sky astrophotography — with equatorial mount, autoguiding, calibration frames, and stacking software — has a genuine learning curve of months to years. This is a fulfilling hobby but not an out-of-the-box experience. If you want immediate results at sub-$500, smart telescopes like the Seestar S30 Pro or Dwarf Mini are the honest answer. If you want to learn the full craft, budget 12+ months of learning alongside the equipment.

Approach Comparison: Which Is Right for You?

ApproachBest TargetsSkill RequiredImage QualityBudget
Smart telescopeDeep-sky, nebulae, galaxiesNone — automatedGood for aperture size~$350–$499
Phone + telescope (no tracker)Moon, planetsVery lowExcellent (for Moon/planets)~$100–$300 + adapter
Camera + star trackerMilky Way, star fieldsLow–mediumExcellent for wide-field~$150 tracker + camera
EQ mount + telescope + cameraDeep-sky (limited), planetsHigh — months to learnVariable — skill dependentDifficult under $500 total

Recommended Products

Editor's Pick — Best Under-$500 Deep-Sky Astrophotography

ZWO Seestar S30 Pro

50mm f/5 optical system Motorised filter wheel Automated stacking + delivery to phone

The Seestar S30 Pro is the most capable under-$500 astrophotography instrument for someone who wants colour deep-sky images without a steep learning curve. Its 50mm f/5 optical system, built-in camera, motorised filter wheel (H-alpha, OIII, dual-narrowband), and AI stacking software deliver impressive results from suburban skies with zero calibration required. Point at the Orion Nebula, start a 30-minute session, receive a processed colour image on your phone. The motorised narrowband filter wheel is the major upgrade from the discontinued S50 — it allows observers to suppress light pollution dramatically and isolate specific emission features that no raw colour-camera smart scope can match. Full review: Seestar S30 Pro review.

DWARFLAB Dwarf Mini — Most portable astrophotography under $500

The Dwarf Mini fits in a jacket pocket and delivers the smart telescope experience at the most accessible price point. For wide-field targets — the Orion Nebula complex, Andromeda Galaxy, large star clusters, and Milky Way sections — it produces shareable colour results from a first session without any setup beyond placing it on a flat surface and opening the app. The trade-off vs the Seestar S30 Pro: smaller aperture, lower per-pixel resolution, and no motorised filter wheel. Ideal for travel, balcony observing, or anyone trying astrophotography for the first time. Full review: Dwarf Mini review.

Celestron AstroMaster 130EQ — Best traditional option for Moon + planetary

For observers who specifically want the traditional telescope experience — visual observing plus Moon and planetary photography with a smartphone — the AstroMaster 130EQ is the best sub-$300 option with an equatorial mount. The 130mm Newtonian at 650mm focal length gives appropriate magnification for planetary imaging. The EQ mount allows one-axis slow-motion tracking to keep objects in frame for longer video captures. Add a $20 clip-on phone adapter to the eyepiece and this is a complete Moon and planet photography setup. Important: this telescope will NOT produce tracked deep-sky images — it is for bright solar system objects only. See our beginner guide: best telescopes for beginners.

Affiliate links. Editorial standards.

When to Upgrade Beyond $500

The sub-$500 ceiling is a real creative constraint for traditional astrophotography. Here are the signs you're ready to invest more and what specifically to add:

If you're using a smart telescope and want better resolution

The DWARFLAB Dwarf 3 (48MP wide-field, ~$450–$499) or Vaonis Vespera II (~$1,000+) give better per-pixel quality for deep-sky imaging. The natural next step from the Seestar S30 Pro or Dwarf Mini is a larger aperture smart telescope rather than a traditional setup — the zero learning curve remains a major advantage.

If you want to pursue traditional tracked deep-sky imaging

The minimum viable traditional deep-sky astrophotography kit — equatorial mount with motor drive + optical tube + DSLR or dedicated astro-camera + guiding — realistically costs $800–$1,500 assembled. This is a significant step up but opens the full creative palette of professional-quality astrophotography. See our guide: best telescope mount for astrophotography.

If you've mastered Moon/planet photography

The next traditional planetary photography upgrade is a webcam-style planetary camera (ZWO ASI series, ~$150–$300) replacing the smartphone — these cameras are purpose-designed for the rapid frame rates needed for planetary video stacking and will noticeably improve planetary detail over a phone camera.


Astrophotography Under $500 FAQ

Can I do real astrophotography for under $500?

Yes, depending on your definition. Smart telescopes like the ZWO Seestar S30 Pro and DWARFLAB Dwarf Mini deliver real colour images of nebulae, galaxies, and star clusters fully automated at or under $500 — these are genuine astrophotography results. Moon and planetary photography with any telescope + phone adapter also produces impressive images under $500. Traditional long-exposure deep-sky imaging with a tracked equatorial mount + camera is very difficult to assemble for under $500 total and requires months to learn effectively.

What is a smart telescope and how is it different from a traditional telescope?

A smart telescope automatically locates objects, tracks them, stacks exposures, and delivers processed colour images to your phone — no astrophotography skill required. A traditional telescope requires manual or motorised pointing, separate camera equipment, and processing software. Smart telescopes show results on a screen rather than through an eyepiece; traditional telescopes give the direct visual experience plus the option to photograph. For someone primarily interested in astrophotography results at minimum learning curve, smart telescopes are the 2026 answer at the sub-$500 price point. Full guide: smart telescope vs traditional telescope.

Do I need a tracking mount for astrophotography?

It depends entirely on what you're photographing. For Moon and bright planets: no tracking needed — these objects are bright enough for exposures under 1/100s, which completely freezes Earth's rotation. For deep-sky objects (nebulae, galaxies): yes, tracking is essential if using a traditional camera. Without it, exposures over ~30 seconds produce star trails. Smart telescopes handle tracking internally — this is part of what makes them effective for beginner deep-sky imaging without an external equatorial mount.

Is the ZWO Seestar S30 Pro or Dwarf Mini better for astrophotography under $500?

Both produce genuine astrophotography results. The Seestar S30 Pro has better per-pixel resolution and the major advantage of a motorised filter wheel with H-alpha and OIII filters — making it significantly more capable from light-polluted suburban skies. The Dwarf Mini is smaller and more portable with a wider field of view, better for large targets like the Milky Way or the full Orion constellation. If budget is the primary constraint, the Dwarf Mini costs less. If image quality from suburban skies matters more, the Seestar S30 Pro is worth the price difference. Comparison: Seestar S30 Pro vs Dwarf comparison.

Can I photograph the Milky Way with a $500 setup?

Yes — two approaches work well. A smart telescope (DWARFLAB Dwarf 3 or Dwarf Mini) can image Milky Way sections automatically. Alternatively, a star tracker (~$150–$250) with any DSLR or mirrorless camera and a wide lens captures sweeping Milky Way panoramas with 60–90 second tracked exposures — the traditional landscape astrophotography approach. Both are achievable under $500, but both also require dark skies (Bortle 4 or better) for the Milky Way to be photographable. From suburban skies, the Milky Way is largely invisible.


Related Guides